
In this article, we’ll explore ESP32 FreeRTOS task priorities and scheduling, understand how the system decides which task runs first, and implement a practical LED blinking example with different priorities.
When working with the ESP32, one of the most powerful features you get is FreeRTOS support. Unlike the traditional Arduino loop(), FreeRTOS allows you to create multiple tasks that run independently. This is especially useful when your ESP32 project needs to handle several activities at once, like reading sensors, controlling motors, and serving a web page—all without blocking each other.
What Are FreeRTOS Tasks?
A task in FreeRTOS is like a mini-program running inside your ESP32. Each task has:
- Its own stack memory
- A priority level (decides how important it is)
- A loop that runs independently from other tasks
By default, FreeRTOS schedules tasks so they can share CPU time, creating the illusion of multitasking.
Why Do Task Priorities Matter?
Imagine you are cooking in the kitchen while answering a phone call. If the phone call is urgent, you’d pause cooking to pick it up. Similarly, in FreeRTOS:
- Higher priority tasks run first.
- Lower priority tasks run only when higher ones are idle or delayed.
This ensures that critical tasks (like reading a sensor every 100 ms) don’t get blocked by less important tasks (like blinking an LED).
ESP32 FreeRTOS Scheduling
FreeRTOS uses a priority-based preemptive scheduler. This means:
- If two tasks have the same priority, they share CPU time (round-robin).
- If one task has higher priority, it will always run before the lower priority one.
- You can use
vTaskDelay()orvTaskDelayUntil()to let other tasks run.
Example: Two Tasks with Different Priorities
Let’s implement a simple example where:
- Task 1 blinks an LED slowly (low priority).
- Task 2 blinks an LED quickly (high priority).
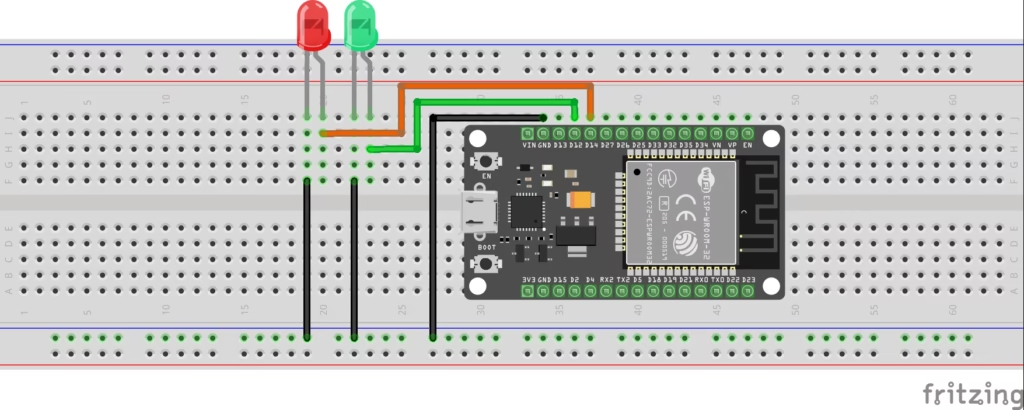
Hardware Setup
For this example, you need:
- ESP32 development board
- 1 external LED (connected to GPIO 12)
- 1 external LED (connected to GPIO 14)
- Jumper wires and breadboard
Code Example
// ESP32 FreeRTOS task priorities

#include <Arduino.h>

#define LED1 12   // External LED

#define LED2 14   // External LED

// Task handles
TaskHandle_t Task1Handle;
TaskHandle_t Task2Handle;

// Task 1: Slow blinking LED
void Task1(void *pvParameters) {
  (void) pvParameters;
  for (;;) {
    digitalWrite(LED1, HIGH);
    vTaskDelay(1000 / portTICK_PERIOD_MS); // 1 sec delay
    digitalWrite(LED1, LOW);
    vTaskDelay(1000 / portTICK_PERIOD_MS);
  }
}

// Task 2: Fast blinking LED
void Task2(void *pvParameters) {
  (void) pvParameters;
  for (;;) {
    digitalWrite(LED2, HIGH);
    vTaskDelay(200 / portTICK_PERIOD_MS); // 200 ms delay
    digitalWrite(LED2, LOW);
    vTaskDelay(200 / portTICK_PERIOD_MS);
  }
}

void setup() {
  pinMode(LED1, OUTPUT);
  pinMode(LED2, OUTPUT);

  // Create Task1 with low priority (1)
  xTaskCreate(
    Task1,
    "BlinkSlow",
    1000,
    NULL,
    1,
    &Task1Handle
  );

  // Create Task2 with high priority (2)
  xTaskCreate(
    Task2,
    "BlinkFast",
    1000,
    NULL,
    2,
    &Task2Handle
  );
}

void loop() {
  // Empty, FreeRTOS is managing tasks
}

// ESP32 FreeRTOS task prioritiesBasic Instructions
- Connect the ESP32 to your PC via USB.
- Install the Arduino IDE if you don’t have. Open the Arduino IDE.
- Install ESP32 boards in arduino IDE if not installed.
- Select your ESP32 board under Tools → Board and correct Port.
- Copy-paste the provided code.
- Upload the sketch to your ESP32.
- Observe:
- The external LED (GPIO 12) blinks slowly (low priority).
- The external LED (GPIO 14) blinks faster (high priority).
- If you add the challenge task, check Serial Monitor for output.
How This Works
- Task1 (priority 1) blinks LED1 slowly.
- Task2 (priority 2) blinks LED2 faster.
- Since Task2 has higher priority, it always runs first when ready. Task1 only runs when Task2 is waiting during
vTaskDelay().
If you swap the priorities, you’ll notice LED1 dominates the execution, and LED2 blinks less frequently.
Try It Yourself
Now that you’ve seen how ESP32 FreeRTOS task priorities work, here’s a challenge for you:
Create a third task that prints a message on the Serial Monitor every 2 seconds.
- Give it priority 1 (same as the slow blinking task).
- Observe how FreeRTOS schedules two tasks with the same priority.
- Notice how both share CPU time fairly, while the higher priority task (fast LED) still dominates.
Hint Code Snippet
// Task 3: Print message every 2 seconds
void Task3(void *pvParameters) {
  (void) pvParameters;
  for (;;) {
    Serial.println("Hello from Task 3");
    vTaskDelay(2000 / portTICK_PERIOD_MS);
  }
}
Add it to your setup() with:
xTaskCreate(
  Task3,
  "SerialPrint",
  1000,
  NULL,
  1,   // Same priority as Task1
  NULL
);
Expected Result
- LED2 (fast blink, priority 2) always runs first.
- LED1 (slow blink, priority 1) and Task3 (Serial print, priority 1) share CPU time equally.
- You’ll see the LED blinking slowly and a message printed every 2 seconds.
This way, You will not only learn the concept but also experiment and confirm how FreeRTOS task priorities actually work on ESP32.
Key Takeaways
- Higher priority tasks always get CPU time first.
- Equal priority tasks share CPU fairly.
- Use
vTaskDelay()to avoid blocking other tasks. - Misusing priorities can cause starvation, where low-priority tasks never get executed.
What’s Next?
Now that you understand ESP32 FreeRTOS task priorities and scheduling, the next step is learning how tasks communicate with each other. For example, you may want a sensor task to send data to a display task. For that, FreeRTOS provides queues, which we’ll cover in the next article.
HOW TO GET STARTED WITH FREERTOS AND ESP32