
If you’re working with the ESP32 and still relying on the classic analogWrite() function, you’re missing out on one of the most powerful features this microcontroller offers. The ESP32 LEDC PWM controller is a hardware-based PWM system designed for high-precision LED dimming, motor speed control, servo generation, and even audio output.
In this guide, you’ll learn everything you need to master ESP32 LEDC PWM, including multi-channel outputs, adjustable frequencies, fade functions, and real-world examples. This is an essential skill for any serious Arduino ESP32 developer.
Why Use ESP32 LEDC PWM Instead of analogWrite()?
analogWrite() on ESP32 is only a software wrapper and lacks the precision needed for advanced applications. The ESP32 hardware PWM system (LEDC) offers:
- Up to 16 ESP32 PWM channels
- Up to 20-bit resolution
- Multiple timers
- High-frequency PWM for motors
- Ultra-smooth fades for LEDs
- Precise control ideal for robotics and IoT
Whether you need precise LED dimming or high-speed motor control, esp32 ledc pwm is the correct tool.
Understanding the LEDC PWM Controller
The LEDC PWM controller is made of two main components:
1. LEDC Timers
Define:
- ESP32 PWM frequency
- Resolution (number of bits)
2. LEDC Channels
Define:
- Output pin
- Duty cycle
- Which timer they use
ESP32 offers:
- 4 timers
- 16 channels
Meaning you can run LEDs, motors, buzzers, and servos simultaneously at different frequencies.
Official ESP32 LEDC documentation
Example 1: Basic ESP32 LEDC PWM Example (LED Dimming)
This is the simplest but most essential ESP32 LEDC example code.
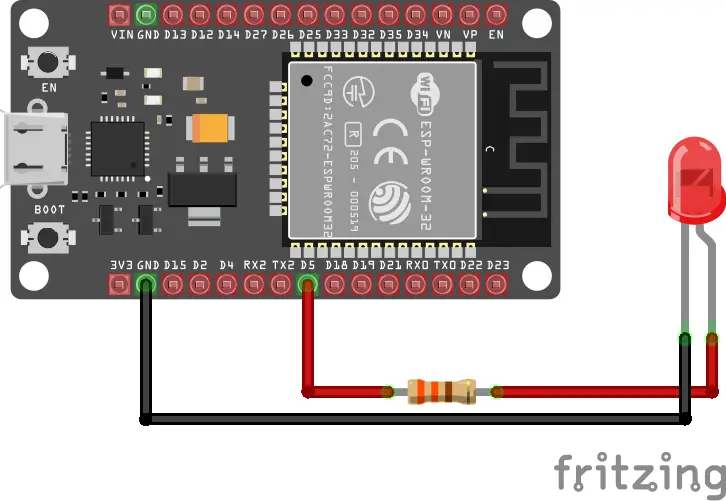
Wiring
LED → 330Ω → GPIO 5
Code
int ledPin = 5;

int pwmFreq = 5000;     // 5 kHz PWM
int pwmResolution = 8;  // 0–255

void setup() {
  // Attach PWM directly to the pin
  ledcAttach(ledPin, pwmFreq, pwmResolution);
}

void loop() {
  for (int duty = 0; duty <= 255; duty++) {
    ledcWrite(ledPin, duty);
    delay(5);
  }

  for (int duty = 255; duty >= 0; duty--) {
    ledcWrite(ledPin, duty);
    delay(5);
  }
}This provides smooth ESP32 LED dimming using hardware PWM.
Example 2: Using Multiple PWM Channels (RGB LED)
Demonstrates how powerful esp32 ledc pwm becomes with multiple channels.
int ledPins[] = {14, 12, 27};  // PWM output pins

const int pwmFreq = 5000;      // 5 kHz
const int pwmResolution = 8;   // 0–255

void setup() {
  // Attach PWM to each pin
  for (int i = 0; i < 3; i++) {
    ledcAttach(ledPins[i], pwmFreq, pwmResolution);
  }
}

void loop() {
  // Increase brightness together
  for (int duty = 0; duty <= 255; duty++) {
    for (int i = 0; i < 3; i++) {
      ledcWrite(ledPins[i], duty);
    }
    delay(10);
  }
}Each LED channel is controlled independently, perfect for RGB lights and indicators.
RGB LEDs are one of the most common real-world uses of ESP32 LEDC PWM, as each color channel requires independent brightness control. If you want a complete, step-by-step walkthrough focused specifically on RGB LEDs, see this guide on how to control RGB LED using ESP32.
Example 3: ESP32 Motor Speed Control Using PWM (20 kHz Silent PWM)
Motors perform best at higher frequencies. With ESP32 motor speed control, we typically use 20 kHz (above the audible range).
const int motorPin = 4;

const int pwmFreq = 20000;   // 20 kHz (silent for motors)
const int pwmResolution = 10; // 0–1023

void setup() {
  // Attach PWM directly to the motor pin
  ledcAttach(motorPin, pwmFreq, pwmResolution);
}

void loop() {
  for (int duty = 0; duty <= 1023; duty++) {
    ledcWrite(motorPin, duty);
    delay(3);
  }
}This gives smooth and silent motor control.
Example 4: Multiple Timers = Multiple Frequencies
You can generate:
- 5 kHz → LEDs
- 20 kHz → Motors
- 1 kHz → Buzzers
- 50 Hz → Servos
  // LED: 5 kHz, 8-bit resolution
  ledcAttach(ledPin, 5000, 8);

  // Motor: 20 kHz, 10-bit resolution
  ledcAttach(motorPin, 20000, 10);

  // Servo: 50 Hz, 16-bit resolution
  ledcAttach(servoPin, 50, 16);
This is one of the biggest advantages of esp32 ledc pwm.
Example 5: Smooth Hardware Fading (LEDC Fade Function)
For ultra-smooth ESP32 LED dimming:
#include "esp32-hal-ledc.h"

const int ledPin = 5;

const int pwmFreq = 5000;
const int pwmRes  = 8;     // 0–255

void setup() {
  ledcAttach(ledPin, pwmFreq, pwmRes);
}

void loop() {
  // Fade 0 -> 255 in 2000ms
  ledcFade(ledPin, 0, 255, 2000);
  delay(2500);

  // Fade 255 -> 0 in 2000ms
  ledcFade(ledPin, 255, 0, 2000);
  delay(2500);
}The fade happens in hardware —> zero flicker, zero CPU usage.
Quick Reference: Best ESP32 PWM Settings
| Application | Frequency | Resolution |
|---|---|---|
| LED dimming | 500 Hz – 5 kHz | 8–12 bits |
| DC motors | 16–25 kHz | 10 bits |
| Servos | 50 Hz | 16 bits |
| Audio | 8–20 kHz | 10–14 bits |
Matching the right ESP32 PWM frequency ensures better performance.
Best Practices for ESP32 LEDC PWM
✔ Use higher resolution for smoother dimming
✔ Use 20 kHz+ for motors
✔ Avoid delay() in real projects
✔ Use separate timers when frequencies differ
✔ Use LEDC fade for professional LED transitions
These tips come from real-world engineering experience and will improve reliability.
Frequently Asked Questions
Q1: What is ESP32 LEDC PWM?
It is the ESP32’s hardware PWM generator, offering high-resolution, stable multi-channel PWM.
Q2: Can ESP32 output PWM on any pin?
Most GPIOs support PWM except input-only pins.
Q3: How many PWM channels does ESP32 have?
Up to 16 channels via the LEDC PWM controller.
Q4: What is the maximum PWM frequency?
Up to 40 MHz with low resolution and ~20 kHz at 10–12 bits.
Conclusion
The ESP32 LEDC PWM system is one of the most powerful features of the ESP32. With multi-channel support, adjustable frequencies, high resolution, and hardware-accelerated fading, it dramatically improves LED dimming, motor control, robotics, and IoT applications.
Once you integrate LEDC into your projects, you’ll never go back to simple analogWrite() again.
Next step
Combine hardware PWM with web interfaces. Follow this ESP32 web server PWM tutorial to control LED brightness and motor speed from any device on your network.