
In this guide, we will show you how to install and use ESP32 LittleFS Filesystem Uploader in Arduino IDE 2.0. LittleFS (Lightweight Filesystem) is a file system designed for microcontrollers with flash storage. It is a great alternative to SPIFFS, providing better performance and reliability.
Using LittleFS with the ESP32 boards is useful to:
- Create configuration files with settings.
- Logging sensor data locally.
- Create files to save small amounts of data instead of using a microSD card.
- Save HTML, CSS, and JavaScript files to build a web server.
Prerequisites
Before you begin, make sure you have the following installed:
- Arduino IDE 2.0
- ESP32 Board Package
Install Arduino IDE 2.0
Ensure that you have Arduino IDE 2.0 installed. If not, download and install it from here Arduino 2.0.
Install ESP32 boards
How To Install ESP32 And ESP8266 Boards In Arduino IDE (Step-by-Step Guide) – ArduinoYard
Installing ESP32 LittleFS Plugin
To use LittleFS, we need to install the ESP32 filesystem uploader tool.
Install the ESP32 LittleFS Filesystem Uploader
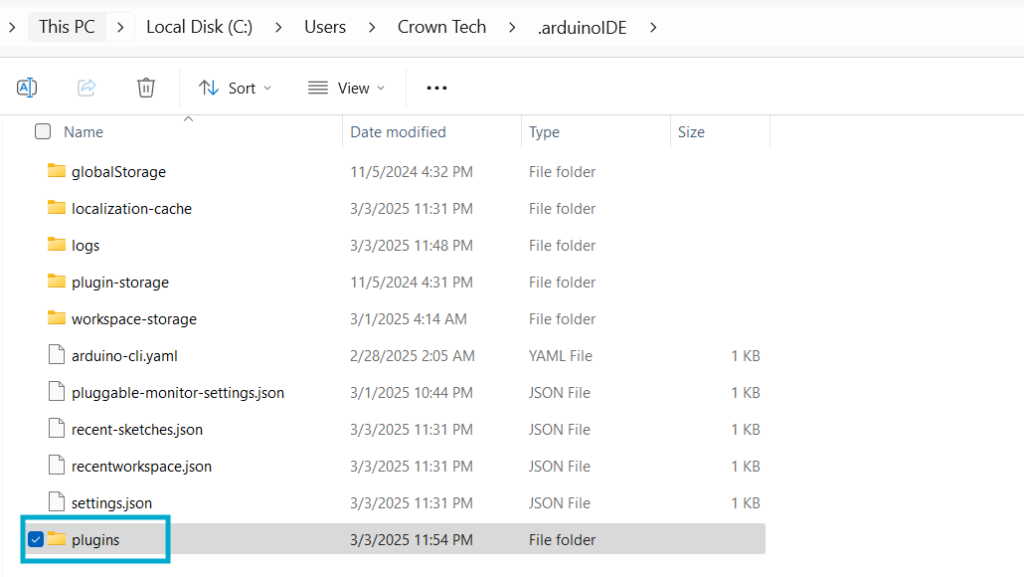
- On your computer, go to the following path: C:\Users\<username>\.arduinoIDE\. Create a new folder called plugins if you haven’t already.
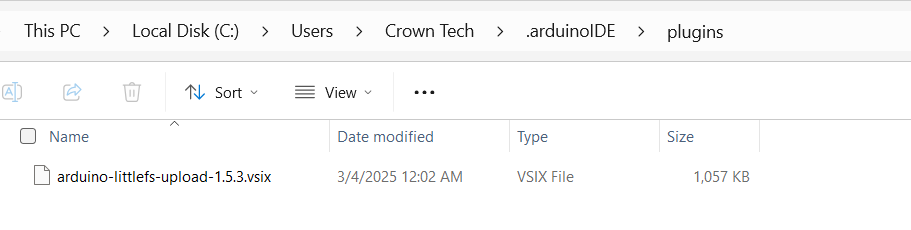
- Download the ESP32 LittleFS Plugin file and save it in that newly created /plugins folder.
- Restart Arduino IDE 2.0.
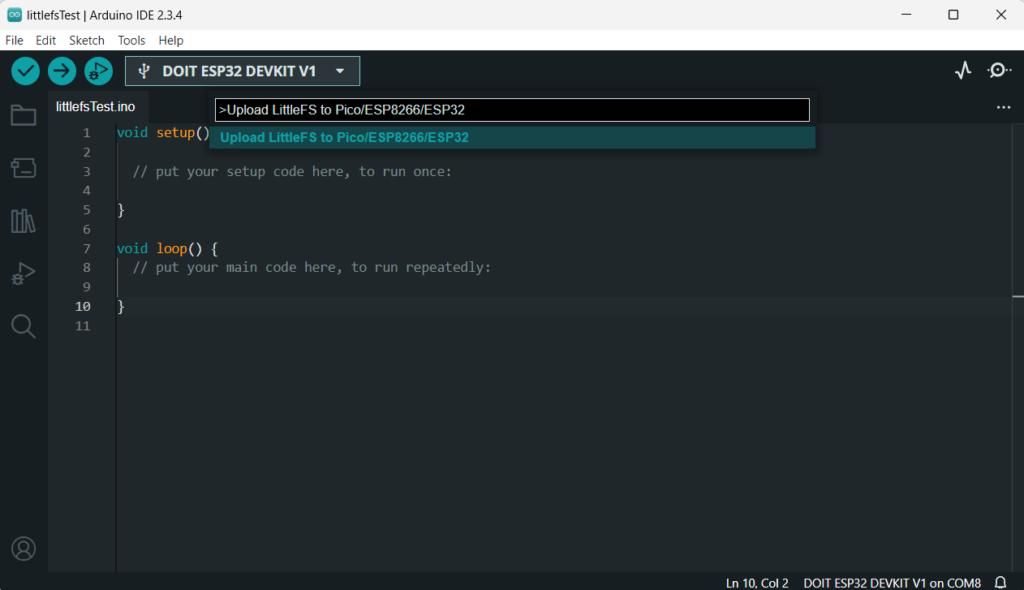
- To check if the plugin was successfully installed, press [Ctrl] + [Shift] + [P] to open the command palette. Search for “Upload Little FS to Pico/ESP8266/ESP32” and you can find the option called ‘Upload Little FS to Pico/ESP8266/ESP32‘.
Uploading Files to ESP32 using the Filesystem Uploader in Arduino IDE 2.0
To store and manage files, we need to upload them to the ESP32’s flash memory using LittleFS.
- Create an Arduino sketch and save it. For demonstration purposes, you can save an empty sketch. I have named it as littlefsTest.
- Then, open the sketch folder. You can go to Sketch > Show Sketch Folder. The folder where your sketch is saved should open.
- Inside that folder, create a new folder called data.

- Inside the data folder is where you should put the files you want to upload to the ESP32 filesystem. As an example, create a .txt file with some text called testFile.txt (and save it inside the data folder).

- Make sure you have the right board (Tools > Board) and COM port selected (Tools > Port).
- Depending on the ESP32 board selected, you may need to select the desired flash size (some boards don’t have that option, don’t worry). In the Arduino IDE, in Tools > Flash size, select the desired flash size (this will depend on the size of your files).
- Then, upload the files to the ESP32 board. Press [Ctrl] + [Shift] + [P] on Windows to open the command palette. Search for the Upload LittleFS to Pico/ESP8266/ESP32 command and click on it.
Important: Ensure the Serial Monitor is closed. Otherwise, the upload will fail.
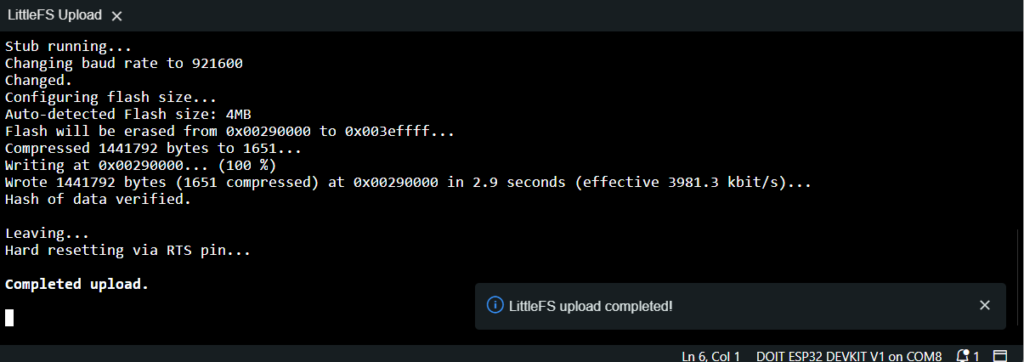
After a few seconds, you should get the message “Completed upload. “. The files were successfully uploaded to the ESP32 filesystem.
Troubleshooting
If you get the following error message “ERROR: No port specified, check IDE menus“, restart the Arduino IDE, and try again.
Testing the ESP32 LittleFS Uploader
Now, let’s check if the file was saved into the ESP32 filesystem. Upload the following code to your ESP32 board. This code will read the contents of the .txt file you saved previously on LittleFS.
// ESP32 LittleFS Filesystem Uploader in Arduino IDE 2.0
#include "LittleFS.h"

void setup() {
  Serial.begin(115200);

  if(!LittleFS.begin()){
    Serial.println("An Error has occurred while mounting LittleFS");
    return;
  }

  File file = LittleFS.open("/testFile.txt", "r");
  if(!file){
    Serial.println("Failed to open file for reading");
    return;
  }

  Serial.println("File Content:");
  while(file.available()){
    Serial.write(file.read());
  }
  file.close();
}

void loop() {

}
After uploading, open the Serial Monitor at a baud rate of 115200.

Press the ESP32 on-board “RST” button. It should print the content of your .txt file in the Serial Monitor.

You’ve successfully uploaded files to the ESP32 filesystem using the plugin.
Conclusion
You have now successfully installed and used LittleFS with ESP32 in Arduino IDE 2.0. ESP32 LittleFS Filesystem Uploader is a powerful file system allows you to store configuration files, log data, and manage files efficiently on the ESP32’s flash memory.
If you want to Install Filesystem uploader in Arduino IDE 1.8 Classic version, you should visit:
How To Install ESP32+ESP8266 Combined Filesystem Uploader In Arduino IDE – ArduinoYard