ESP32 SPIFFS Data Logging is a simple yet powerful way to track temperature changes, monitor equipment performance, or simply keep a record of system activity.
When building IoT projects, storing and reviewing sensor data is often just as important as collecting it.
With SPIFFS (Serial Peripheral Interface Flash File System), the ESP32 can save data directly to its internal flash memory — no SD card required. Combine that with the ESP32’s ability to host a webpage, and you get a complete local data logging and monitoring solution. This tutorial will walk you through creating such a system from scratch.
How It Works
Here’s the basic idea:
- The ESP32 collects data — from sensors or generated values.
- This data is stored in a text file inside SPIFFS.
- A simple web server on the ESP32 lets you view the log file in your browser.
- Everything works locally, so no internet connection or cloud server is required.
This is perfect for standalone monitoring systems, remote installations without internet access, or quick prototypes where you don’t want to deal with external storage.
What You’ll Need
- Arduino IDE Installed
- ESP32 development board
- Micro-USB cable
- Arduino IDE installed with ESP32 support
- Optional sensors (for real readings instead of random test data)
Why SPIFFS?
Most people think of SD cards when it comes to data logging, but SPIFFS offers several advantages:
- Uses built-in ESP32 flash memory — no extra hardware
- Easy file handling with Arduino functions
- Stores not only data but also web pages, stylesheets, and scripts
- Perfect for compact, portable projects
The only limitation is storage size, but for small logs or short-term monitoring, SPIFFS is more than enough.
Setting Up the Arduino Environment
Before coding, make sure your Arduino IDE is set up for ESP32 development:
- Install the ESP32 board package through the Boards Manager.
- Include the SPIFFS library (built-in with the ESP32 core).
- Have your Wi-Fi credentials ready for testing.
Example Code for Data Logging and Webpage Display
The code below creates a basic ESP32 SPIFFS Data Logging system that writes values to a file every few seconds and serves them on a webpage.
//ESP32 SPIFFS Data Logging and Webpage Monitoring
#include <WiFi.h>
#include <SPIFFS.h>
const char* ssid = "ESP32_Logger"; // Name of ESP32 Wi-Fi network
const char* password = ""; // Minimum 8 characters
WiFiServer server(80);
void setup() {
Serial.begin(115200);
if (!SPIFFS.begin(true)) {
Serial.println("SPIFFS mount failed");
return;
}
// Start ESP32 in Access Point mode
WiFi.softAP(ssid, password);
Serial.print("AP IP address: ");
Serial.println(WiFi.softAPIP());
server.begin();
}
void loop() {
logData();
serveClient();
delay(5000); // log every 5 seconds
}
void logData() {
File file = SPIFFS.open("/log.txt", FILE_APPEND);
if (!file) {
Serial.println("Failed to open file for appending");
return;
}
String logEntry = String(millis() / 1000) + "s: Value " + String(random(20, 40)) + "\n";
file.print(logEntry);
file.close();
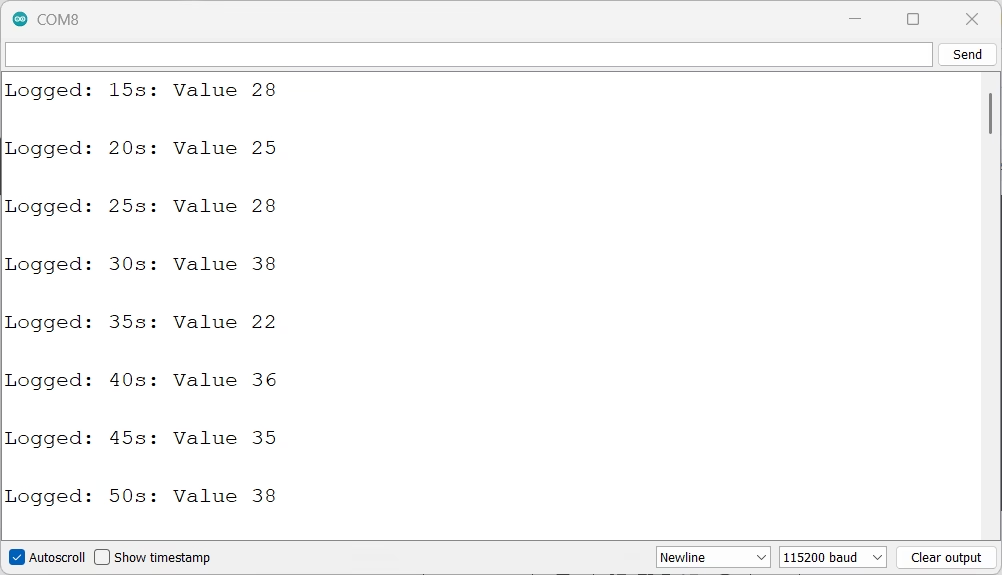
Serial.println("Logged: " + logEntry);
}
void serveClient() {
WiFiClient client = server.available();
if (!client) return;
while (!client.available()) delay(1);
client.readStringUntil('\r'); // Ignore request details
client.flush();
File file = SPIFFS.open("/log.txt");
if (!file) {
client.println("HTTP/1.1 500 Internal Server Error\r\nContent-Type: text/plain\r\n\r\nFailed to read log");
return;
}
client.println("HTTP/1.1 200 OK");
client.println("Content-Type: text/plain");
client.println("Connection: close");
client.println();
while (file.available()) {
client.write(file.read());
}
file.close();
}
How to Use
- Upload the code to your ESP32.
- Open the Serial Monitor — note the “AP IP address” (usually
192.168.4.1). - On your phone or laptop, connect to the Wi-Fi network ESP32_Logger.
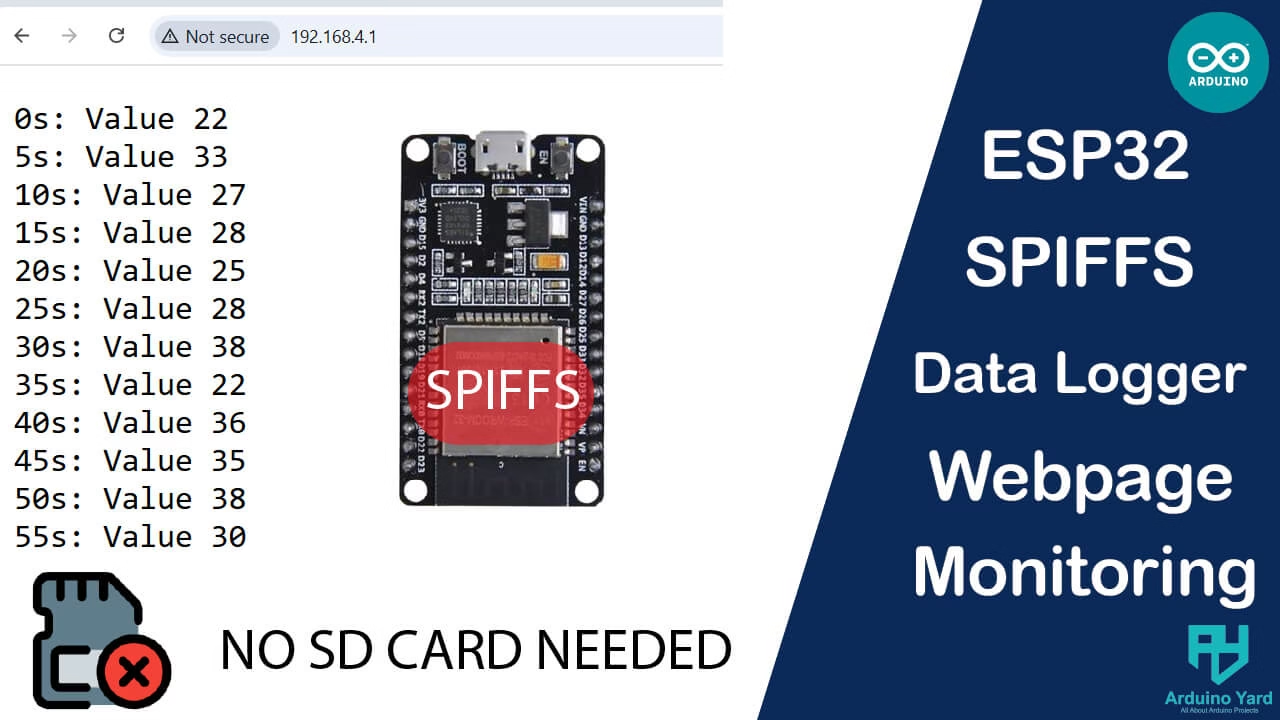
- Open a web browser and go to
http://192.168.4.1— you’ll see the logged data.
- Serial Monitor Output
- Webpage Results
The ESP32 will log a random number every 5 seconds with a timestamp. You can replace random(20, 40) with any sensor reading.
Advantages of AP Mode for Data Logging
- Works anywhere without a router
- Direct, private connection to the ESP32
- Great for field use or isolated systems
- No dependency on internet or external networks
In this example, random numbers are logged every five seconds along with the timestamp (in seconds since startup). You can replace the random value with sensor readings for real-world use.
Making It Better
This basic system can be improved in many ways:
- Display the log as an HTML table instead of plain text.
- Add a button to clear the log file from the webpage.
- Include real-time updates using JavaScript and AJAX.
- Save data in CSV format for easier analysis later.
Your Turn
Now that you’ve seen how ESP32 SPIFFS Data Logging works in Access Point mode, here’s a little challenge for you:
Task:
Modify the project so that instead of showing plain text logs, the ESP32 serves an HTML page with a table that updates every few seconds without refreshing the whole page. You can use JavaScript and AJAX for this.
Hints:
- Store the table’s HTML in SPIFFS so it loads quickly.
- Create a separate endpoint (for example,
/data) that sends only the latest logs as plain text or JSON. - Use
setInterval()in JavaScript to fetch new data and update the table automatically.
This will make your project look more professional and user-friendly, and it will give you hands-on experience with combining HTML, JavaScript, and ESP32 web servers.
Final Thoughts
Using ESP32 SPIFFS Data Logging with a built-in web server is one of the simplest and most effective ways to create a local monitoring tool. It avoids the complexity of cloud systems, keeps everything self-contained, and can be easily customized for many different applications. Whether you’re logging environmental data, tracking system events, or just experimenting with IoT, this method is reliable, flexible, and beginner-friendly.
How to upload ESP32 SPIFFS filesystem uploader in arduino IDE
How To Install ESP32+ESP8266 Combined Filesystem Uploader In Arduino IDE – ArduinoYard