
Introduction
In this article, we’ll explore how to use an I2C LCD with Arduino, a simplified and efficient way to add text-based interfaces to your projects. The I2C interface significantly reduces the number of pins required to connect an LCD to your Arduino, making it ideal for projects where pin availability is limited.
By mastering this tutorial, you’ll be able to enhance your Arduino projects with versatile and interactive text displays.
What is an I2C LCD Display?
An I2C LCD display is a character-based module similar to standard LCD displays but equipped with an I2C interface. This interface reduces the required connections to just four wires: VCC, GND, SDA, and SCL.

Key Features:
- Supports both 16×2 and 20×4 LCDs, offering flexibility in character display.
- Uses the I2C communication protocol for efficient pin management.
- Features a built-in potentiometer on the module for contrast adjustment.
- Equipped with a backlight for better visibility in low-light conditions.
For a more detailed explanation of I2C technology, check out this Wikipedia page.
What is the PCF8574 I2C Module?
The PCF8574 is an I/O expander chip that converts parallel data from the LCD into serial data for communication over the I2C protocol. This module is what makes a standard LCD into an I2C LCD display. It comes pre-soldered with pins for the LCD and a 4-pin I2C interface for easy connection to your Arduino.

Key Features of PCF8574:
- Converts parallel communication to I2C.
- Reduces the number of required pins to four.
- Includes a built-in potentiometer for LCD contrast adjustment.
- Works with multiple devices on the same I2C bus.
Typical I2C Addresses:
- The default I2C address for most PCF8574 modules is 0x27 or 0x3F.
- If you need to use multiple I2C devices or displays, you can change the address by adjusting the address-selection jumpers (A0, A1, A2) on the PCF8574 module.
For example:
- All jumpers open: 0x27
- A0 connected to GND: 0x26
- A0 and A1 connected to GND: 0x24
Check the module’s datasheet for more configurations.
Making a Standard LCD into an I2C LCD
To turn a regular 16×2 or 20×4 LCD into an I2C LCD, solder the PCF8574 module to the back of the LCD. Align the pins on the module with the LCD’s input pins (VSS, VDD, RS, RW, E, D4–D7) and solder them in place.
This process will reduce the pin requirement from 16 to 4, enabling communication over I2C.
Components Required
To interface an I2C LCD with Arduino, you’ll need:
- Arduino board (e.g., Uno, Nano, or Mega)
- I2C LCD Display (16×2 or 20×4)
- Jumper wires
- Breadboard (optional)
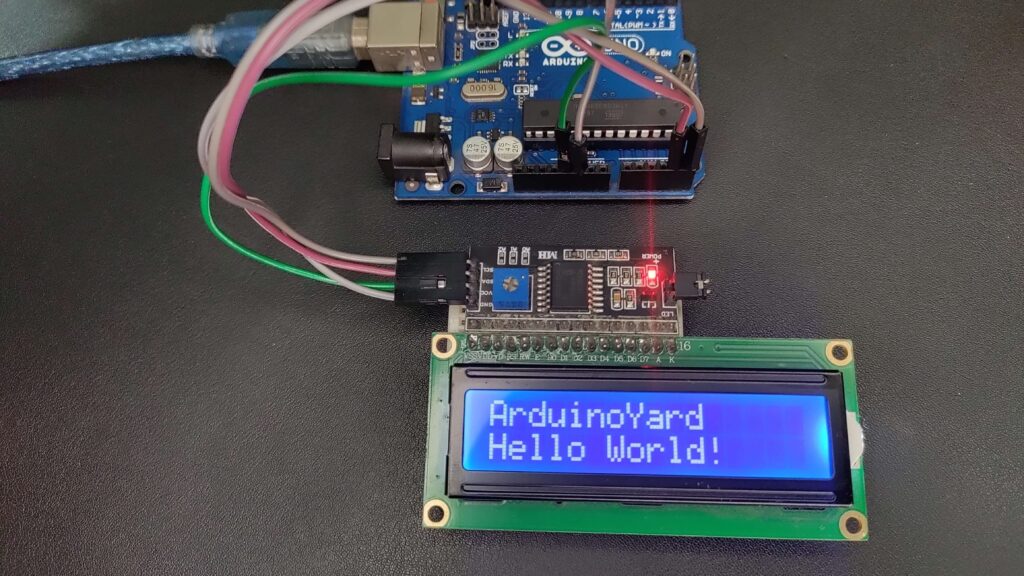
Wiring the I2C LCD to Arduino
The I2C LCD requires only four connections:
| I2C LCD Pin | Arduino Pin | Purpose |
|---|---|---|
| VCC | 5V | Power supply |
| GND | GND | Ground connection |
| SDA | A4 (Uno), 20 (Mega) | Data line |
| SCL | A5 (Uno), 21 (Mega) | Clock line |

Note for Other Boards:
For boards like the Arduino Leonardo, MKR etc. the SDA and SCL pins are typically labeled separately on the board.
Using a 20×4 I2C LCD
If you want to use a 20×4 I2C LCD, the process is similar to the 16×2 I2C LCD. The main difference lies in:
- Initialization: Specify the correct dimensions in the
lcd.begin()function. For a 20×4 LCD:lcd.begin(20, 4); - Cursor Positioning: Adjust the
lcd.setCursor()positions as per the larger display area. The column range is now 0–19, and there are four rows (0–3). - Practical Application: A 20×4 display is useful for projects requiring more text or data to be displayed simultaneously.
Installing the Required Library
To use an I2C LCD with Arduino, install the LiquidCrystal_I2C library.
Steps to Install:
- Open the Arduino IDE.
- Go to Sketch > Include Library > Manage Libraries.
- Search for “LiquidCrystal_I2C.”
- Select the library and click Install.
To verify installation, check for examples under File > Examples > LiquidCrystal_I2C.
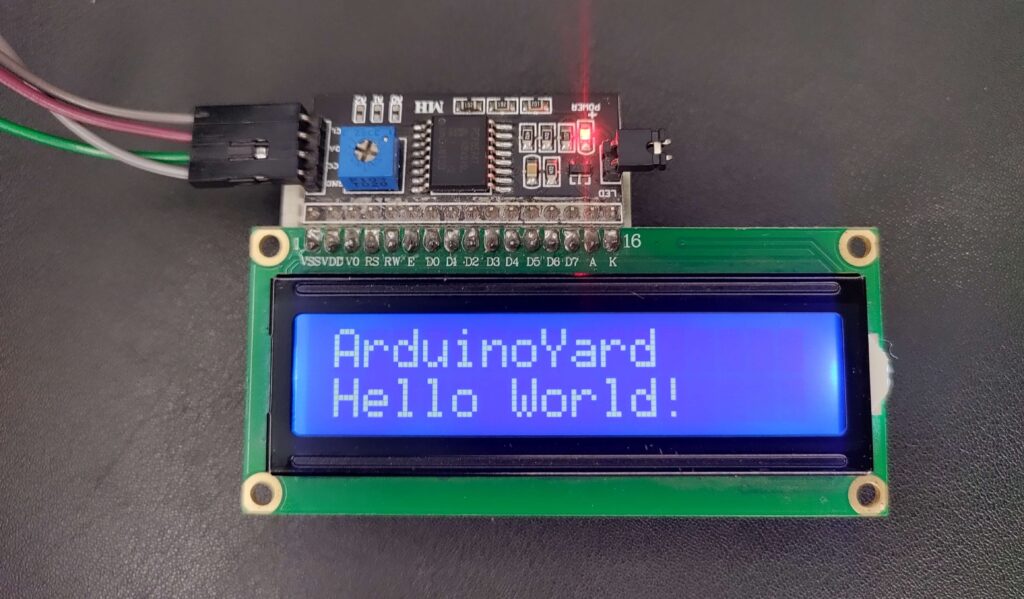
Arduino Code Example: Display Text
Here’s a simple example to display “ArduinoYard” on the first line and “I2C LCD” on the second:
// How to Use an I2C LCD with Arduino, ArduinoYard
#include <Wire.h>
#include <LiquidCrystal_I2C.h>

// Initialize the library with the I2C address (e.g., 0x27 or 0x3F)
LiquidCrystal_I2C lcd(0x27, 16, 2);

void setup() {
  lcd.init();
  lcd.backlight();

  lcd.setCursor(0, 0);
  lcd.print("ArduinoYard");

  lcd.setCursor(0, 1);
  lcd.print("I2C LCD");
}

void loop() {
  // No continuous updates needed
}
For a 20×4 LCD:
Change the initialization to:
LiquidCrystal_I2C lcd(0x27, 20, 4);And adjust lcd.setCursor() calls to fit your display layout.
Working:
Advanced Example: Dynamic Data
This example displays real-time elapsed time on the second line:
// How to Use an I2C LCD with Arduino, ArduinoYard
#include <Wire.h>
#include <LiquidCrystal_I2C.h>

LiquidCrystal_I2C lcd(0x27, 16, 2);

void setup() {
  lcd.init();
  lcd.backlight();
  lcd.print("ArduinoYard");
}

void loop() {
  lcd.setCursor(0, 1);
  lcd.print(millis() / 1000);
}
Adjusting Contrast
The contrast of the LCD can be adjusted using the small potentiometer on the PCF8574 module. Rotate the potentiometer clockwise or counterclockwise to find the optimal contrast level for your display. This ensures clear and visible characters under different lighting conditions.

Troubleshooting Tips
- No Display: Verify the I2C address (common values are 0x27 or 0x3F).
- Random Characters: Check wiring and ensure the correct library is installed.
- Dim Backlight: Ensure the backlight jumper is connected.
- Poor Contrast: Adjust the potentiometer on the I2C module.
Conclusion
Using an I2C LCD with Arduino simplifies connections and unlocks the potential for more complex projects by saving valuable pins. Whether you’re using a 16×2 or 20×4 LCD, the flexibility of the I2C interface makes it an excellent addition to your Arduino toolkit.
With the tips and examples provided here, you can confidently integrate an I2C LCD with Arduino into your next project. For more beginner-friendly tutorials and exciting Arduino projects, stay tuned to ArduinoYard!
We’d love to hear your thoughts or questions—leave a comment below. Don’t forget to share your creations with us!