In this article, we will explore how to interface the MFRC522 RFID reader with Arduino UNO to read RFID tags. which is widely used in access control, inventory systems, and authentication projects. RFID (Radio Frequency Identification) is a wireless communication technology that uses electromagnetic fields to identify and track objects. You can read more about radio frequency identification in details:
What is RFID and how does it work?
Components Required
- Arduino UNO
- MFRC522 RFID reader
- RFID Tags (Keycards or Keyfobs)
- Jumper Wires
Understanding the MFRC522 RFID Reader

The MFRC522 module consists of:
- Antenna Coil: Reads RFID tags.
- SPI Interface: Communicates with microcontrollers.
- Power Pins: Operates at 3.3V (not 5V compatible).
- Indicator LEDs: Provide visual feedback when a tag is read.
It uses the SPI protocol for communication, which ensures fast and reliable data exchange.
Connections
To interface the MFRC522 RFID reader with the Arduino UNO, use the following wiring:
| RFID Module Pin | Arduino Pin |
|---|---|
| VCC | 3.3V |
| GND | GND |
| RST | Pin 9 |
| SDA | Pin 10 |
| MOSI | Pin 11 |
| MISO | Pin 12 |
| SCK | Pin 13 |

Ensure that the VCC pin is connected to the Arduino’s 3.3V pin to avoid damaging the module.
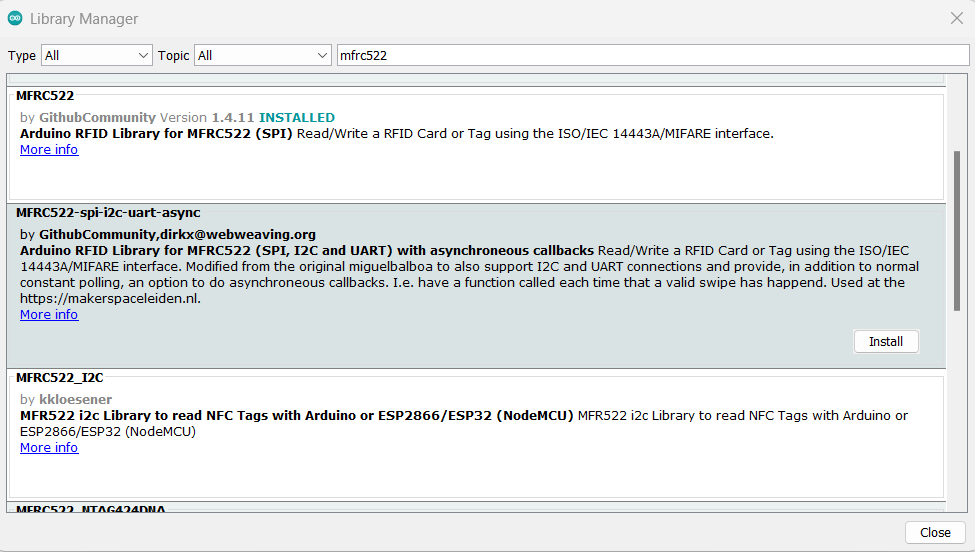
Library Installation
The MFRC522 module requires the RFID Library for Arduino. Follow these steps to install it:
- Open the Arduino IDE.
- Navigate to Sketch > Include Library > Manage Libraries.
- Search for “MFRC522” in the Library Manager.
- Select the library by GithubCommunity and click Install.
MFRC522 RFID Reader with Arduino Code
Below is a sample code to read the unique ID (UID) of RFID tags:
// MFRC522 RFID Reader with Arduino by ArduinoYard
#include <SPI.h>
#include <MFRC522.h>

#define RST_PIN 9
#define SS_PIN 10

MFRC522 rfid(SS_PIN, RST_PIN);

void setup() {
  Serial.begin(9600);
  SPI.begin();       // Initialize SPI bus
  rfid.PCD_Init();   // Initialize RFID module
  Serial.println("Place your RFID tag near the reader...");
}

void loop() {
  // Check if an RFID tag is detected
  if (!rfid.PICC_IsNewCardPresent() || !rfid.PICC_ReadCardSerial()) {
    return;
  }

  // Print the UID of the tag
  Serial.print("UID: ");
  for (byte i = 0; i < rfid.uid.size; i++) {
    Serial.print(rfid.uid.uidByte[i], HEX);
    Serial.print(" ");
  }
  Serial.println();

  // Halt the PICC (tag)
  rfid.PICC_HaltA();
}
Code Explanation
- Library Initialization:
- The
MFRC522andSPIlibraries handle RFID communication and SPI protocol.
- The
- Setup:
- Initializes the SPI bus and RFID reader.
- Loop:
- Continuously checks for the presence of an RFID tag.
- If a tag is detected, its unique ID (UID) is read and displayed in the Serial Monitor.
- Halting the Tag
- The
PICC_HaltA()function halts communication with the tag after reading its UID.
- The
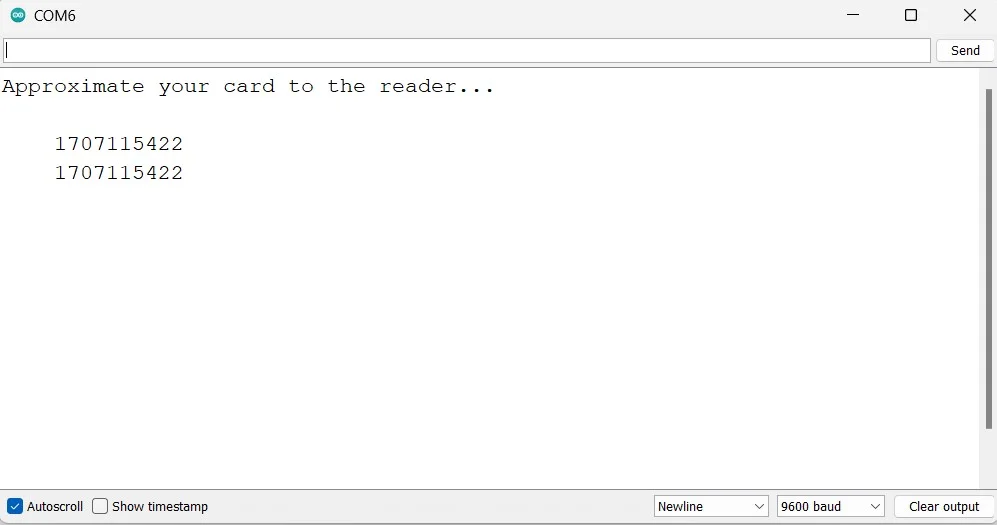
Testing the Setup
- Connect the MFRC522 RFID reader to the Arduino as per the wiring diagram.
- Upload the code to your Arduino UNO using the Arduino IDE.
- Open the Serial Monitor (set baud rate to 9600).
- Place an RFID tag near the module’s antenna coil.

5. Observe the UID of the tag displayed on the Serial Monitor.
Applications
- Access Control: Use RFID to grant or restrict access to doors, devices, or systems.
- Inventory Management: Track items in warehouses using RFID tags.
- Attendance Systems: Implement RFID-based solutions for employee or student attendance.
Conclusion
The MFRC522 RFID reader is a versatile and easy-to-use component for building RFID-based projects. With the provided code and wiring, you can quickly start experimenting with RFID technology. Whether you’re developing an access control system or creating an innovative inventory solution, the combination of the Arduino UNO and the MFRC522 RFID reader offers endless possibilities for automation and security projects. Explore and let your creativity flourish!
You can find more Arduino Sensor/Modules Guides on this website:
0.96 Inch I2C OLED Display With Arduino – ArduinoYard
How To Use Ultrasonic Sensor HC-SR04 With Arduino: A Beginner’s Guide – ArduinoYard
Using IR Sensor With Arduino (Proximity Sensor) – Easy Guide – ArduinoYard