
Introduction
This guide will walk you through testing the Mosquitto MQTT broker with ESP32. MQTT (Message Queuing Telemetry Transport) is a lightweight messaging protocol commonly used in IoT applications. The ESP32, a powerful microcontroller with WiFi capabilities, can communicate with an MQTT broker such as Mosquitto to send and receive messages.
Prerequisites
Before getting started, ensure you have the following:
- ESP32 Development Board
- Arduino IDE
- PubSubClient Library for MQTT
- Mosquitto Broker Installed (Check our previous guide)
- WiFi Network for ESP32 to connect to
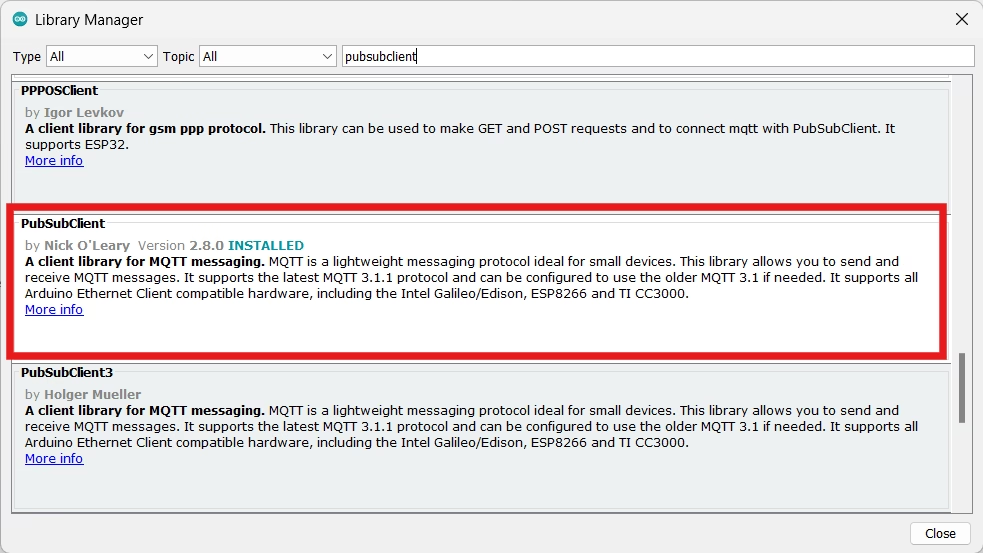
Step 1: Install Required Libraries
In the Arduino IDE, install the necessary libraries:
- Open Library Manager (
Sketch>Include Library>Manage Libraries). - Search for PubSubClient and install it.
Step 2: Connect ESP32 to MQTT Broker
Code for ESP32 to Publish and Subscribe
//Mosquitto MQTT Broker with ESP32
#include <WiFi.h>
#include <PubSubClient.h>

// WiFi credentials
const char* ssid = "YOUR_WIFI_SSID";
const char* password = "YOUR_WIFI_PASSWORD";

// MQTT Broker details
const char* mqtt_server = "YOUR_PC_IP";
const int mqtt_port = 1883;
const char* mqtt_topic = "test/topic";

WiFiClient espClient;
PubSubClient client(espClient);

void setup() {
    Serial.begin(115200);
    setup_wifi();
    client.setServer(mqtt_server, mqtt_port);
    client.setCallback(callback);
}

void setup_wifi() {
    delay(10);
    Serial.println("Connecting to WiFi...");
    WiFi.begin(ssid, password);
    while (WiFi.status() != WL_CONNECTED) {
        delay(500);
        Serial.print(".");
    }
    Serial.println("\nWiFi Connected!");
}

void callback(char* topic, byte* message, unsigned int length) {
    Serial.print("Message received on topic: ");
    Serial.println(topic);
    Serial.print("Message: ");
    for (int i = 0; i < length; i++) {
        Serial.print((char)message[i]);
    }
    Serial.println();
}

void reconnect() {
    while (!client.connected()) {
        Serial.print("Attempting MQTT connection...");
        if (client.connect("ESP32Client")) {
            Serial.println("connected");
            client.subscribe(mqtt_topic);
        } else {
            Serial.print("failed, rc=");
            Serial.print(client.state());
            Serial.println(" retrying in 5 seconds");
            delay(5000);
        }
    }
}

void loop() {
    if (!client.connected()) {
        reconnect();
    }
    client.loop();
    client.publish(mqtt_topic, "Hello from ESP32");
    delay(2000);
}
Find Your PC’s IP Address:
Open command window enter command ipconfig and Enter:

In code, add your SSID, Password and IP address of your PC. Upload the code.
Please note: ESP32 and PC should be connected to same WiFi network.
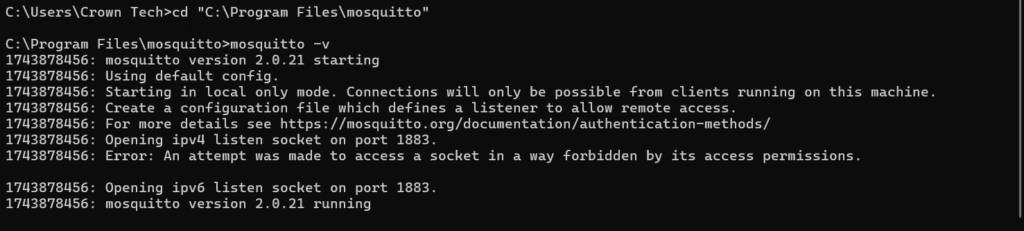
Step 3: Run Mosquitto Broker on Windows
Ensure the Mosquitto MQTT Broker is running. Open a terminal:
Go to the mosquitto Directory using command cd "C:\Program Files\mosquitto"
then run mosquitto -v
This starts the broker on port 1883.
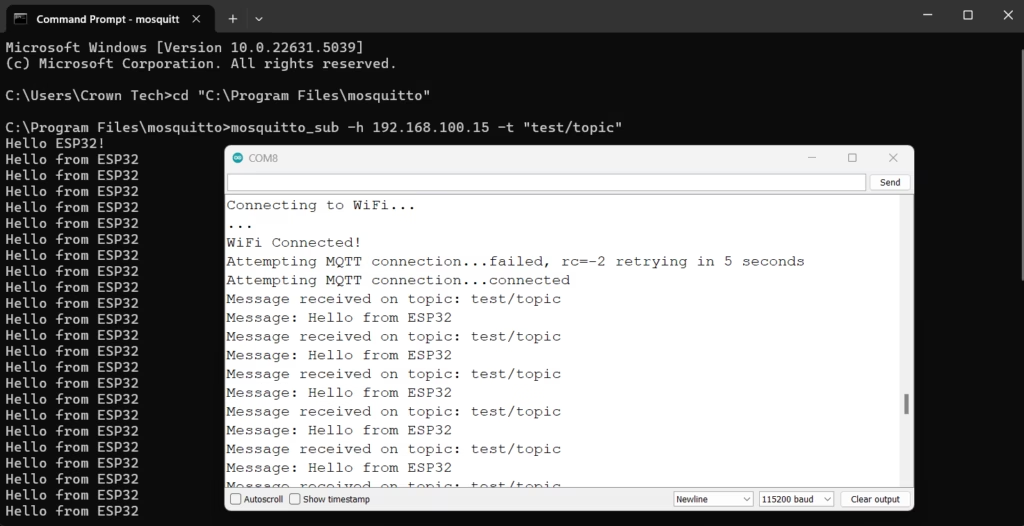
Step 4: Test Communication of Mosquitto MQTT Broker with ESP32
Subscribe to the Topic
From your PC, open a new command prompt:
Go to the mosquitto Directory using command cd "C:\Program Files\mosquitto"
then run mosquitto_sub -h YOUR_PC_IP -t “test/topic”
You should see messages from the ESP32.
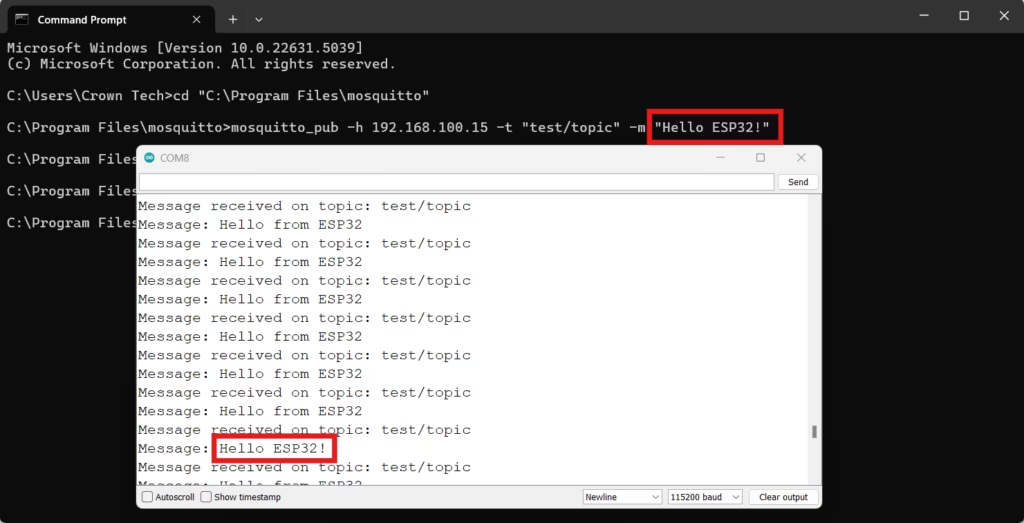
Publish a Message to ESP32
To send a message to ESP32:
From your PC, open a new command prompt:
Go to the mosquitto Directory using command cd "C:\Program Files\mosquitto"
then run the command: mosquitto_pub -h YOUR_PC_IP -t “test/topic” -m “Hello ESP32!”
ESP32 should receive and print the message in the Serial Monitor.
Troubleshooting
- ESP32 Not Connecting?
- Check WiFi credentials.
- Verify that Mosquitto is running.
- Ensure firewall allows port 1883.
- No Messages Received?
- Double-check MQTT topic names.
- Restart ESP32 and Mosquitto.
Customization
Once you have MQTT working with ESP32, you can use it to build various IoT applications:
- Home Automation: Control lights, fans, and appliances remotely.
- Sensor Monitoring: Send temperature, humidity, or motion sensor data to a dashboard.
- Security Systems: Receive alerts for door/window openings or motion detection.
- Industrial Applications: Monitor machines and send alerts in case of failures.
- Smart Agriculture: Automate irrigation based on sensor readings.
You can integrate Node-RED, Blynk, or Home Assistant to visualize and control your IoT setup more efficiently.
Example Task: Reading DHT11 Data
Try modifying the ESP32 code to:
- Read temperature and humidity from a DHT11 sensor.
- Send the data to a new MQTT topic (e.g.,
sensor/dht11). - Use mosquitto_sub to check if the data is published successfully.
- Expand this to trigger an action when the temperature crosses a threshold (e.g., turning on a fan via MQTT).
Conclusion
You have successfully tested Mosquitto MQTT Broker with ESP32! This setup enables real-time IoT applications such as sensor monitoring, home automation, and remote control systems. With this knowledge, you can now build advanced IoT applications by integrating more sensors, actuators, and cloud services. Try experimenting with Node-RED, Blynk, or Home Assistant for better visualization and automation.