
This article will guide you through integrating and using an SD card module with Arduino board. Incorporating an SD card module into your Arduino projects opens up a world of possibilities, such as data logging, file storage, or creating interactive systems that utilize external data.
Required Components
- Arduino board (e.g., Uno, Mega, Nano)
- SD card reader module
- microSD card (formatted as FAT16 or FAT32)
- Computer with Arduino IDE installed
Step 1: Preparing the SD Card
Before connecting your SD card module with Arduino, format it to ensure compatibility:
- Insert the microSD card into your computer.
- Use a tool like SD Memory Card Formatter to format the card as FAT16 or FAT32.
- Add a few sample text files or leave it empty for testing.
If you want to know more about FAT16 and FAT32:
FAT16 and FAT32: characteristics and differences
Step 2: Wiring the SD Card Module
Connect the SD card module to the Arduino:
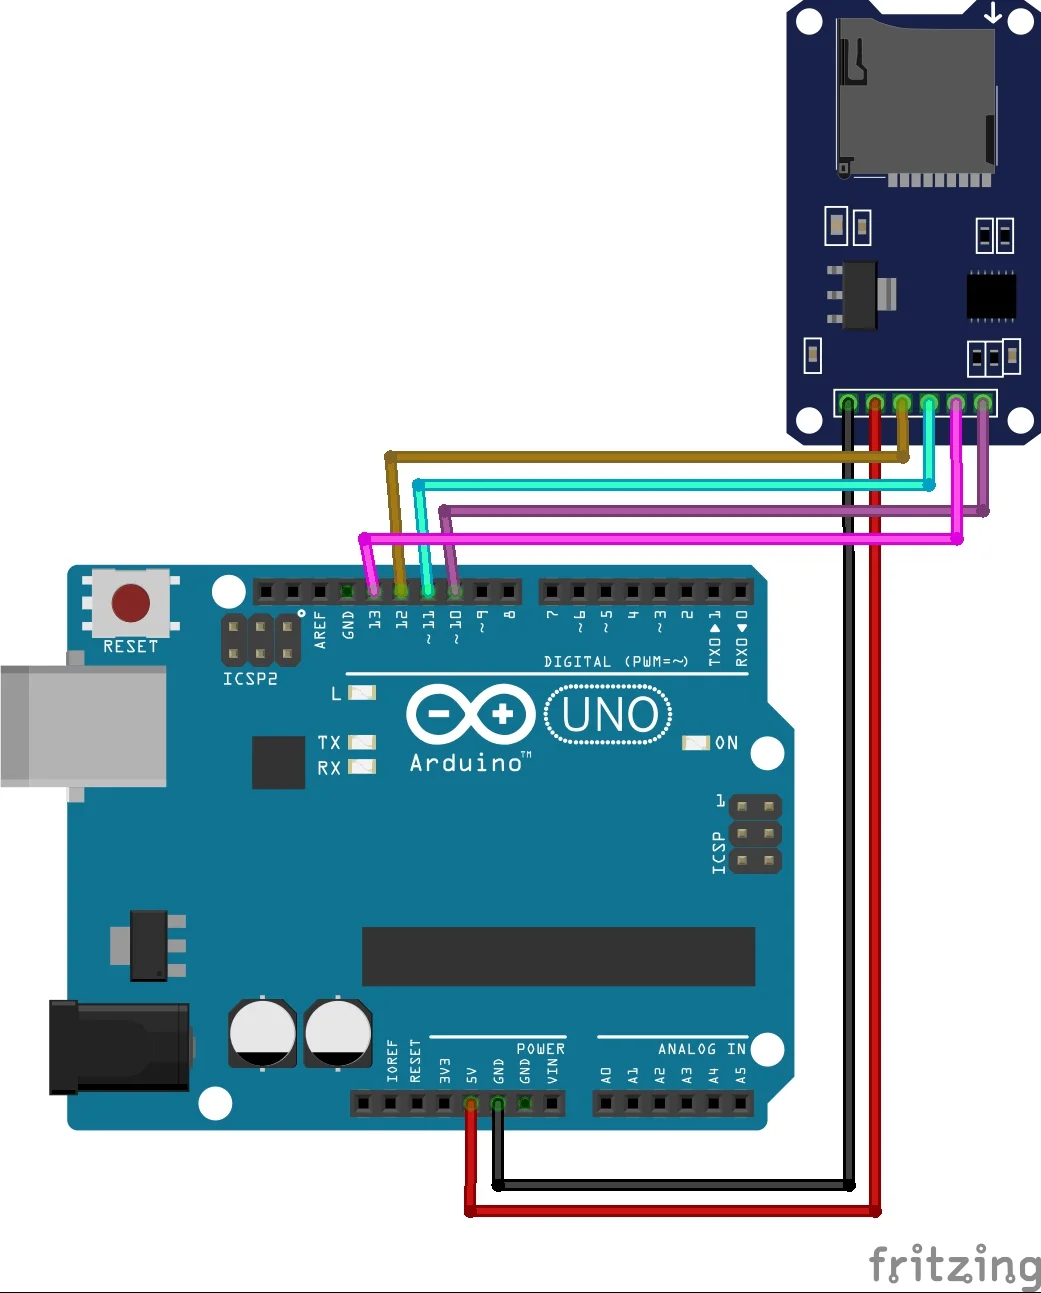
- SD Card Module Pins:
VCC→5V(or3.3Vfor some modules)GND→GNDCS(Chip Select) →Pin 10MOSI(Master Out Slave In) →Pin 11MISO(Master In Slave Out) →Pin 12SCK(Clock) →Pin 13
Note: These pin assignments apply to the Arduino Uno. For other boards, verify the SPI pin configuration.
Step 3: Installing the SD Library
The Arduino IDE comes with the SD library pre-installed. If it’s missing, you can install it via:
- Open the Arduino IDE.
- Go to Tools > Manage Libraries.
- Search for “SD” and install the library.
Step 4: Example Code
The following code demonstrates reading and writing data to the SD card:
#include <SD.h>
#include <SPI.h>
const int chipSelect = 10;
void setup() {
Serial.begin(9600);
while (!Serial) {}
Serial.println("Initializing SD card...");
if (!SD.begin(chipSelect)) {
Serial.println("Card failed or not present");
return;
}
Serial.println("Card initialized.");
// Writing to the SD card
File dataFile = SD.open("test.txt", FILE_WRITE);
if (dataFile) {
dataFile.println("Hello, SD card!");
dataFile.close();
Serial.println("Data written to test.txt");
} else {
Serial.println("Error opening test.txt");
}
// Reading from the SD card
dataFile = SD.open("test.txt");
if (dataFile) {
Serial.println("test.txt content:");
while (dataFile.available()) {
Serial.write(dataFile.read());
}
dataFile.close();
} else {
Serial.println("Error reading test.txt");
}
}
void loop() {
// Nothing to do here
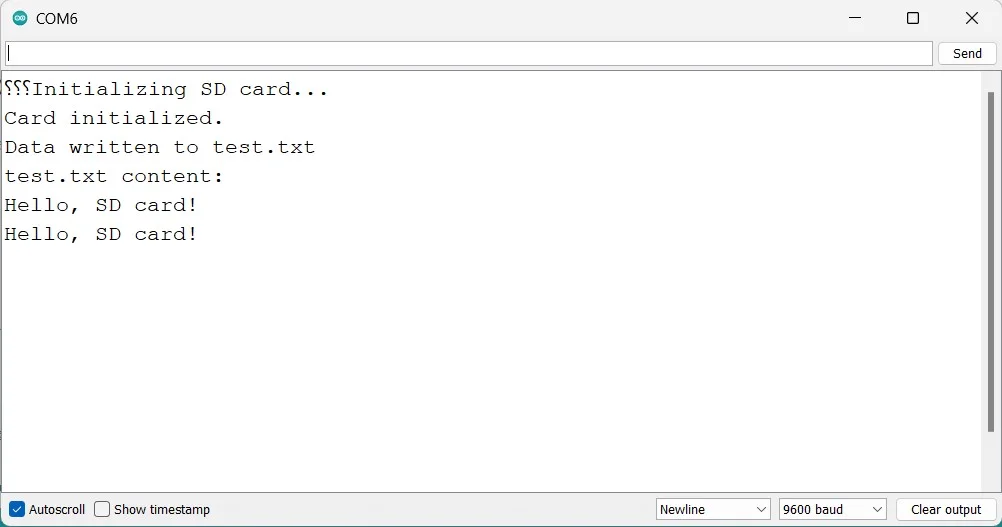
}Step 5: Upload and Test
- Connect your Arduino to your computer.
- Open the above sketch in the Arduino IDE.
- Select the correct board and port under the Tools menu.
- Click Upload and open the Serial Monitor to observe the output.
Troubleshooting
- SD Card Initialization Failed: Ensure proper wiring and that the card is formatted correctly.
- File Not Found: Double-check file names and ensure they match exactly.
- Power Issues: Some SD card modules require a regulated 3.3V supply. Verify your module’s voltage requirements.
Applications
Using an SD card module with Arduino is ideal for:
- Data Logging: Record sensor data for analysis.
- File Storage: Store images, configuration files, or other data.
- DIY Projects: Create MP3 players, image viewers, or other interactive systems.
Conclusion
By following this guide, you can easily integrate an SD card module into your Arduino projects and unlock the potential of external data storage. It’s an easy and simple guide to integrate SD card module to arduino uno. We will also share guide to use SD card module with esp32 as well.
Thank you!!!
You can find more arduino sensor guides on this website:
0.96 Inch I2C OLED Display With Arduino – ArduinoYard
How To Use Ultrasonic Sensor HC-SR04 With Arduino: A Beginner’s Guide – ArduinoYard
Using IR Sensor With Arduino (Proximity Sensor) – Easy Guide – ArduinoYard
Interfacing NEO-6M GPS Module With Arduino – ArduinoYard