Introduction
Controlling a servo motor with ESP32 is one of the simplest and most rewarding projects you can start with. Whether you’re building a robotic arm, a pan-tilt camera system, or even an automated pet feeder, the ESP32 gives you precision control and the ability to integrate your project with IoT features like Wi-Fi or Bluetooth.
In this guide, we’ll cover everything you need to know, from how a servo motor works, to wiring it with the ESP32, to writing code that moves it exactly where you want. We’ll also cover troubleshooting tips, controlling multiple servos, and some practical project ideas to take your build further.
What is a Servo Motor?
A servo motor is a small but mighty device that can rotate to a specific position when given the right signal. Unlike a regular DC motor that spins freely, a servo motor uses feedback control to stay at the angle you set.
Typical hobby servos (like the popular SG90 or MG90S) have three wires:
- GND (Ground) – usually brown or black
- VCC (Power) – usually red, often 5V
- Signal – usually orange, yellow, or white, carries the control signal

Because of their precise positioning, servo motors are widely used in robotics, model airplanes, camera mounts, and automation projects.
💡 Fun fact: Many inexpensive servos can rotate about 180°, but some special ones can go 360° or more.
Why Use ESP32 with a Servo Motor?
The ESP32 is not just another microcontroller. It’s a dual-core, Wi-Fi + Bluetooth-enabled powerhouse that makes it perfect for modern IoT and automation projects. When using a servo motor with ESP32, you get:
- Multiple GPIO pins for controlling more than one servo at once
- Precise PWM signals for smooth servo movement
- Built-in wireless for remote control and monitoring
- Fast processing speed for complex robotics tasks
If you’ve worked with Arduino before, think of ESP32 as Arduino on steroids, more power, more features, and still beginner-friendly.
If you’re using the popular SG90 servo motor in your project, you can check out its official datasheet here for detailed specifications and operating guidelines.
Components You’ll Need
For this basic project, you only need a few items:
- ESP32 development board (e.g., ESP32 DevKit V1)
- Servo motor (SG90, MG90S, or similar)
- Jumper wires
- Breadboard (optional, for easy connections)
- External 5V power supply (recommended if using bigger servos)
Circuit Diagram – Wiring a Servo Motor to ESP32
Connecting a servo motor with ESP32 is straightforward:
- Connect GND on the servo to a GND pin on ESP32
- Connect VCC on the servo to 5V on ESP32 (or external supply)
- Connect the signal pin of the servo to GPIO 13 on ESP32 (or any PWM-capable pin)
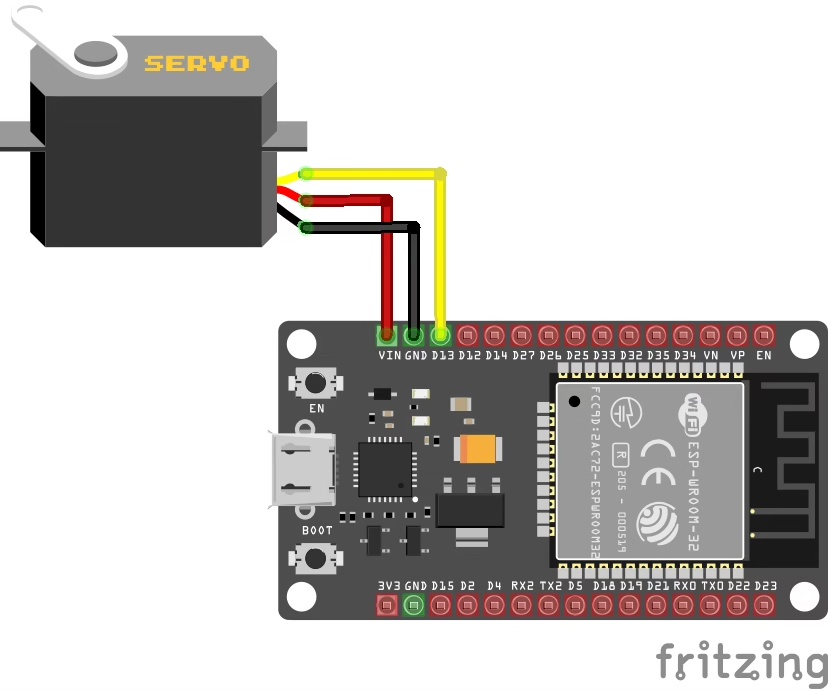
⚠ Important: If your servo draws a lot of current, power it from an external 5V source and connect the grounds together.
Writing the Code
Now that we’ve set up the hardware, let’s jump into the code. For this project, we’ll be using the Servo library available in the Arduino IDE to control the servo motor.
Step 1: Install the ESP32 board in the Arduino IDE if you haven’t already. You can do this by going to File → Preferences → Additional Boards Manager URLs and adding the following URL:
https://dl.espressif.com/dl/package_esp32_index.json
Step 2: Go to Tools → Board and select ESP32 Dev Module.
Step 3: Write the code to control the servo motor. Here’s a basic example to rotate the servo from 0° to 180°:
#include <ESP32Servo.h>

Servo myServo;  // Create a servo object

void setup() {
  myServo.attach(13);  // Attach the servo to GPIO 13
}

void loop() {
  myServo.write(0);   // Move servo to 0 degrees
  delay(1000);         // Wait for 1 second
  myServo.write(180); // Move servo to 180 degrees
  delay(1000);         // Wait for 1 second
}
This simple code will move the servo motor back and forth between 0° and 180° every second.
Troubleshooting Tips
While working with servo motors and the ESP32, you may encounter some common issues. Here are a few troubleshooting tips:
- Servo not moving: Double-check your connections, especially the signal pin to ensure it’s connected to the right GPIO pin.
- ESP32 crashes: Make sure the servo is not drawing too much power from the ESP32. If needed, provide an external power supply to the servo.
- Servo jittering: Ensure you’re using the correct voltage for the servo motor (usually 5V).
How to Control Multiple Servo Motors
The ESP32 has plenty of GPIO pins, making it easy to control multiple servo motors. Here’s a quick modification to the above code that controls two servos at once:
#include <ESP32Servo.h>

Servo servo1;
Servo servo2;

void setup() {
  servo1.attach(13); // First servo on GPIO 13
  servo2.attach(14); // Second servo on GPIO 14
}

void loop() {
  servo1.write(90);  // First servo to 90 degrees
  servo2.write(45);  // Second servo to 45 degrees
  delay(1000);
  servo1.write(180); // First servo to 180 degrees
  servo2.write(135); // Second servo to 135 degrees
  delay(1000);
}
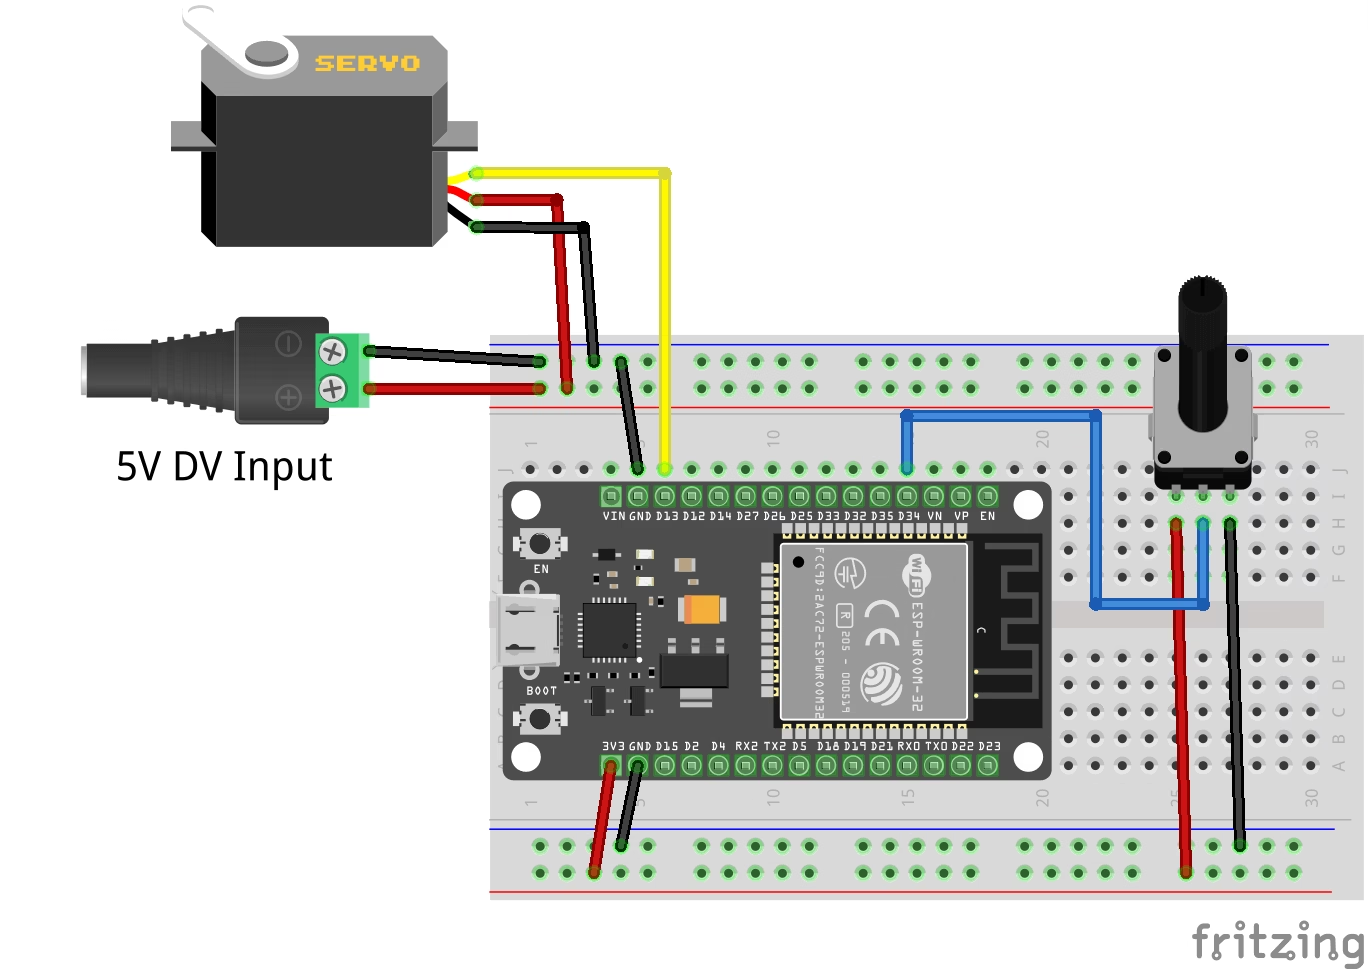
Bonus Project: Control a Servo Motor with a Potentiometer (ESP32)
Want a more interactive example? Let’s control the servo motor with ESP32 using a potentiometer. As you twist the knob, the servo moves in real time.
Extra Components Needed
- Potentiometer (10kΩ recommended)
Wiring for Bonus Project
- Potentiometer VCC → 3.3V pin on ESP32
- Potentiometer GND → GND
- Potentiometer middle pin → GPIO 34 (ADC input)
- Servo motor wiring stays the same as before
Code for Potentiometer Control
#include <ESP32Servo.h>

Servo myServo;

int potPin = 34;  // Potentiometer connected to GPIO 34
int servoPin = 13; // Servo signal pin
int potValue;
int angle;

void setup() {
  Serial.begin(115200);
  myServo.attach(servoPin);
}

void loop() {
  potValue = analogRead(potPin); // Read potentiometer
  angle = map(potValue, 0, 4095, 0, 180); // Map to servo range
  myServo.write(angle); // Move servo
  Serial.print("Angle: ");
  Serial.println(angle);
  delay(15);
}
How it works: The ESP32 reads the potentiometer’s analog value, maps it to an angle between 0° and 180°, and moves the servo accordingly.
Video Demonstration
Real-World Project Ideas
Once you’ve mastered controlling a servo motor with ESP32, you can build:
- Robotic Arm – Multiple servos for joints
- Camera Pan-Tilt Mount – Remote-controlled via Wi-Fi
- Automated Door Lock – Servo turns a latch when you send a command
- Smart Curtain Opener – Servo pulls a small curtain rope based on light levels
Conclusion
Using a servo motor with ESP32 is an excellent starting point for robotics, home automation, and IoT applications. The combination gives you precise motion control plus the power of wireless connectivity, making your projects far more versatile than with traditional controllers.
With the simple examples above, you can start experimenting right away — and as you get more comfortable, you can add multiple servos, sensors, or even smartphone control.
Related Articles
- How to Use Ultrasonic Sensor with ESP32 – Measure distances for obstacle avoidance
- Control an LED with ESP32 Web Server – Build your first IoT control interface
- ESP32 with OLED Display – Show live servo positions or other data
- DHT22 with ESP32 – Add environmental sensing to your servo projects