In this step-by-step tutorial, we’ll show you how to create a Weather Station using DHT11 and I2C LCD Display with Arduino. This beginner-friendly project lets you monitor temperature and humidity in real-time, making it a perfect addition to homes, greenhouses, or any indoor space where climate control matters.
The DHT11 sensor is a cost-effective and reliable choice for sensing temperature and humidity, delivering digital data that easily integrates with Arduino projects. To display the data neatly, we’ll use a 20×4 I2C LCD display, which simplifies wiring by requiring only two Arduino pins for communication.
This hands-on project is a great way to explore working with sensors and displays in Arduino projects, giving you practical experience that can be applied to more advanced weather monitoring systems or home automation setups. By the end of this guide, you’ll have a fully functional weather station providing live climate data at a glance.
COMPONENTS REQUIRED
DHT11
The DHT11 is a basic, ultra-low-cost digital temperature and humidity sensor. It can measure temperature and humidity in the surrounding air.
20×4 or 16×2 LCD Display (with I2C module)
This display module will show the temperature and humidity readings. The I2C version requires only two pins for communication, making it a convenient option.
Arduino or ESP32
Either microcontroller can be used for this project. We will provide code that works with both.
Jumper Wires
To connect the components.
required libraries
Before starting, make sure to install the following libraries in your Arduino IDE:
- DHT Sensor Library by Adafruit
This library allows you to interface with the DHT11 or DHT22 sensor. - LiquidCrystal I2C Library by Frank de Brabander
This library is necessary for controlling the I2C LCD display.
You can easily install these libraries from the Arduino IDE’s Library Manager. Go to sketch-> Include Library-> Library Manager and search the names of library to install.
WIRING DIAGRAM

Here’s how to wire everything together:
DHT11 Sensor:
- VCC connects to 3.3V or 5V (depending on your board and sensor).
- GND connects to GND.
- Data Pin connects to a digital pin (for example, D2).
20×4 or 16×2 LCD (I2C):
- SDA connects to GPIO 21 on ESP32 / A4 on Arduino.
- SCL connects to GPIO 22 on ESP32 / A5 on Arduino.
- VCC connects to 5V.
- GND connects to GND.
Finding LCD Display I2C Address
Note: Use your own wiring diagram here. I2C address is typically 0x27, but make sure to check your specific LCD module’s I2C address with this I2C scanner sketch
#include <Wire.h>


void setup()
{
  Wire.begin();

  Serial.begin(9600);
  while (!Serial);             // Leonardo: wait for serial monitor
  Serial.println("\nI2C Scanner");
}


void loop()
{
  byte error, address;
  int nDevices;

  Serial.println("Scanning...");

  nDevices = 0;
  for(address = 1; address < 127; address++ )
  {
    // The i2c_scanner uses the return value of
    // the Write.endTransmisstion to see if
    // a device did acknowledge to the address.
    Wire.beginTransmission(address);
    error = Wire.endTransmission();

    if (error == 0)
    {
      Serial.print("I2C device found at address 0x");
      if (address<16)
        Serial.print("0");
      Serial.print(address,HEX);
      Serial.println("  !");

      nDevices++;
    }
    else if (error==4)
    {
      Serial.print("Unknown error at address 0x");
      if (address<16)
        Serial.print("0");
      Serial.println(address,HEX);
    }
  }
  if (nDevices == 0)
    Serial.println("No I2C devices found\n");
  else
    Serial.println("done\n");

  delay(5000);           // wait 5 seconds for next scan
}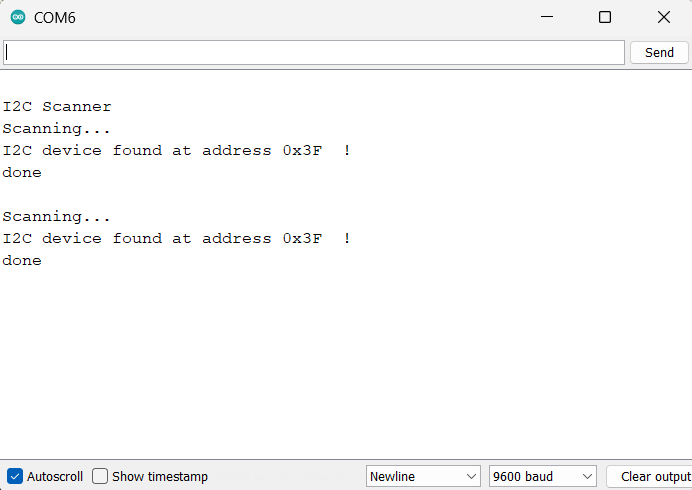
We got the address of 0x3F for our LCD with the above given sketch. In the main code, On line#13 you can update the I2C address if your LCD got different address.
LiquidCrystal_I2C lcd(0x3F, 20, 4);
If you want to get detailed tutorial you can follow: Arduino | How to Scan and Detect I2C Addresses | Adafruit Learning System
code for DHT11 and I2C LCD Display (20×4)
If you’re using a 20×4 I2C LCD display, use the following code to take advantage of the larger screen space for clearer data display.
// Weather Station using DHT11 and I2C LCD Display
#include <Wire.h>
#include <LiquidCrystal_I2C.h>
#include "DHT.h"

// Define DHT pin and type (DHT11 or DHT22)
#define DHTPIN 2      // Pin where the DHT sensor is connected
#define DHTTYPE DHT11 // Change to DHT11 if using DHT11

// Initialize DHT sensor
DHT dht(DHTPIN, DHTTYPE);

// Initialize the LCD with I2C address 0x3F
LiquidCrystal_I2C lcd(0x27, 20, 4);  // 20x4 LCD

void setup() {
  // Start Serial Monitor
  Serial.begin(115200);

  // Initialize DHT sensor
  dht.begin();

  // Initialize the LCD
  lcd.init();
  lcd.backlight();

  // Display initial message
  lcd.setCursor(0, 0);
  lcd.print("Weather Station by");

  lcd.setCursor(0, 1);
  lcd.print("   ArduinoYard");

  lcd.setCursor(0, 2);
  lcd.print("Temperature: ");

  lcd.setCursor(0, 3);
  lcd.print("Humidity: ");
}

void loop() {
  // Wait a few seconds between measurements
  delay(2000);

  // Read temperature and humidity values
  float humidity = dht.readHumidity();
  float temperature = dht.readTemperature();

  // Check if any reads failed and exit early
  if (isnan(humidity) || isnan(temperature)) {
    Serial.println("Failed to read from DHT sensor!");
    lcd.setCursor(0, 3);
    lcd.print("Sensor error      ");
    return;
  }

  // Print temperature to the LCD
  lcd.setCursor(12, 2);  // Column 6, Row 1
  lcd.print(temperature);
  lcd.print((char)223);  // Print the degree symbol
  lcd.print("C  ");

  // Print humidity to the LCD
  lcd.setCursor(10, 3);  // Column 10, Row 2
  lcd.print(humidity);
  lcd.print("%  ");
}
code for DHT11 and I2C LCD Display (16×2)
If you want to use a 16×2 I2C LCD display instead of the 20×4 display, you can use the following code. The logic is the same, but the text placement has been adjusted to fit the smaller screen size. This is a great option if you want a more compact display for your project.
// Weather Station using DHT11 and I2C LCD Display
#include <Wire.h>
#include <LiquidCrystal_I2C.h>
#include "DHT.h"

// Define DHT pin and type (DHT11 or DHT22)
#define DHTPIN 2         // Pin where the DHT sensor is connected
#define DHTTYPE DHT11    // Change to DHT22 if using DHT22

// Initialize DHT sensor
DHT dht(DHTPIN, DHTTYPE);

// Initialize the LCD with I2C address 0x27 (common address for 16x2 LCD)
LiquidCrystal_I2C lcd(0x27, 16, 2);

void setup() {
  // Start Serial Monitor
  Serial.begin(115200);

  // Initialize DHT sensor
  dht.begin();

  // Initialize the LCD
  lcd.init();
  lcd.backlight();

  // Display initial labels
  lcd.setCursor(2, 0);
  lcd.print("Temp: ");

  lcd.setCursor(2, 1);
  lcd.print("Hum: ");
}

void loop() {
  // Wait a few seconds between measurements
  delay(2000);

  // Read temperature and humidity values
  float humidity = dht.readHumidity();
  float temperature = dht.readTemperature();

  // Check if any reads failed and exit early
  if (isnan(humidity) || isnan(temperature)) {
    Serial.println("Failed to read from DHT sensor!");
    lcd.setCursor(0, 1);
    lcd.print("Sensor error  ");
    return;
  }

  // Print temperature to the LCD
  lcd.setCursor(8, 0);
  lcd.print(temperature);
  lcd.print((char)223);  // Degree symbol
  lcd.print("C  ");

  // Print humidity to the LCD
  lcd.setCursor(8, 1);
  lcd.print(humidity);
  lcd.print("%  ");
}
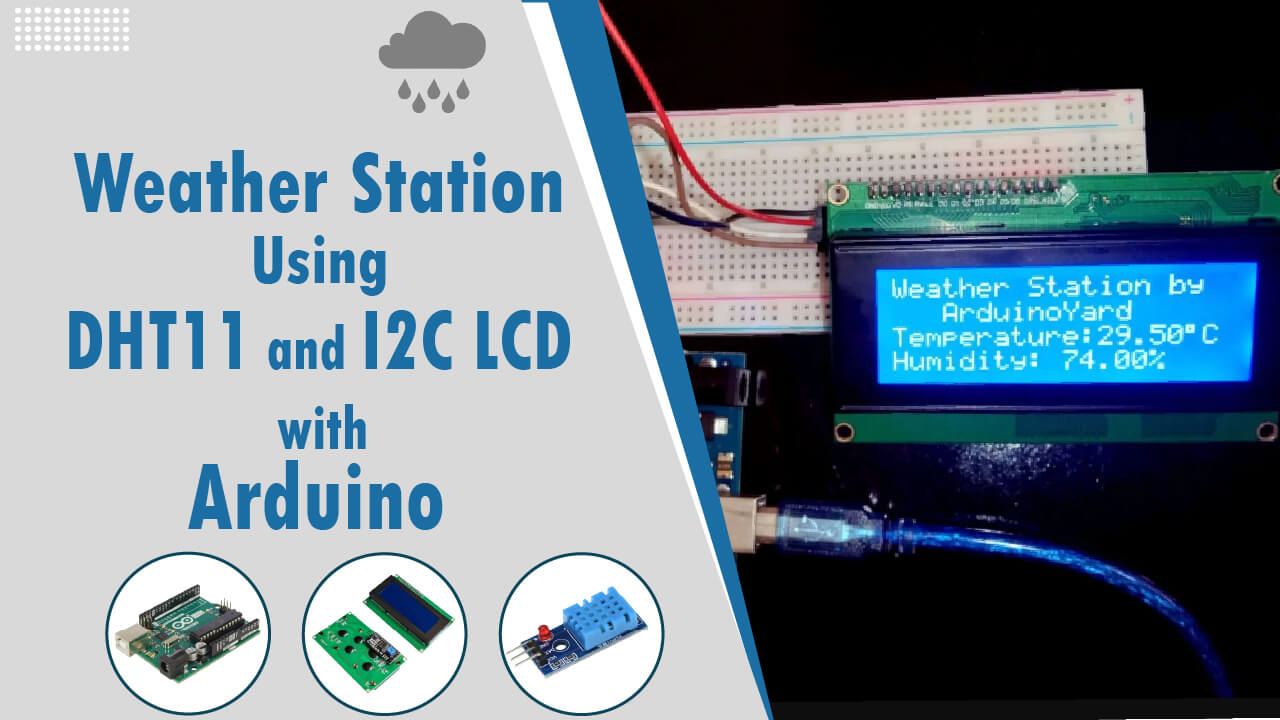
DEMONSTRATION
Below is an image demonstrating the DHT11 and I2C LCD Display in action. The display shows real-time temperature and humidity readings captured by the DHT11 sensor and presented clearly on the 20×4 I2C LCD screen.

CONCLUSION
This project showcases how to effectively use the DHT11 and I2C LCD Display to create a compact and reliable temperature and humidity monitoring system. By combining the DHT11 sensor (or DHT22 for more accuracy) with an I2C LCD, you can easily display real-time environmental data, making it perfect for applications like home automation, greenhouses, or personal weather stations.
The DHT11 and I2C LCD Display setup provides a simple yet powerful foundation that can be expanded further. You might consider adding data logging, setting alarms for specific temperature or humidity thresholds, or even implementing wireless data transmission to a web dashboard.
If you have questions or need additional help, feel free to ask in the comments!
Thank You!!!
You can find more Arduino projects on this website:
Useful Automatic Room Light Control Using Arduino And PIR Sensor HC-SR501 – ArduinoYard
Autonomous Edge-Detection Robot With Arduino – ArduinoYard
Arduino MP3 Player With Voice Control Using HC-05 Bluetooth Module And DFplayer Mini – ArduinoYard