That’s where the ESP32 I2C scanner helps—it quickly finds all connected I2C devices and their addresses.
If you’re using I2C modules with your ESP32 board, the first thing you need to do is find the correct I2C address of your device. Sometimes, the address is different from what the datasheet says, or you’re using a module with an unknown address.
What is I2C?
I2C (Inter-Integrated Circuit) is a 2-wire serial communication protocol with:
- SDA: Serial Data Line
- SCL: Serial Clock Line
It supports multiple devices (slaves) on the same bus, all identified by unique 7-bit addresses.
Read more about I2C Communication: Basics of the I2C Communication Protocol
What is ESP32 I2C Scanner?
The ESP32 I2C scanner is a simple Arduino sketch that scans all possible I2C addresses (from 1 to 127) and shows you which devices respond. It’s a very helpful tool to check whether your I2C device is connected properly and what address it’s using.
Why Do You Need It?
I2C devices like OLED displays, LCDs, BME280 sensors, MPU6050 motion sensors, and others need a correct I2C address to work. If you use the wrong address in your code, the device won’t respond.
Running an ESP32 I2C scanner before writing your main program helps you find the right address and save time in debugging.
ESP32 I2C Scanner Code
Here’s the I2C scanner code that works with ESP32 boards. You can run it using the Arduino IDE.
#include <Wire.h>

void setup() {
  Wire.begin(21, 22);  // GPIO21 = SDA, GPIO22 = SCL (default for ESP32)
  Serial.begin(115200);
  while (!Serial);  // Wait for serial monitor
  Serial.println("ESP32 I2C Scanner Started...");
}

void loop() {
  byte error, address;
  int nDevices = 0;

  Serial.println("Scanning...");

  for (address = 1; address < 127; address++) {
    Wire.beginTransmission(address);
    error = Wire.endTransmission();

    if (error == 0) {
      Serial.print("I2C device found at address 0x");
      if (address < 16)
        Serial.print("0");
      Serial.print(address, HEX);
      Serial.println(" ✔");
      nDevices++;
    } else if (error == 4) {
      Serial.print("Unknown error at address 0x");
      if (address < 16)
        Serial.print("0");
      Serial.println(address, HEX);
    }
  }

  if (nDevices == 0)
    Serial.println("No I2C devices found.\n");
  else
    Serial.println("Scan complete.\n");

  delay(5000);  // Wait 5 seconds before scanning again
}
How to Use the Scanner
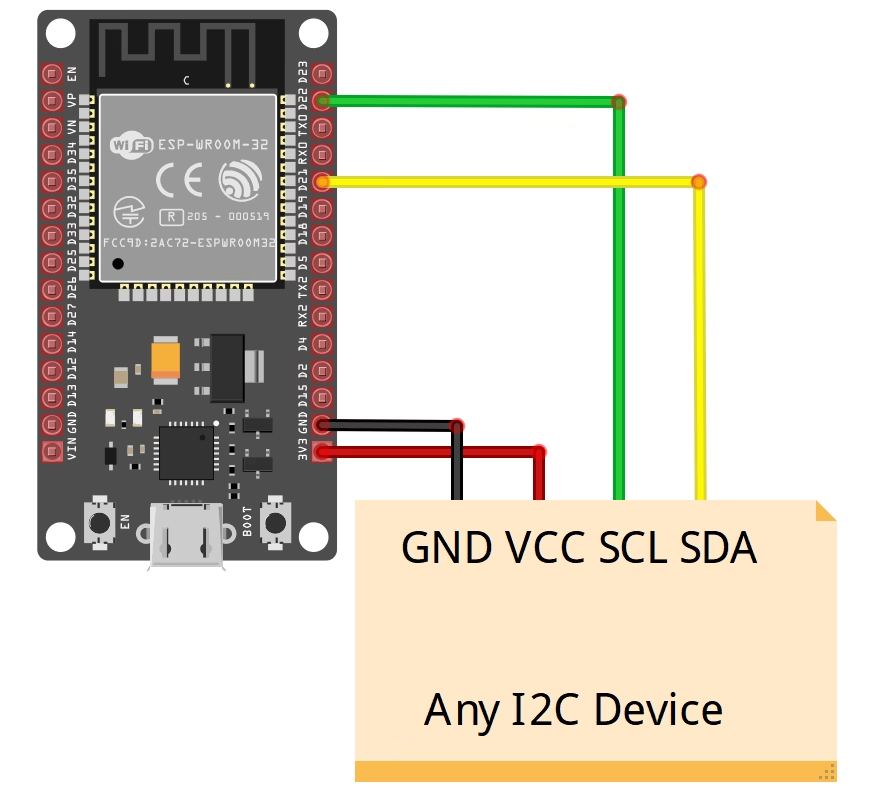
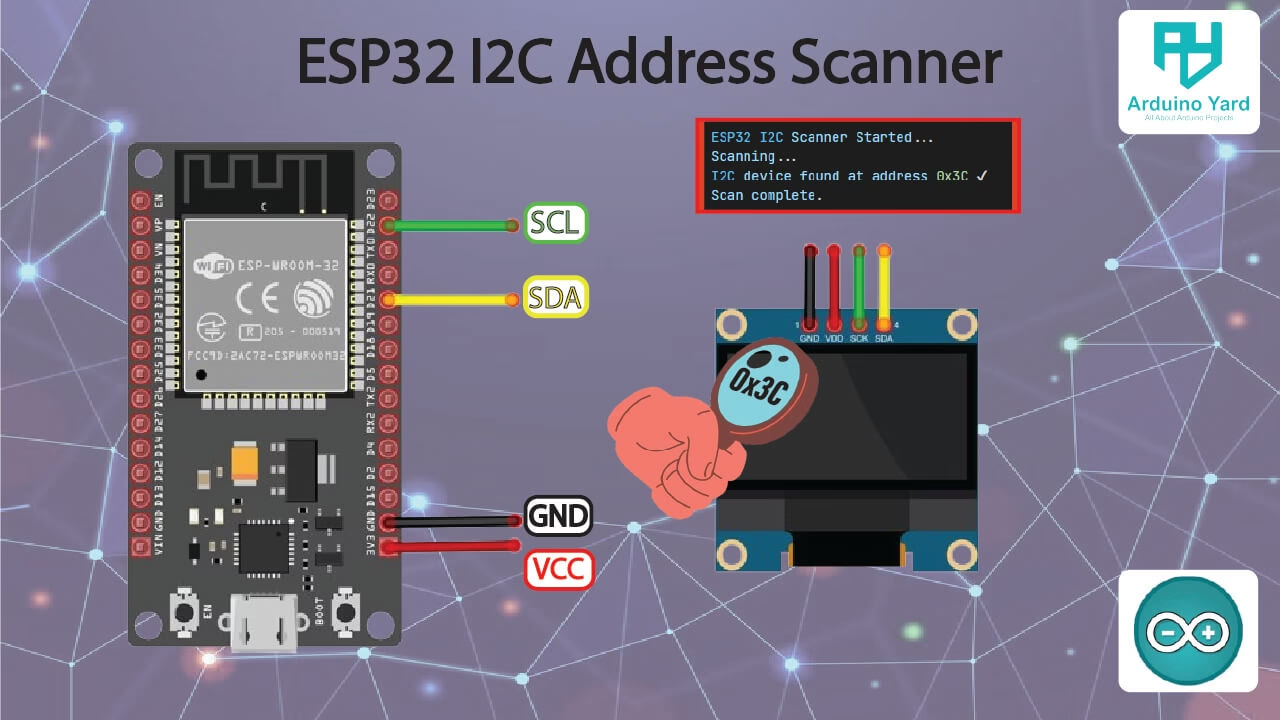
- Connect any I2C Module to ESP32 as above given diagram.
- Open Arduino IDE.
- Connect your ESP32 board to your computer.
- Paste the code into a new sketch.
- Select the correct board (like “ESP32 Dev Module”) and port.
- Upload the code.
- Open the Serial Monitor (set baud rate to 115200).
- You will see the addresses of connected I2C devices.
Example Output
ESP32 I2C Scanner Started...
Scanning...
I2C device found at address 0x3C ✔
Scan complete.
In this example, an I2C device (such as an OLED) is found at address 0x3C.
Can I Use Other GPIO Pins?
Yes! Unlike Arduino, the ESP32 allows you to use almost any digital pins for I2C. You can change the pins like this:
Wire.begin(18, 19); // Use GPIO18 for SDA and GPIO19 for SCLMake sure the pins you choose are not used by other hardware like SPI or UART.
Conclusion
The ESP32 I2C scanner is an essential tool for every developer working with I2C modules. It quickly detects connected devices and shows their addresses, helping you avoid issues and start your project with confidence.
Make it a habit to run the I2C scanner before writing your main code—it’s quick, simple, and super helpful!
SOME OF OUR PROJECTS WHICH ARE USING I2C PROTOCOL:
YouTube Channel Statistics Display With NodeMCU(ESP8266) And I2C OLED Display – Easy – ArduinoYard
Weather Station Using DHT11 And I2C LCD Display With Arduino – ArduinoYard