Overview
In this tutorial, we’ll explore how to create a simple yet practical ESP32 Webserver PWM Control project. This project involves setting up a web server on the ESP32, allowing users to control the PWM output directly from a web browser using an intuitive slider interface. Through this web interface, hosted by the ESP32, you can easily adjust the brightness of an LED by modifying the PWM duty cycle in real time.
What is PWM?
PWM, or Pulse Width Modulation, is a technique used to control the amount of power delivered to electronic devices. It works by varying the duty cycle (the percentage of time the signal is HIGH in one cycle) of a digital signal. PWM is commonly used for applications such as dimming LEDs, controlling motors, and generating analog-like signals.
Components Required
- ESP32 development board
- An LED
- Breadboard and Jumper Wires
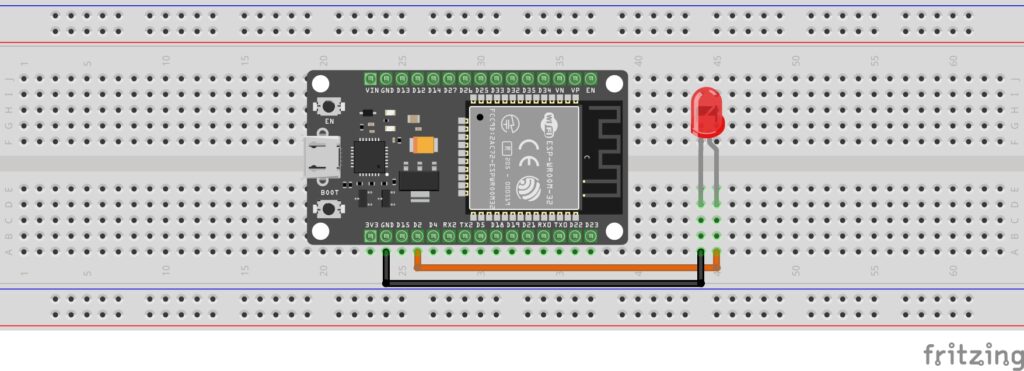
Circuit Diagram
Connect the components as follows:
- Connect the anode (longer leg) of the LED to GPIO 2 of the ESP32.
- Connect the cathode (shorter leg) of the LED to GND.
Step 1: Install Required Libraries
Ensure you have the latest version of the ESPAsyncWebServer and AsyncTCP libraries installed:
- Go to Sketch > Include Library > Manage Libraries in the Arduino IDE.
- Search for ESPAsyncWebServer and install it.

- Search for AsyncTCP and install it.

Step 2: Connect the ESP32
Open Arduino IDE and select the appropriate board (e.g., “ESP32 Dev Module”) and port from the Tools menu.
Connect your ESP32 board to your computer via USB.
Step 3: upload the Code
Below is the code to set up the ESP32 Webserver PWM Control using a slider:
#include <WiFi.h>
#include <ESPAsyncWebServer.h>

// Replace with your network credentials
const char* ssid = "Your_SSID";
const char* password = "Your_PASSWORD";

AsyncWebServer server(80);

const int ledPin = 2;  // GPIO pin where the LED is connected
int dutyCycle = 128;   // Initial PWM duty cycle (50%)

const char index_html[] PROGMEM = R"rawliteral(
 <!DOCTYPE html>
    <html>
    <head><title>PWM Control</title></head><body>
    <h1>ESP32 PWM Control</h1>
    <input type='range' min='0' max='255' value=' ' id='pwmSlider' oninput='updatePWM(this.value)'>
    <p>Duty Cycle: <span id='dutyValue'>128</span></p>
    <script>
    function updatePWM(value) {
    fetch('/setPWM?duty=' + value);
    document.getElementById('dutyValue').innerText = value;
    }
    </script>
    </body></html>
)rawliteral";

void setup() {
  Serial.begin(9600);

  // Connect to Wi-Fi
  WiFi.begin(ssid, password);
  Serial.print("Connecting to Wi-Fi");
  while (WiFi.status() != WL_CONNECTED) {
    delay(1000);
    Serial.print(".");
  }
  Serial.println("\nWi-Fi connected");
  Serial.println(WiFi.localIP());

  // Configure LED pin as PWM output
  ledcSetup(0, 5000, 8); // Channel 0, 5 kHz frequency, 8-bit resolution
  ledcAttachPin(ledPin, 0);
  ledcWrite(0, dutyCycle);

// Define the root URL handler
 server.on("/", HTTP_GET, [](AsyncWebServerRequest *request) {
    request->send(200, "text/html", index_html);
  });

  server.on("/setPWM", HTTP_GET, [](AsyncWebServerRequest *request) {
    if (request->hasParam("duty")) {
      dutyCycle = request->getParam("duty")->value().toInt();
      if (dutyCycle < 0) dutyCycle = 0;
      if (dutyCycle > 255) dutyCycle = 255;
      ledcWrite(0, dutyCycle);
    }
    request->send(200, "text/plain", "OK");
  });

  server.begin();
  Serial.println("HTTP server started");
}

void loop() {
  // Nothing needed here as AsyncWebServer handles everything
}How the Code Works
- Wi-Fi Connection: The ESP32 connects to a Wi-Fi network using the provided SSID and password.
- PWM Configuration: The
ledcSetupandledcAttachPinfunctions configure the ESP32’s PWM functionality. - Web Server: The ESP32 runs an asynchronous web server using the ESPAsyncWebServer library, which is more efficient for handling multiple clients.
- Slider Interface: The HTML page served by the ESP32 includes a slider element to adjust the duty cycle. The slider value is sent to the ESP32 via a
fetchAPI call whenever it changes. - Duty Cycle Adjustment: The ESP32 updates the PWM duty cycle in real-time as the slider is moved.
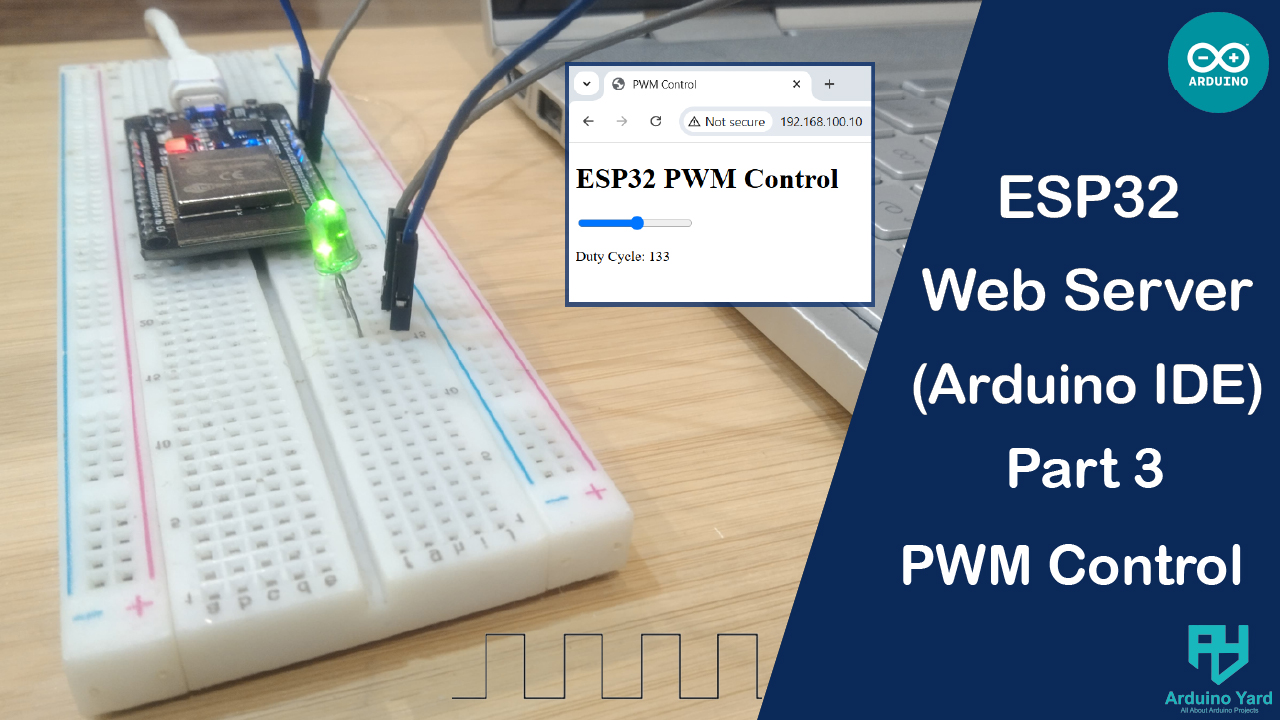
Testing the ESP32 Webserver PWM Control Using Webpage slider
- Upload the code to your ESP32 using the Arduino IDE.
- Open the Serial Monitor to find the IP address of the ESP32.
- Enter the IP address in a web browser to access the control interface.
- Adjust the slider to change the duty cycle and observe the LED brightness change in real time.
Serial Monitor:

WEBPAGE:

DEMO:
Customization
This basic example can be easily extended to create more advanced applications. Here are a few ideas:
- Control Multiple LEDs or Devices: By defining additional PWM channels and sliders, you can control multiple LEDs or other PWM-driven devices simultaneously.
- Add Presets: Implement buttons on the web interface to set predefined duty cycles for specific brightness levels or device states.
- Real-Time Monitoring: Display real-time graphs or logs on the web interface to monitor the PWM signal or device performance.
- Integration with Sensors: Combine the PWM control with sensor data (e.g., light or temperature sensors) to create responsive systems like automatic dimming or climate control.
- Authentication and Security: Add user authentication and HTTPS to protect your web interface from unauthorized access.
- Mobile-Friendly UI: Use CSS frameworks like Bootstrap to make the interface more appealing and responsive on mobile devices.
Conclusion
This project demonstrates how to create a user-friendly web interface to control hardware using the ESP32. Using this ESP32 Webserver PWM Control project, you can create responsive and efficient IoT applications. Extend this concept to control motors, RGB LEDs, or other devices for more advanced projects!
Thank You!!!
In case you missed:
Part 1: Getting Started With The ESP32 Web Server: Hello World! – ArduinoYard
Part 2: ESP32 Webserver LED Control: Toggle An LED Using A Webpage – ArduinoYard