In this article we will learn how to use Rotary Encoder with Arduino. A rotary encoder is a device that converts rotational motion into electrical signals. It is often used to detect position, speed, and direction of rotation. Unlike a potentiometer, a rotary encoder is not limited to a finite range, making it suitable for infinite rotation.
Key Features:
- Incremental Encoder: Outputs pulses indicating rotation and direction.
- Push Button: Many rotary encoders include a built-in push button for additional functionality.
Read more about rotary encoders: Rotary Encoders | How it works, Application & Advantages
Components Needed
- Arduino board (e.g., Uno, Nano)
- Rotary encoder module
- Jumper wires
- Breadboard (optional)
Wiring the Rotary Encoder with arduino
Here’s how to connect the rotary encoder with Arduino UNO board:
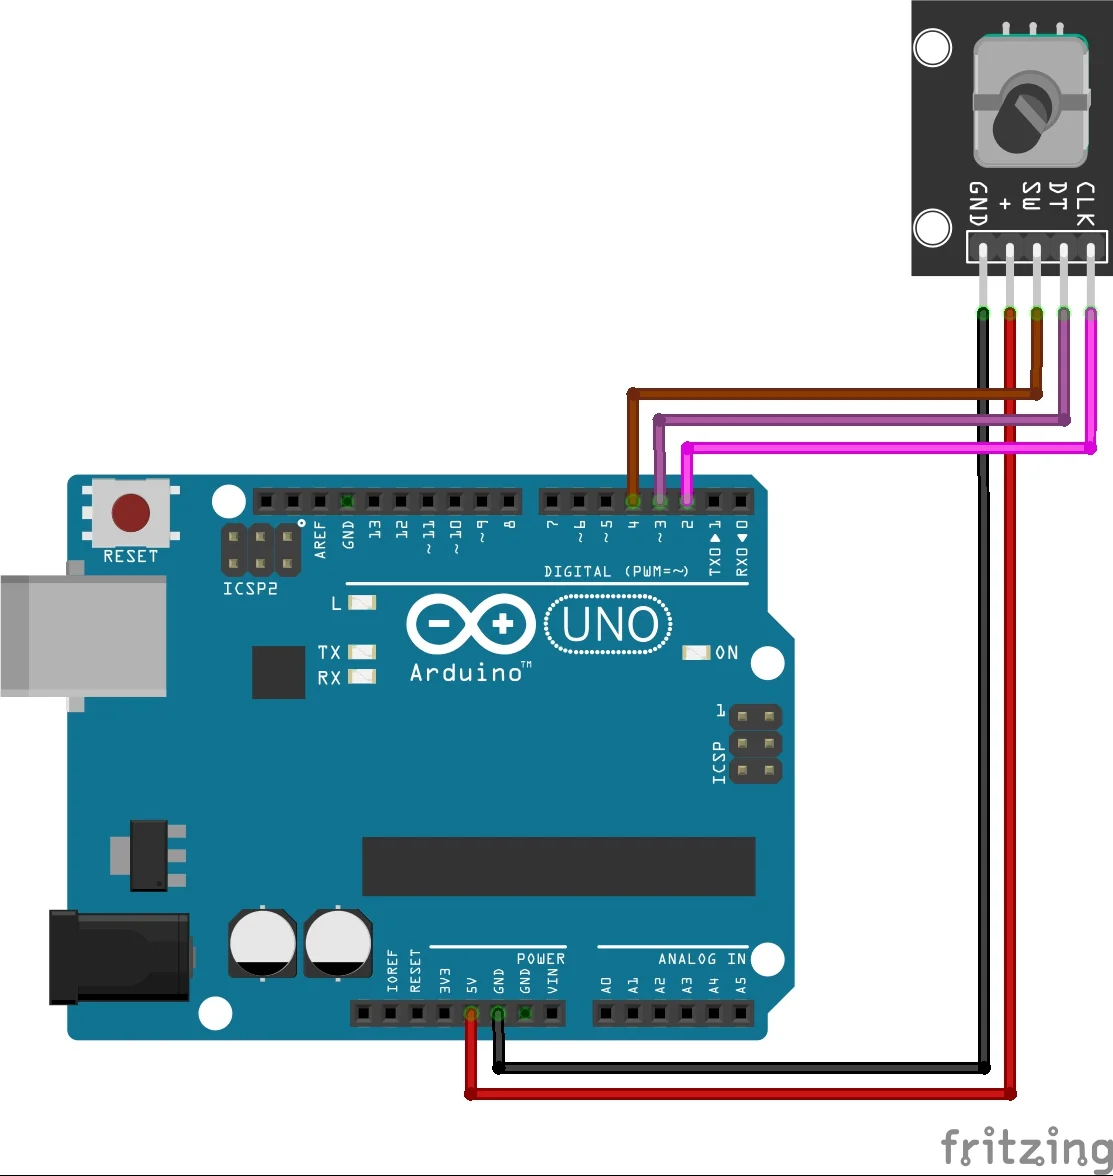
| Rotary Encoder Pin | Arduino Pin |
|---|---|
| GND | GND |
| VCC | 5V |
| CLK (Clock) | Pin 2 |
| DT (Data) | Pin 3 |
| SW (Switch) | Pin 4 |
Arduino Code
Using interrupts, the Arduino can instantly detect signal changes from the rotary encoder. This ensures high accuracy, even during rapid rotations. Here’s the code:
#define CLK 2 // Clock pin connected to interrupt
#define DT 3  // Data pin connected to interrupt
#define SW 4  // Switch pin

volatile int counter = 0;
volatile bool rotated = false;

void setup() {
  pinMode(CLK, INPUT);
  pinMode(DT, INPUT);
  pinMode(SW, INPUT_PULLUP); // Use pull-up resistor for the switch

  // Attach interrupts to the CLK and DT pins
  attachInterrupt(digitalPinToInterrupt(CLK), readEncoder, CHANGE);
  attachInterrupt(digitalPinToInterrupt(DT), readEncoder, CHANGE);

  Serial.begin(9600);
}

void loop() {
  // Print the counter value only when a rotation is detected
  if (rotated) {
    Serial.print("Counter: ");
    Serial.println(counter);
    rotated = false; // Reset the flag
  }

  // Check if the button is pressed
  if (digitalRead(SW) == LOW) {
    Serial.println("Button Pressed");
    delay(50); // Debounce delay
  }
}

void readEncoder() {
  static int lastStateDT = digitalRead(DT);

  int stateCLK = digitalRead(CLK);
  int stateDT = digitalRead(DT);

  // Determine the rotation direction
  if (stateCLK != lastStateDT) {
    if (stateDT != stateCLK) {
      counter++; // Clockwise rotation
    } else {
      counter--; // Counterclockwise rotation
    }
    rotated = true; // Set flag for loop to print the counter
  }

  lastStateDT = stateCLK;
}
How It Works
- Interrupts for Precision: The Arduino listens for changes on the
CLKandDTpins using interrupts, capturing every movement, even at high speeds. - Direction Detection: The code compares the state of
CLKandDTto determine whether the rotation is clockwise or counterclockwise. - Button Press: The
SWpin is polled in the loop to detect button presses, which can trigger additional functionality in your project.
Testing the Setup
- Upload the code to your Arduino board.
- Open the Serial Monitor at 9600 baud.
- Rotate the encoder clockwise or counterclockwise. The counter value will increase or decrease.
- Press the encoder’s button to display a “Button Pressed” message.

Advantages of Using Interrupts
- Accuracy: Interrupts capture every change in signal, even during fast rotations.
- Efficiency: The Arduino can focus on other tasks when no signal change occurs.
- Responsiveness: The encoder’s movements are processed in real time, ensuring smooth operation.
Applications
- Menu navigation in embedded systems
- Motor speed and position control
- Audio volume adjustment
- Precision measurement devices
Conclusion
Rotary encoders are powerful input devices that provide precision and versatility for a variety of applications. You can achieve high accuracy and responsiveness, even for fast or frequent rotation by using rotary encoder with arduino microcontrollers. This setup is ideal for projects requiring real-time control, such as menu navigation or motor control. The built-in push button adds extra functionality, making the encoder even more versatile. With minimal components and easy integration, a rotary encoder is a must-have for any Arduino project. Try it out and unlock its potential for your next creation!
Thank you!!!
You can find more arduino sensor guides on this website:
0.96 Inch I2C OLED Display With Arduino – ArduinoYard
How To Use Ultrasonic Sensor HC-SR04 With Arduino: A Beginner’s Guide – ArduinoYard
Using IR Sensor With Arduino (Proximity Sensor) – Easy Guide – ArduinoYard