
Introduction
In this guide, we’ll explore how to use the 28BYJ-48 Stepper Motor with Arduino, driven by the ULN2003 Driver Module. Stepper motors are ideal for projects requiring precise position control, such as robot arms, CNC machines, and automatic curtains.
This complete guide will cover working, wiring, code, libraries, and troubleshooting, so you can confidently use this motor in your Arduino projects.
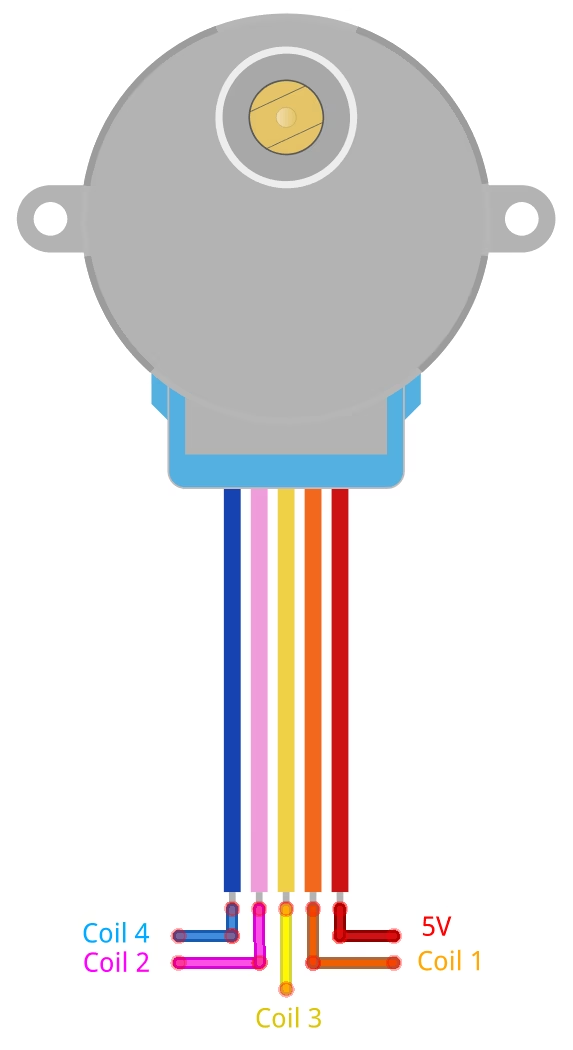
What is a 28BYJ-48 Stepper Motor?
The 28BYJ-48 is a popular unipolar stepper motor commonly used in hobby electronics and automation projects. It features an internal geared reduction system, making it suitable for low-speed, high-torque applications.
Specifications:
- Rated Voltage: Typically 5V, but can operate at 5V–12V depending on the driver and application.
- Gear Ratio: 64:1 (though the exact ratio is slightly different, around 63.683:1)
- Step Angle: 5.625° per step (before gearing)
- Steps per Revolution: 2048 (full-step mode), 4096 (half-step mode) after gear reduction
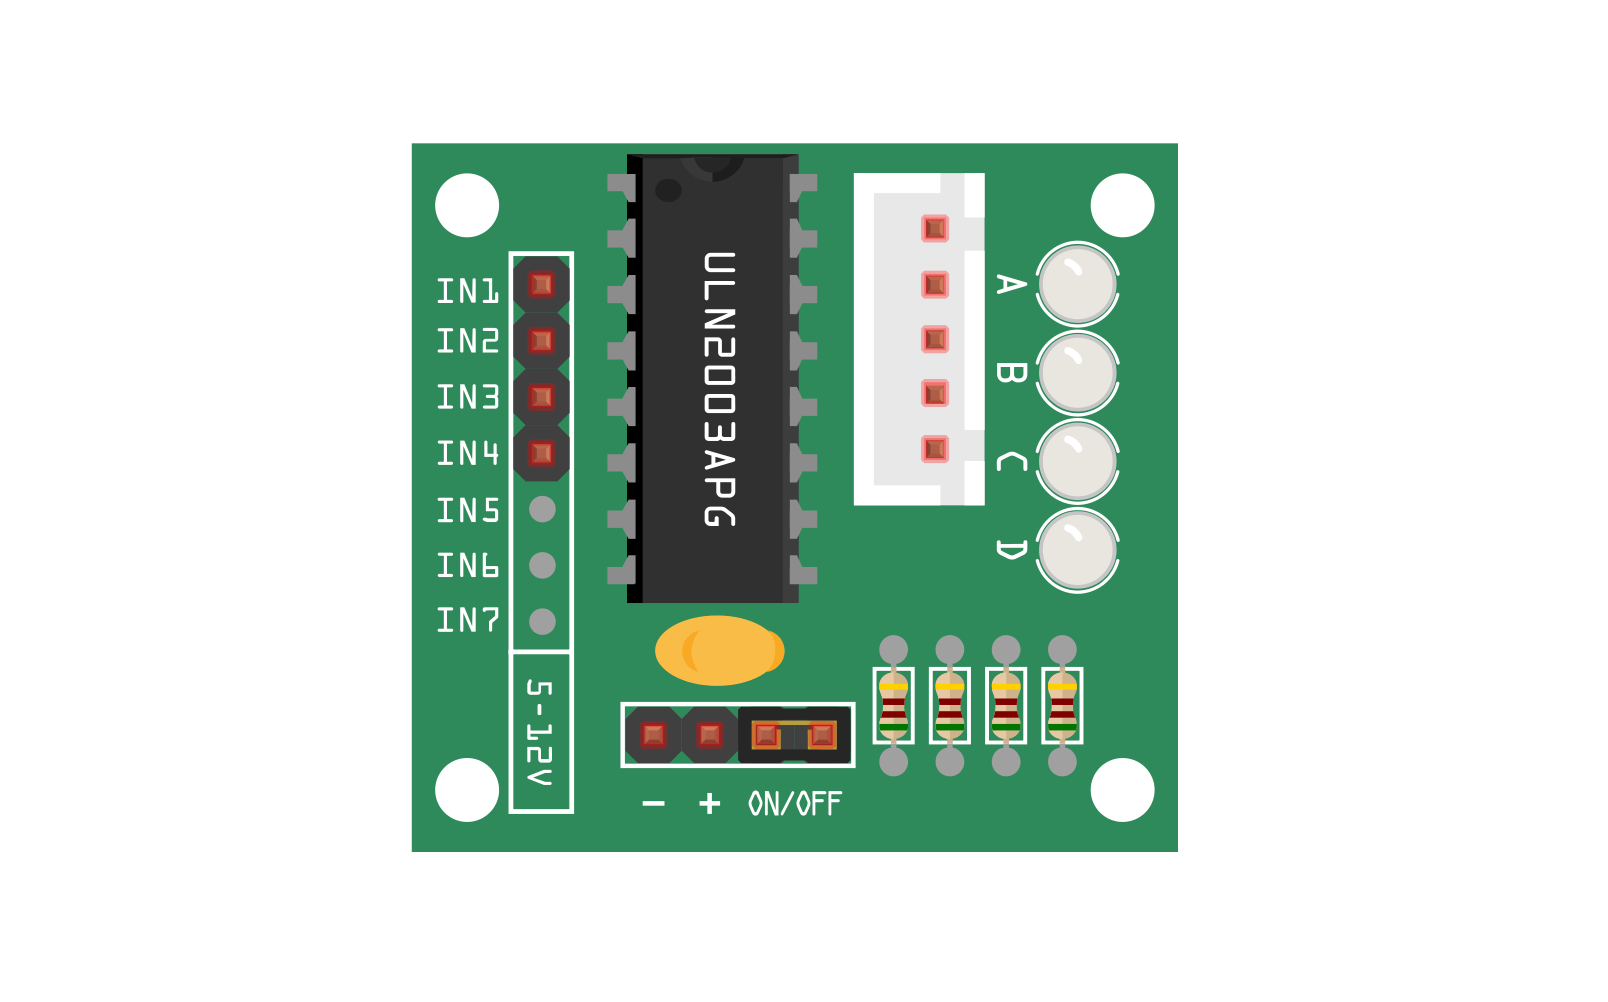
What is ULN2003 Stepper Driver Module?
The ULN2003 is a Darlington transistor array module designed to drive the 28BYJ-48 stepper motor efficiently. It acts as an interface between the Arduino and the motor, allowing easy step control while handling the higher current required by the motor.
Key Features:
- Works with 5V-12V input (indicated on the board)
- 4 LEDs for visual indication of step sequences
- Simple 4-wire control (IN1, IN2, IN3, IN4)
- Can only drive unipolar stepper motors like the 28BYJ-48
Components Required
To complete this project, you’ll need:
- Arduino UNO
- 28BYJ-48 Stepper Motor
- ULN2003 Driver Module
- Jumper Wires
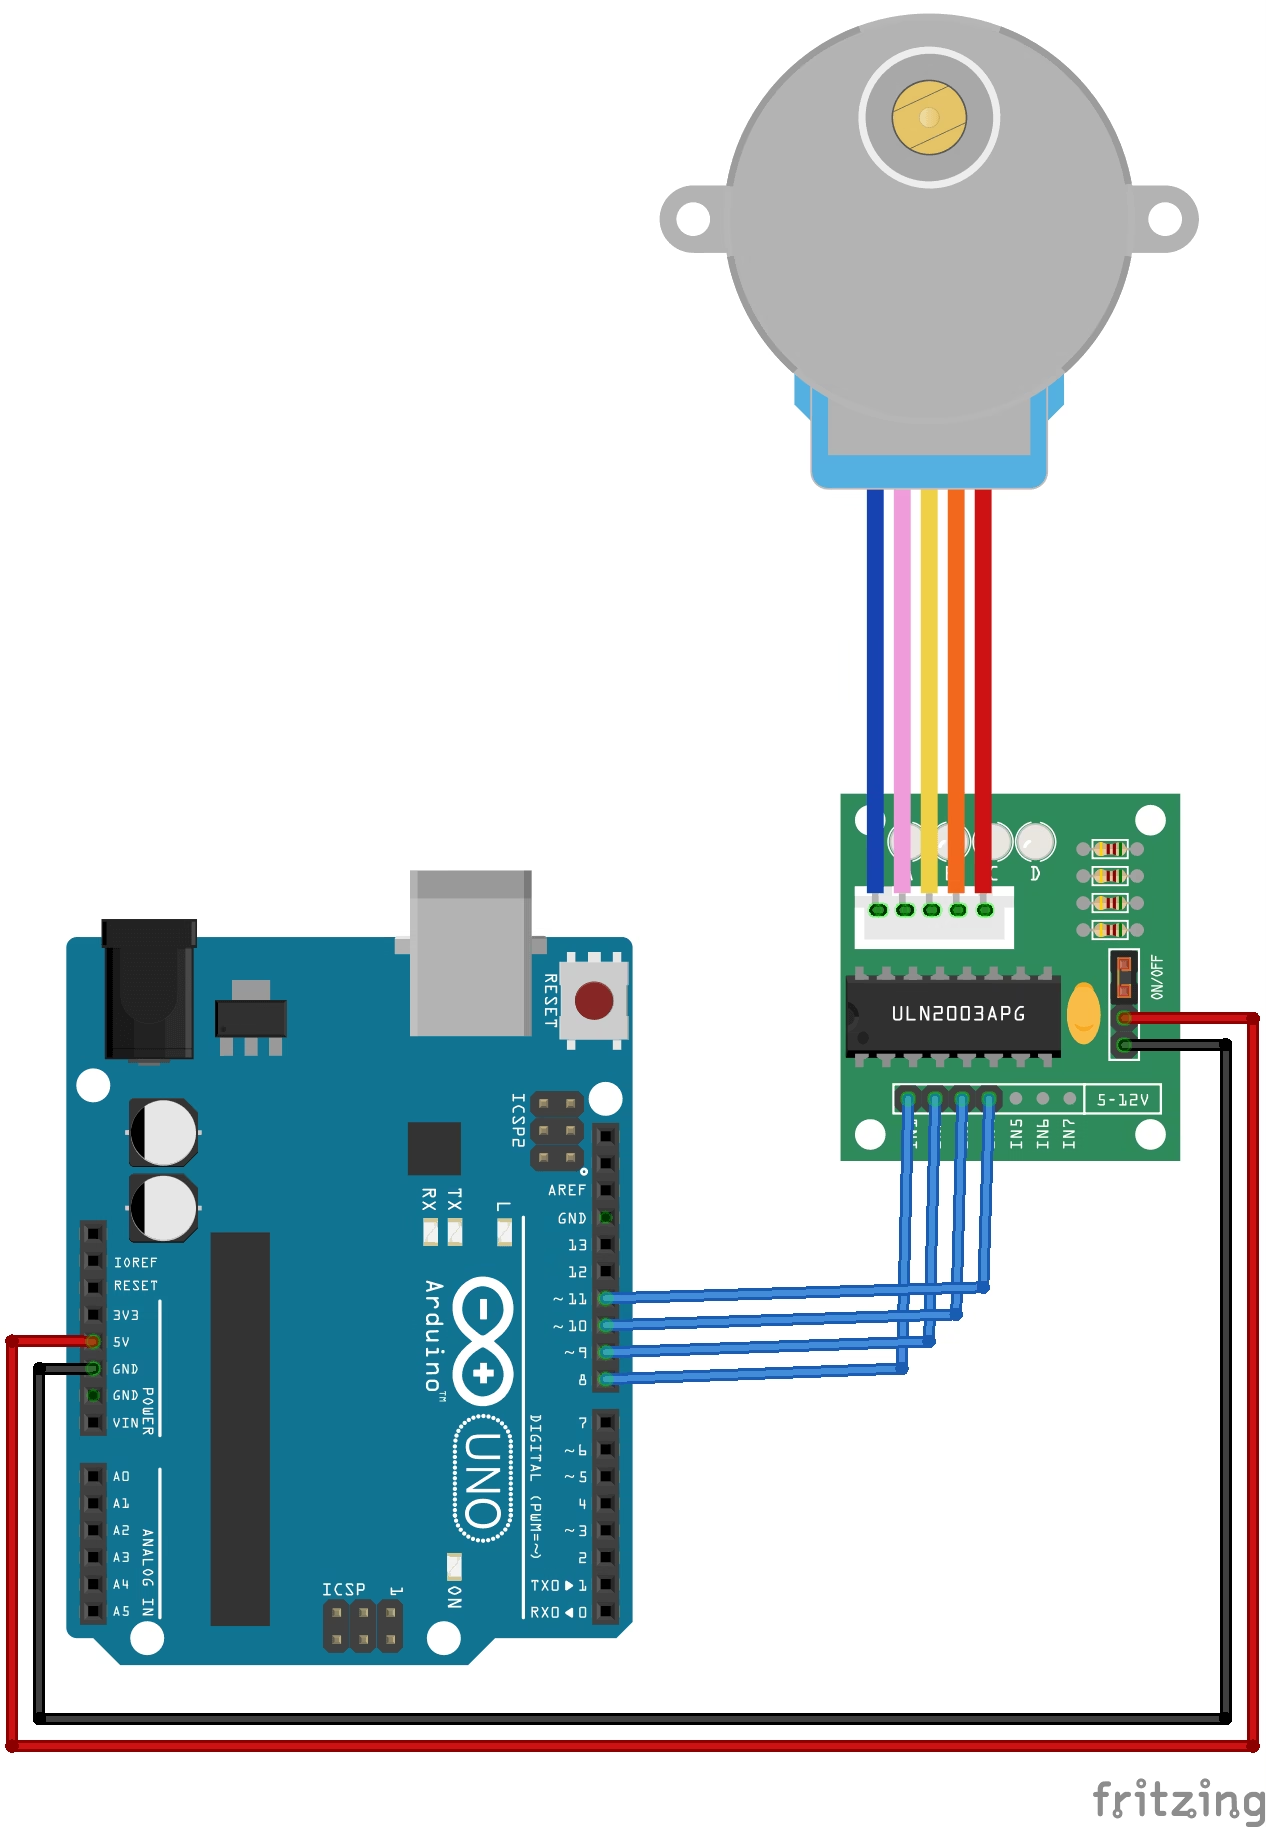
Wiring Diagram – 28BYJ-48 with Arduino
Connection Table
| ULN2003 Pin | Arduino Pin |
|---|---|
| IN1 | 8 |
| IN2 | 9 |
| IN3 | 10 |
| IN4 | 11 |
| VCC | 5V |
| GND | GND |
The 28BYJ-48 motor connects directly to the white socket on the ULN2003 board.
Library Installation
To easily control the stepper motor, we’ll use the Stepper library included with Arduino IDE. No need for extra downloads.
Arduino Code – Basic Example
Here’s the simplest example to rotate the motor one full revolution in both directions:
// 28BYJ-48 Stepper Motor with Arduino - Basic
#include <Stepper.h>

// Steps per revolution for 28BYJ-48
const int stepsPerRevolution = 2048;

// Define stepper motor object
Stepper myStepper(stepsPerRevolution, 8, 10, 9, 11);

void setup() {
  myStepper.setSpeed(10); // RPM
}

void loop() {
  myStepper.step(stepsPerRevolution); // One full rotation clockwise
  delay(1000);
  myStepper.step(-stepsPerRevolution); // One full rotation counter-clockwise
  delay(1000);
}
Explanation
Stepperobject connects to Arduino pins 8, 9, 10, and 11.stepsPerRevolutiondefines how many steps make one full rotation.setSpeed()sets rotation speed in RPM.step()moves the motor forward or backward.
Demo
Circuit Explanation
The ULN2003 Driver Module receives step sequences from Arduino and powers the stepper coils in order. This controlled coil activation produces precise rotational movement.
Step Sequence Example (Full-Step Mode)
| Step | IN1 | IN2 | IN3 | IN4 | Motor Movement |
|---|---|---|---|---|---|
| 1 | HIGH | LOW | LOW | LOW | First step |
| 2 | LOW | HIGH | LOW | LOW | Second step |
| 3 | LOW | LOW | HIGH | LOW | Third step |
| 4 | LOW | LOW | LOW | HIGH | Fourth step |
- The sequence then repeats continuously to keep the motor rotating.
- The motor direction can be reversed by changing the step order.
Understanding Steps, Gearing, and Precision
The 28BYJ-48 uses a built-in gear reduction of 64:1. Combined with its 5.625° step angle, this gives:
Steps per Revolution = 64 × (360° ÷ 5.625°) = 2048 steps per full rotation
This high step count makes it very precise (perfect for small robots, valves, and positioning systems).
Common Problems & Troubleshooting
1. Motor Not Moving
- Double-check wiring.
- Ensure you power the motor from Arduino 5V pin (or external supply if motor stalls).
2. Motor Jitters but Doesn’t Turn
- Sequence might be wrong — double-check the pin order in the
Stepperobject.
3. Weak Torque
- Ensure proper supply voltage (5V regulated).
- Don’t try to power from weak sources like USB power banks.
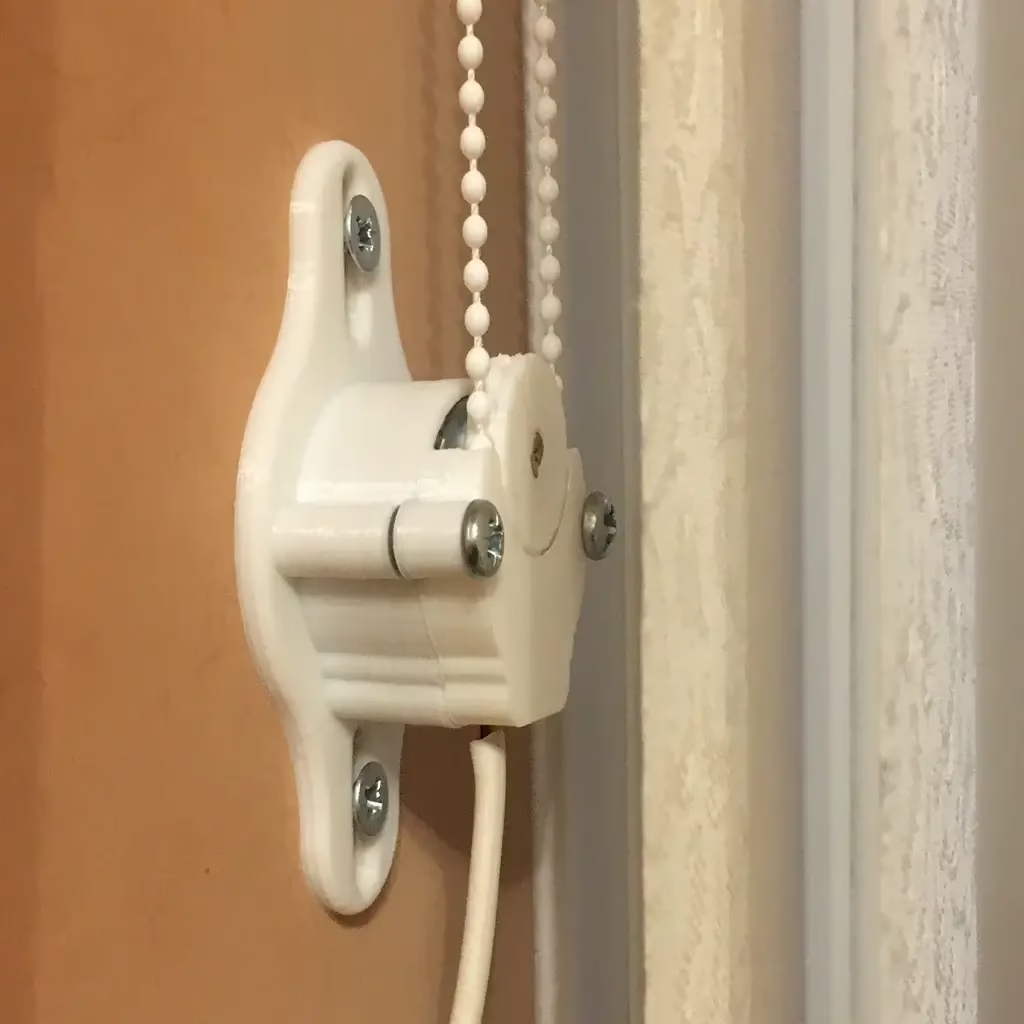
Applications of 28BYJ-48 Stepper Motor
This motor is used in:
- Smart Home Projects (automatic curtains, valve controls)
- 3D Printers (small axis movement)
- Camera Pan/Tilt systems
- Robots & Mechatronics Projects
Advanced Tip: Half-Step Mode
For smoother movement, you can use half-step mode, where the motor takes 4096 steps per rotation. This improves accuracy at the cost of speed.
Full Code with Half-Step Mode
// 28BYJ-48 Stepper Motor with Arduino - Half Step
#include <Stepper.h>

// Half-step mode = 4096 steps per revolution
const int stepsPerRevolution = 4096;

// Initialize stepper
Stepper myStepper(stepsPerRevolution, 8, 10, 9, 11);

void setup() {
  myStepper.setSpeed(10); // RPM
}

void loop() {
  myStepper.step(stepsPerRevolution); // One full rotation
  delay(1000);
  myStepper.step(-stepsPerRevolution); // Reverse rotation
  delay(1000);
}
Conclusion
The 28BYJ-48 stepper motor with Arduino is an excellent starting point if you want to learn stepper motor control. It’s affordable, easy to use, and works perfectly with the ULN2003 driver module. With this guide, you should be ready to use this motor in your next Arduino project.