Introduction
The DFPlayer Mini with ESP32 is a powerful combination that lets you add high-quality audio playback to your projects without the need for external MP3 decoders or internet streaming. This tiny MP3 module plays files directly from a microSD card and is ideal for smart systems, interactive devices, or fun DIY electronics.
In this guide, you’ll learn how to connect and program the DFPlayer Mini with ESP32, prepare the microSD card, and use sample code to start playing MP3 files in minutes.
Features of DFPlayer Mini
- Supports MP3 and WAV audio formats.
- Works with microSD cards (FAT16 and FAT32, up to 32GB).
- Built-in 3W amplifier for direct speaker connection.
- Serial communication with Microcontroller via UART (TX/RX pins).
- Supports playback control (Next, Previous, Play, Pause, Volume Up/Down).
- Operates on 3.3V–5V (compatible with ESP32 logic levels)
Components Required
To use DFPlayer Mini with ESP32, you’ll need the following:
- ESP32 Development Board
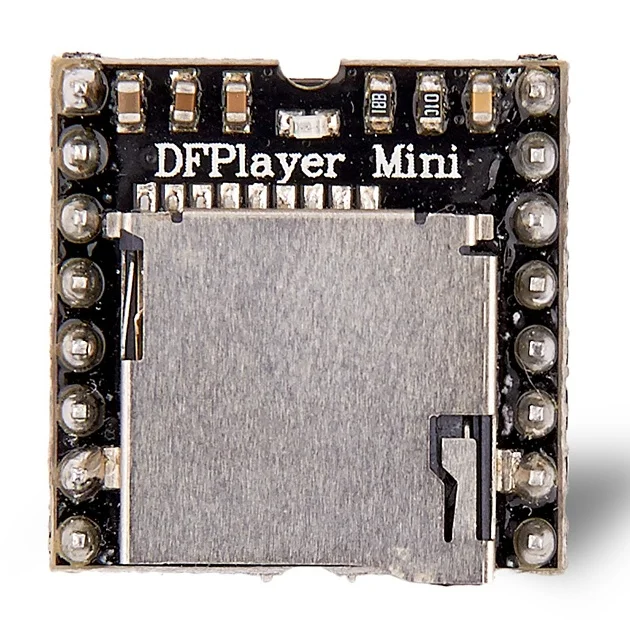
- DFPlayer Mini MP3 Module
- microSD Card (formatted to FAT32)
- 3W Speaker
- Jumper Wires
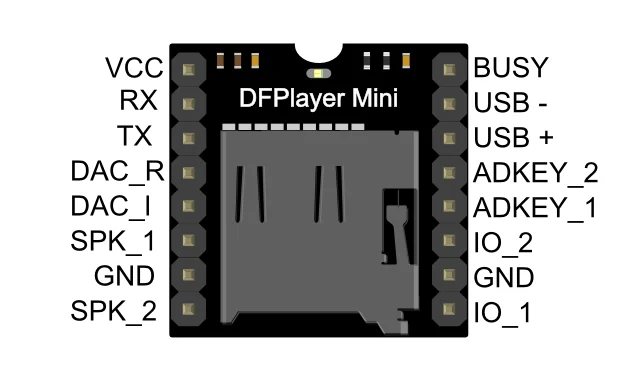
DFPlayer Mini Pinout
| Pin | Description |
|---|---|
| VCC | Input Voltage (3.2V–5V) |
| GND | Ground |
| RX | Serial input (from ESP32 TX) |
| TX | Serial output (to ESP32 RX) |
| SPK1/2 | Speaker output + / – |
| DAC_L/R | Audio output (for amplifiers) |
| BUSY | Playback status indicator |
| IO1/IO2 | Trigger pins (not used here) |
For more detailed specifications visit DFRobot Wiki page.
Wiring DFPlayer Mini with ESP32
Connection Table
| DFPlayer Mini | ESP32 |
|---|---|
| VCC | 5V (Vin) |
| GND | GND |
| RX | GPIO17 |
| TX | GPIO16 |
| SPK1/SPK2 | Speaker + / – |
💡 No resistor is needed. ESP32 uses 3.3V logic, and the DFPlayer Mini accepts it directly. Connect RX and TX pins as shown.

📝 Note: Not sure which GPIO pins to use on your ESP32? Check out our complete ESP32 Pinout Reference Guide to learn about all the input/output pins, UART, PWM, ADC, and more.
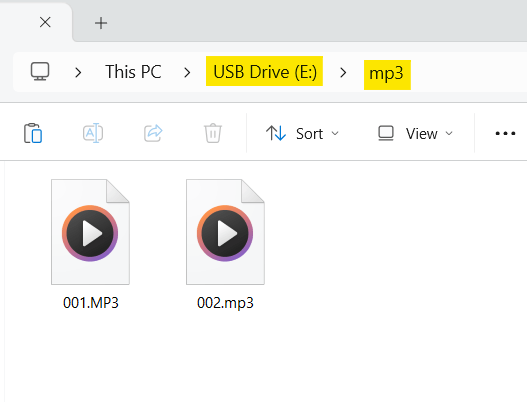
Preparing the microSD Card
- Format the microSD card to FAT32.
- Create a folder named
mp3. - Rename MP3 files in the format
0001.mp3,0002.mp3, etc. - Insert the SD card into DFPlayer Mini.
Installing DFPlayer Mini Library
To control the DFPlayer Mini with Arduino, we use the DFRobotDFPlayerMini library.
Steps:
- Open Arduino IDE.
- Go to Sketch → Include Library → Manage Libraries.
- Search for DFRobotDFPlayerMini and install it.
Arduino Code for DFPlayer Mini with ESP32
// DFPlayer Mini with ESP32 - ArduinoYard
#include "HardwareSerial.h"
#include "DFRobotDFPlayerMini.h"

HardwareSerial mySerial(1);  // Use UART1
DFRobotDFPlayerMini myDFPlayer;

void setup() {
  Serial.begin(115200);
  mySerial.begin(9600, SERIAL_8N1, 16, 17);  // RX = 16, TX = 17

  if (!myDFPlayer.begin(mySerial)) {
    Serial.println("DFPlayer Mini not detected!");
    while (1)
      ;
  }

  Serial.println("DFPlayer Mini ready!");
  myDFPlayer.volume(25);  // Volume level (0–30)
  Serial.println("Playing File 001.mp3");
  myDFPlayer.play(1);  // Play first track (0001.mp3)
}

void loop() {
  // Nothing in loop
}Code Explanation
HardwareSerial mySerial(1): Initializes UART1mySerial.begin(9600, SERIAL_8N1, 16, 17): Uses GPIO16 for RX, GPIO17 for TXmyDFPlayer.begin(mySerial): Starts communication with DFPlayermyDFPlayer.volume(25): Sets medium volumemyDFPlayer.play(1): Plays file0001.mp3
Demostration
Serial Monitor Output:

DEMO Video:
This demo was make on Arduino UNO, you should expect same output using the setup explained above.
Additional DFPlayer Mini Commands
| Command | Function |
myDFPlayer.next(); | Play next track |
myDFPlayer.previous(); | Play previous track |
myDFPlayer.pause(); | Pause playback |
myDFPlayer.start(); | Resume playback |
myDFPlayer.volume(10); | Set volume (0-30) |
myDFPlayer.playFolder(2, 5); | Play file 5 from folder 2 |
Troubleshooting Tips
Not detecting DFPlayer Mini?
- Double-check TX/RX pin numbers and wiring
- Ensure baud rate is 9600
- Make sure
myDFPlayer.begin()is successful
No audio output?
- Use a proper speaker (not a buzzer)
- Confirm file name format:
0001.mp3,0002.mp3, etc. - Format the SD card as FAT32 (not exFAT)
Poor audio quality?
- Use a clean 5V power supply
- Avoid long wires to the speaker
- Check speaker impedance (4Ω or 8Ω, 3W recommended)
Conclusion
Using the DFPlayer Mini with ESP32 is a great way to add sound, music, or voice interaction to your embedded systems. With just two UART pins, you can control tracks, adjust volume, and trigger specific audio events in your projects. It’s perfect for home automation, alarms, interactive installations, and more.
What’s Next?
Now that you’ve learned to use the DFPlayer Mini with ESP32, try building one of these:
- 🔔 Smart Doorbell with Voice Feedback
- 🎮 Talking Quiz Game using Buttons and DFPlayer
- 🚶 Motion-Sensing Welcome System
- 🎤 ESP32-based Voice Announcement System
Subscribe to the ArduinoYard YouTube Channel for detailed project videos and tutorials!
on your diagram for the MINI DFPLAYER. WHY DN’T YOU SHOW THE POWER TO THE ESP32.
Newby
regards
al, eatherall
ESP32 can be powered from its USB port or by giving 5V on the Vin pin.