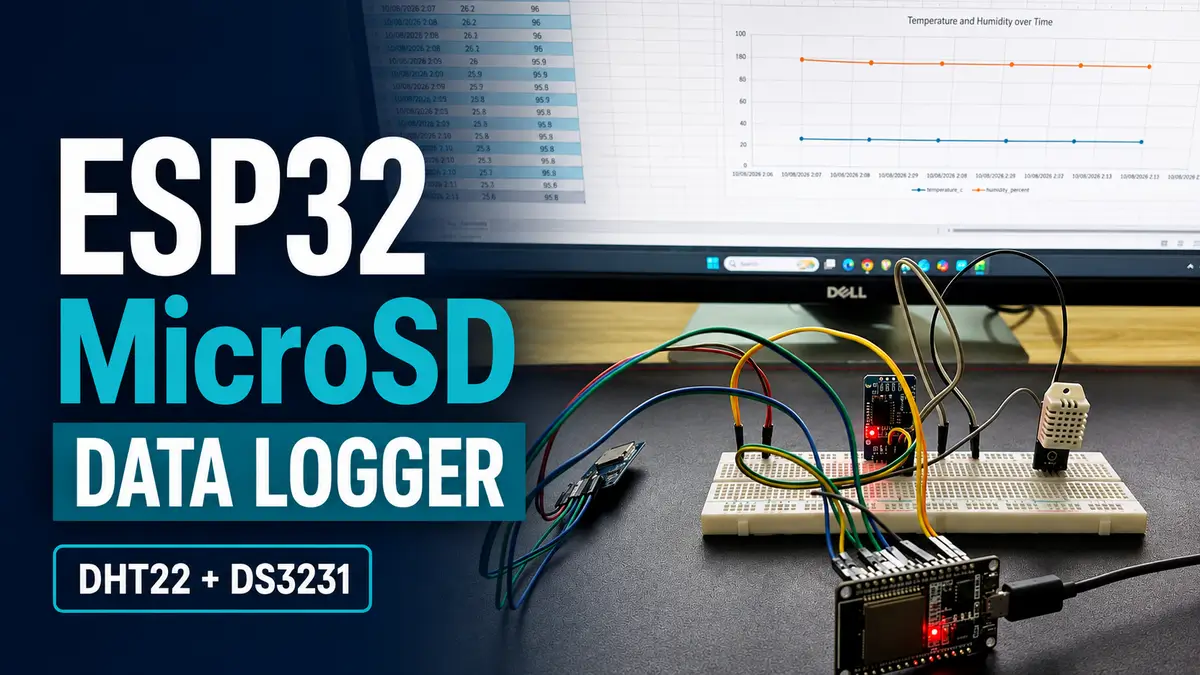
An ESP32 MicroSD data logger is a simple way to record sensor readings without depending on Wi-Fi, a cloud service, or a continuously connected computer. The ESP32 reads a sensor at a fixed interval and saves each measurement to a CSV file on a MicroSD card. You can then remove the card and open the file directly in Excel, Google Sheets, LibreOffice Calc, Python, or another data-analysis tool.
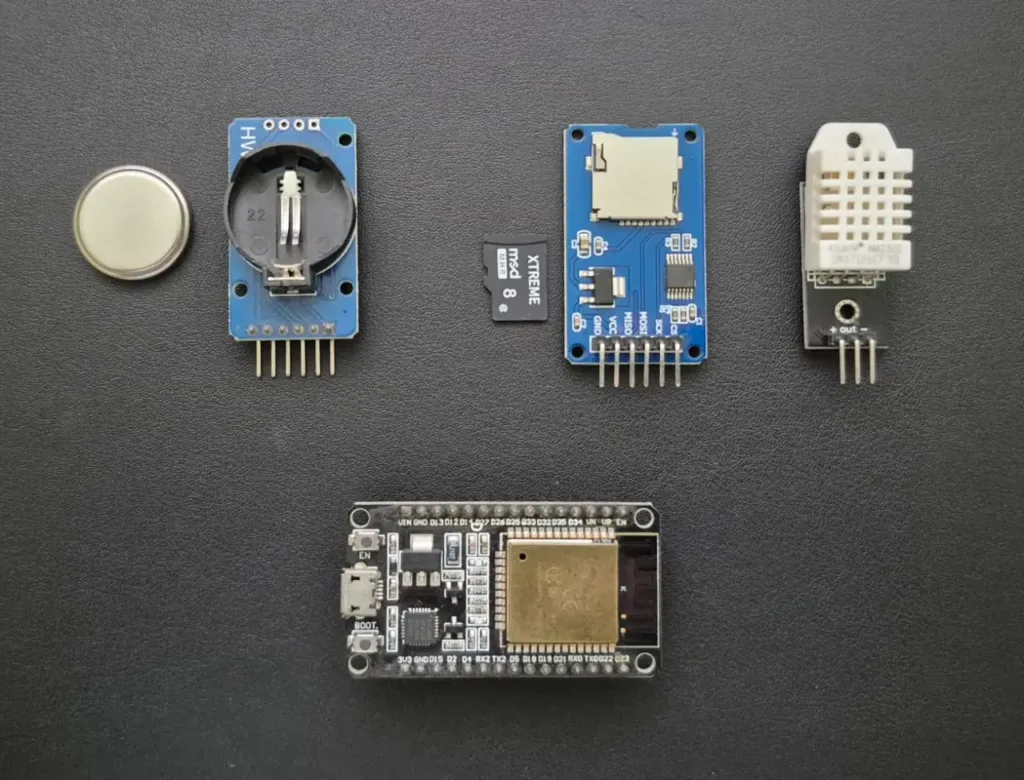
In this tutorial, we will build a complete environmental data logger using:
- An ESP32 development board
- A DHT22 temperature and humidity sensor
- A DS3231 real-time clock (RTC)
- An SPI MicroSD card module
The finished logger works without an internet connection. It records accurate date and time, temperature, and humidity in a separate CSV file for each day.
Unlike a minimal data-logging example, the code in this project also:
- Creates the CSV header automatically
- Rejects invalid sensor readings instead of writing
nan - Uses
millis()scheduling instead of blocking the program with a longdelay() - Opens and closes the file for every record to reduce data loss after an unexpected reset
- Uses a conservative SPI clock for better compatibility with inexpensive MicroSD modules
- Retries the MicroSD card if initialization or a write operation fails
What Is an ESP32 Data Logger?
A data logger measures one or more signals and stores the results for later analysis. The measured data might be temperature, humidity, pressure, voltage, current, light level, GPS position, machine vibration, or almost anything else an ESP32 can read.
The ESP32 has internal flash storage, but a MicroSD card is more convenient when you need:
- Long recording periods
- Easy removal of the recorded data
- Files that can be opened on a computer
- More storage than the ESP32’s internal filesystem
- Offline operation where Wi-Fi may be unavailable
This project saves the readings as CSV, or comma-separated values. CSV is plain text, but spreadsheet applications recognize its columns automatically.
An example row looks like this:
timestamp,temperature_c,humidity_percent
2026-08-06 14:35:20,28.42,61.37
How This ESP32 MicroSD Data Logger Works
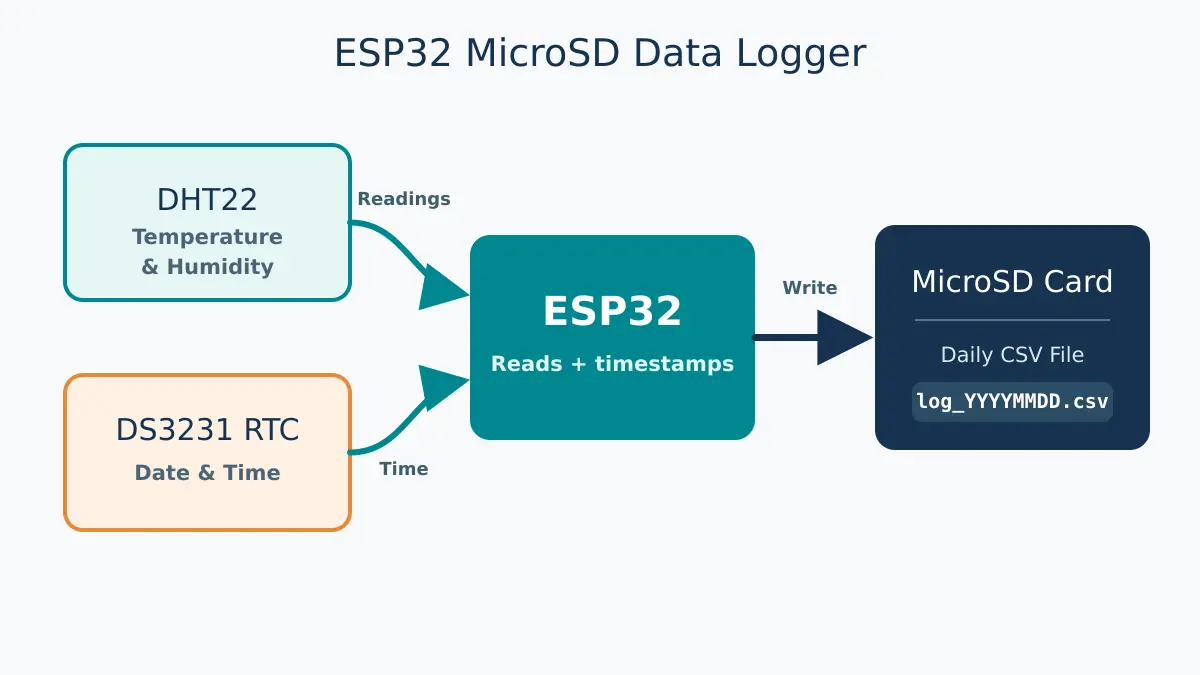
The DHT22 provides temperature and humidity readings. The DS3231 provides the current date and time, even if the ESP32 is restarted or disconnected from power. The ESP32 combines those values into a CSV row and writes it to the MicroSD card over SPI.
The program creates a daily filename such as:
/log_20260806.csvAt midnight, the date changes and the next reading is automatically stored in a new file. This prevents one CSV file from growing indefinitely and makes long deployments easier to organize.
Watch the ESP32 Data Logger Demo
This demonstration shows the ESP32 reading the DHT22 sensor, adding DS3231 timestamps, and saving the measurements as daily CSV files on the MicroSD card.
Components Required
| Component | Quantity | Purpose |
|---|---|---|
| ESP32 DevKit V1 or compatible ESP32 board | 1 | Main controller |
| SPI MicroSD card module | 1 | Interfaces the card with the ESP32 |
| MicroSD card, preferably 8–32 GB | 1 | Stores the CSV files |
| DHT22 sensor or DHT22 module | 1 | Measures temperature and humidity |
| DS3231 RTC module with backup cell | 1 | Maintains the date and time offline |
| 10 kΩ resistor | 1 | DHT22 data pull-up; not required on most three-pin DHT22 modules |
| Breadboard and jumper wires | — | Circuit assembly |
| USB cable | 1 | Programming and power |
If you are new to the sensor, see our DHT22 with ESP32 guide. We also have separate guides for the DS3231 RTC module and SD card module.
Important MicroSD Module Voltage Note
A MicroSD card itself uses 3.3 V power and logic, but breakout modules are not all designed in the same way.
- A 3.3 V-only breakout should be powered from the ESP32’s 3V3 pin.
- A larger module with an onboard regulator and level-shifting circuit may have a 5V or VIN input and may require 5 V at that input.
- Never apply 5 V directly to an ESP32 GPIO pin or to a bare MicroSD card.
Check the labels and documentation for your exact module. This tutorial assumes the signal pins are compatible with the ESP32’s 3.3 V logic. If your module has an AMS1117 regulator and a pin labelled 5V or VIN, power that input as specified by its manufacturer; the SPI signal connections remain the same.
Also check the backup-cell requirements of your DS3231 board. Some RTC modules include a charging circuit and should not be fitted with a non-rechargeable coin cell while that charging circuit is active.
ESP32 Data Logger Wiring
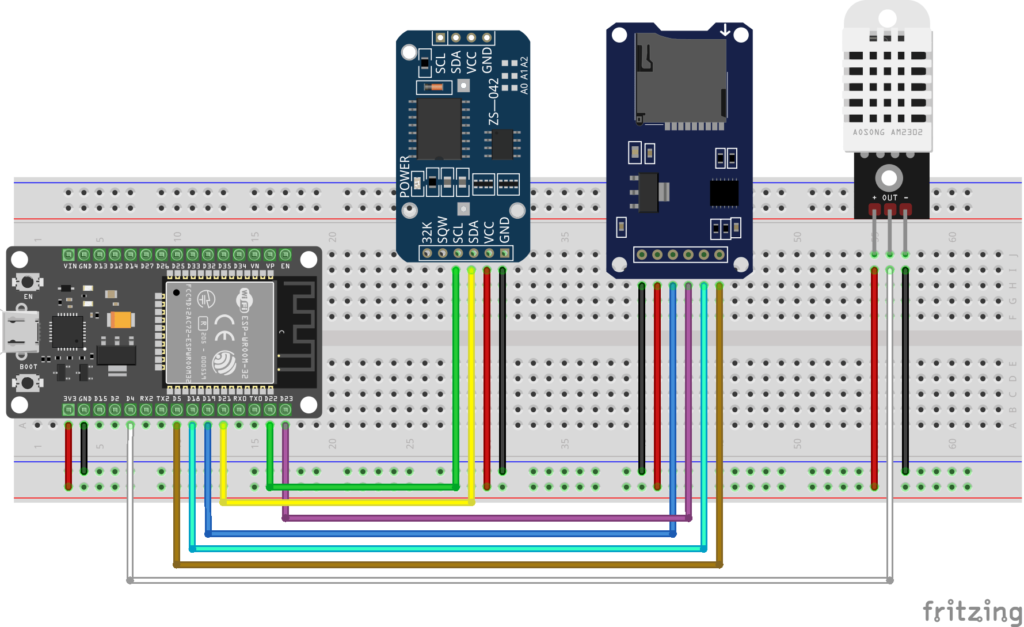
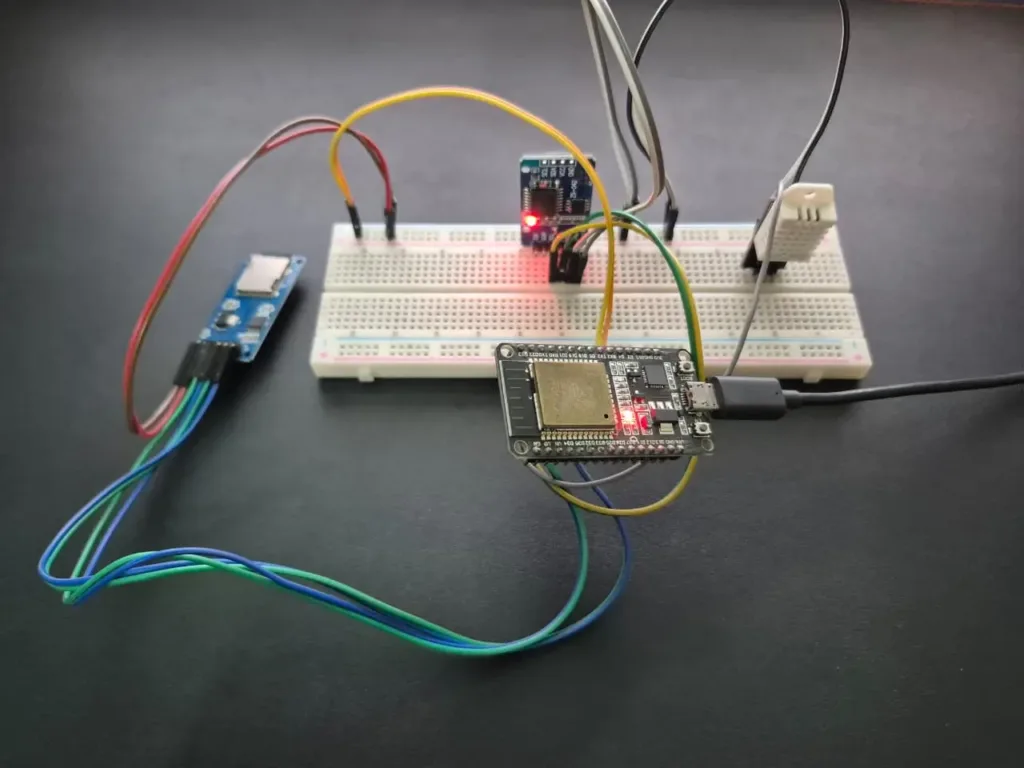
This guide uses the common 30-pin ESP32 DevKit V1. The MicroSD module uses the ESP32’s default VSPI pins, while the DS3231 uses the default I2C pins.
MicroSD Card Module to ESP32
| MicroSD module | ESP32 DevKit V1 | Function |
| CS | GPIO 5 | Chip select |
| SCK or CLK | GPIO 18 | SPI clock |
| MISO or DO | GPIO 19 | Data from card to ESP32 |
| MOSI or DI | GPIO 23 | Data from ESP32 to card |
| GND | GND | Common ground |
| VCC | 3.3 V or module-rated VIN | See the voltage note above |
DHT22 to ESP32
| DHT22 | ESP32 DevKit V1 |
| VCC | 3.3 V |
| DATA | GPIO 4 |
| GND | GND |
When using a bare four-pin DHT22, connect a 10 kΩ resistor between VCC and DATA. Most three-pin DHT22 breakout modules already contain this pull-up resistor.
DS3231 RTC to ESP32
| DS3231 | ESP32 DevKit V1 |
| VCC | 3.3 V |
| GND | GND |
| SDA | GPIO 21 |
| SCL | GPIO 22 |
Keep the SPI wires short, especially SCK, MOSI, and MISO. Loose breadboard wires are one of the most common causes of intermittent card-mount and file-write failures.
Prepare the MicroSD Card
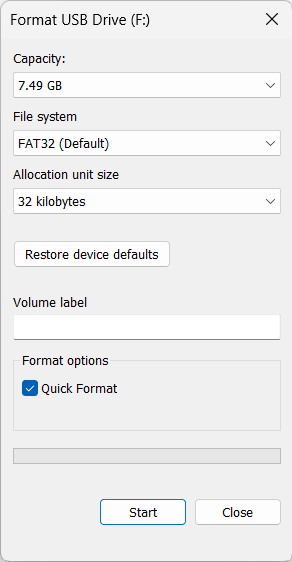
For the simplest setup, use an 8 GB, 16 GB, or 32 GB card formatted as FAT32. The standard Arduino SD workflow supports FAT16 and FAT32; many cards larger than 32 GB are supplied as exFAT and may not mount without reformatting or a different filesystem configuration.
- Back up any files already stored on the card.
- Insert the card into a computer.
- Format it as FAT32.
- Use the default allocation size unless you have a specific reason to change it.
- Eject the card properly and insert it into the MicroSD module before powering the ESP32.
If a previously used card behaves unpredictably, use the official SD Memory Card Formatter and try again. For a beginner project, a 32 GB-or-smaller card is usually easier than forcing FAT32 onto a larger SDXC card.
Prepare the Arduino IDE
Install the current stable esp32 by Espressif Systems board package through the Arduino IDE Boards Manager. Then select the correct board and port. For a common ESP32 DevKit, ESP32 Dev Module is normally suitable.
The following libraries are already included with the ESP32 board package:
SPISDWire
Install these additional libraries through Tools > Manage Libraries or the Library Manager icon:
- DHT sensor library by Adafruit
- Adafruit Unified Sensor
- RTClib by Adafruit
The Adafruit Unified Sensor library is a dependency of the DHT library. Installing it now prevents the common Adafruit_Sensor.h: No such file or directory compilation error.
Step 1: Test the MicroSD Card First
Test the card and SPI wiring before connecting the result to the sensor code. This separates storage problems from DHT22 or RTC problems.
Upload the following sketch:
#include <SPI.h>
#include <SD.h>

const uint8_t SD_CS   = 5;
const uint8_t SD_SCK  = 18;
const uint8_t SD_MISO = 19;
const uint8_t SD_MOSI = 23;
const uint32_t SD_SPI_FREQUENCY = 4000000UL;

void setup() {
  Serial.begin(115200);
  delay(1000);

  SPI.begin(SD_SCK, SD_MISO, SD_MOSI, SD_CS);

  if (!SD.begin(SD_CS, SPI, SD_SPI_FREQUENCY)) {
    Serial.println("ERROR: MicroSD card mount failed.");
    return;
  }

  if (SD.cardType() == CARD_NONE) {
    Serial.println("ERROR: No MicroSD card detected.");
    return;
  }

  uint64_t cardSizeMB = SD.cardSize() / (1024ULL * 1024ULL);
  Serial.printf("MicroSD card detected: %llu MB\n", cardSizeMB);

  File file = SD.open("/sd_test.txt", FILE_WRITE);
  if (!file) {
    Serial.println("ERROR: Could not create /sd_test.txt");
    return;
  }

  file.println("ESP32 MicroSD test passed.");
  file.close();

  file = SD.open("/sd_test.txt", FILE_READ);
  if (!file) {
    Serial.println("ERROR: Could not reopen /sd_test.txt");
    return;
  }

  Serial.println("File contents:");
  while (file.available()) {
    Serial.write(file.read());
  }
  file.close();

  Serial.println("MicroSD read/write test completed successfully.");
}

void loop() {
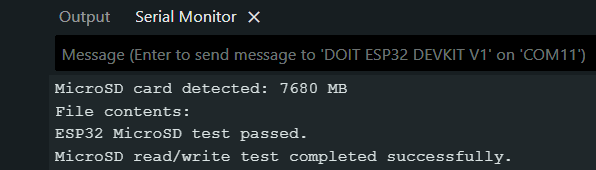
}Open the Serial Monitor at 115200 baud. A successful test should show the card capacity, the text read back from sd_test.txt, and a completion message.
We deliberately initialize the card at 4 MHz. This is the default frequency in the current ESP32 SD library and is more forgiving of long jumper wires and inexpensive modules than an aggressive SPI speed. After the project is stable, advanced users can test a higher frequency if their application needs more throughput.
Step 2: Upload the Complete ESP32 MicroSD Data Logger Code
After the MicroSD test works, upload this complete logger sketch:
#include <Arduino.h>
#include <SPI.h>
#include <SD.h>
#include <Wire.h>
#include <DHT.h>
#include <RTClib.h>

// ---------- Pin configuration ----------
const uint8_t SD_CS   = 5;
const uint8_t SD_SCK  = 18;
const uint8_t SD_MISO = 19;
const uint8_t SD_MOSI = 23;

const uint8_t DHT_PIN  = 4;
const uint8_t I2C_SDA  = 21;
const uint8_t I2C_SCL  = 22;

// ---------- Logger configuration ----------
const uint32_t SD_SPI_FREQUENCY = 4000000UL;  // Reliable starting point
const uint32_t LOG_INTERVAL_MS  = 10000UL;    // One reading every 10 seconds
const uint32_t SD_RETRY_MS      = 5000UL;     // Retry a failed card every 5 s

DHT dht(DHT_PIN, DHT22);
RTC_DS3231 rtc;

bool sdReady = false;
uint32_t lastLogTime = 0;
uint32_t lastSdRetryTime = 0;

bool mountMicroSD() {
  Serial.println("Mounting MicroSD card...");

  if (!SD.begin(SD_CS, SPI, SD_SPI_FREQUENCY)) {
    Serial.println("ERROR: MicroSD card mount failed.");
    return false;
  }

  if (SD.cardType() == CARD_NONE) {
    Serial.println("ERROR: No MicroSD card detected.");
    SD.end();
    return false;
  }

  uint64_t cardSizeMB = SD.cardSize() / (1024ULL * 1024ULL);
  Serial.printf("MicroSD ready: %llu MB\n", cardSizeMB);
  return true;
}

void markMicroSDFailed() {
  SD.end();
  sdReady = false;
  lastSdRetryTime = millis();
  Serial.println("MicroSD unavailable. The ESP32 will retry automatically.");
}

void makeDailyFileName(const DateTime &now, char *fileName, size_t length) {
  snprintf(fileName, length, "/log_%04d%02d%02d.csv",
           (int)now.year(), (int)now.month(), (int)now.day());
}

void makeTimestamp(const DateTime &now, char *timestamp, size_t length) {
  snprintf(timestamp, length, "%04d-%02d-%02d %02d:%02d:%02d",
           (int)now.year(), (int)now.month(), (int)now.day(),
           (int)now.hour(), (int)now.minute(), (int)now.second());
}

bool ensureCsvHeader(const char *fileName) {
  bool needsHeader = true;

  if (SD.exists(fileName)) {
    File existingFile = SD.open(fileName, FILE_READ);
    if (!existingFile) {
      Serial.printf("ERROR: Could not inspect %s\n", fileName);
      return false;
    }

    needsHeader = (existingFile.size() == 0);
    existingFile.close();
  }

  if (!needsHeader) {
    return true;
  }

  File file = SD.open(fileName, FILE_WRITE);
  if (!file) {
    Serial.printf("ERROR: Could not create %s\n", fileName);
    return false;
  }

  size_t bytesWritten =
      file.println("timestamp,temperature_c,humidity_percent");
  bool writeOk = (bytesWritten > 0) && (file.getWriteError() == 0);
  file.close();

  if (!writeOk) {
    Serial.printf("ERROR: Could not write the header to %s\n", fileName);
    return false;
  }

  Serial.printf("Created %s\n", fileName);
  return true;
}

bool appendCsvRow(const char *fileName,
                  const char *timestamp,
                  float temperature,
                  float humidity) {
  File file = SD.open(fileName, FILE_APPEND);
  if (!file) {
    Serial.printf("ERROR: Could not open %s for appending.\n", fileName);
    return false;
  }

  size_t bytesWritten = 0;
  bytesWritten += file.print(timestamp);
  bytesWritten += file.print(',');
  bytesWritten += file.print(temperature, 2);
  bytesWritten += file.print(',');
  bytesWritten += file.println(humidity, 2);

  // close() commits buffered data before the card is used again.
  bool writeOk = (bytesWritten > 0) && (file.getWriteError() == 0);
  file.close();

  if (!writeOk) {
    Serial.printf("ERROR: Write failed for %s\n", fileName);
    return false;
  }

  return true;
}

void readAndLogSensors() {
  float humidity = dht.readHumidity();
  float temperature = dht.readTemperature();

  if (isnan(temperature) || isnan(humidity)) {
    Serial.println("WARNING: Invalid DHT22 reading; this sample was skipped.");
    return;
  }

  if (!sdReady) {
    Serial.println("WARNING: Reading not saved because MicroSD is unavailable.");
    return;
  }

  DateTime now = rtc.now();
  char fileName[24];
  char timestamp[20];

  makeDailyFileName(now, fileName, sizeof(fileName));
  makeTimestamp(now, timestamp, sizeof(timestamp));

  if (!ensureCsvHeader(fileName) ||
      !appendCsvRow(fileName, timestamp, temperature, humidity)) {
    markMicroSDFailed();
    return;
  }

  Serial.printf("Saved: %s, %.2f C, %.2f %%RH -> %s\n",
                timestamp, temperature, humidity, fileName);
}

void setup() {
  Serial.begin(115200);
  delay(1000);

  dht.begin();
  Wire.begin(I2C_SDA, I2C_SCL);

  if (!rtc.begin()) {
    Serial.println("FATAL: DS3231 RTC not found. Check SDA, SCL, and power.");
    while (true) {
      delay(1000);
    }
  }

  if (rtc.lostPower()) {
    Serial.println("RTC lost power. Setting it to the sketch compile time.");
    rtc.adjust(DateTime(F(__DATE__), F(__TIME__)));
  }

  SPI.begin(SD_SCK, SD_MISO, SD_MOSI, SD_CS);
  sdReady = mountMicroSD();
  lastSdRetryTime = millis();

  // Make the first measurement immediately.
  lastLogTime = millis() - LOG_INTERVAL_MS;

  Serial.println("ESP32 MicroSD data logger started.");
}

void loop() {
  uint32_t currentTime = millis();

  if (!sdReady &&
      (uint32_t)(currentTime - lastSdRetryTime) >= SD_RETRY_MS) {
    lastSdRetryTime = currentTime;
    sdReady = mountMicroSD();
  }

  if ((uint32_t)(currentTime - lastLogTime) >= LOG_INTERVAL_MS) {
    lastLogTime = currentTime;
    readAndLogSensors();
  }
}How the Data Logger Code Works
1. Pin and interval settings
The pin definitions match the wiring tables above. LOG_INTERVAL_MS controls the logging interval:
const uint32_t LOG_INTERVAL_MS = 10000UL;The value is in milliseconds, so 10000 means ten seconds. The DHT22 should not be sampled more frequently than once every two seconds. For long-term environmental monitoring, ten seconds, one minute, or several minutes is normally more useful.
2. The MicroSD card is mounted conservatively
mountMicroSD() initializes SPI storage at 4 MHz, confirms that a card is present, and prints its capacity. If mounting fails, the main loop tries again every five seconds instead of permanently freezing the ESP32.
This retry is useful during testing if the card is initially missing or a loose connection briefly interrupts communication. Do not treat it as permission to hot-remove the card during a write.
3. The RTC keeps time without Wi-Fi
The DS3231 is read through I2C on GPIO 21 and GPIO 22. When the RTC reports that it lost backup power, the sketch sets it to the date and time at which the code was compiled:
rtc.adjust(DateTime(F(__DATE__), F(__TIME__)));Compilation time is normally close enough for a general logger. For precise clock setting, temporarily replace it with an explicit value:
rtc.adjust(DateTime(2026, 8, 6, 14, 30, 0));Upload once, confirm the time, and then remove or comment out the explicit adjustment. If you leave an unconditional adjustment in the sketch, every ESP32 restart will reset the RTC to that old value.
The DS3231 stores the time you give it; it does not automatically know your time zone or daylight-saving rules.
4. A new CSV file is selected each day
makeDailyFileName() generates a filename using the RTC date. The logger therefore writes to log_20260806.csv on August 6, for example, and automatically switches to the next file after midnight.
5. The CSV header is written only once
Before appending a reading, ensureCsvHeader() checks whether the daily file already contains data. A new or empty file receives this header:
timestamp,temperature_c,humidity_percentThe header makes the file understandable without requiring the reader to inspect the code.
6. Invalid readings are rejected
DHT sensors occasionally return an invalid value because of wiring, timing, or electrical noise. The program checks both readings with isnan() and skips that sample. This is preferable to filling the CSV file with unusable nan entries.
7. Each record is committed before the next sample
The logger opens the file, appends one row, and closes it. Closing the file commits buffered data and greatly reduces the amount of recent data at risk if the ESP32 resets or loses power.
This approach is ideal for slow sensors such as the DHT22. A high-speed vibration or audio logger should instead buffer multiple samples and write them in blocks, accepting that more buffered data can be lost during a sudden power failure.
Step 3: Test the Complete Data Logger
- Insert the prepared MicroSD card.
- Power the assembled circuit from USB.
- Upload the complete sketch.
- Open the Serial Monitor at 115200 baud.
- Confirm that the RTC and MicroSD card initialize successfully.
- Let the circuit record several samples.
Typical Serial Monitor output should resemble:
Mounting MicroSD card...
MicroSD ready: 15185 MB
ESP32 MicroSD data logger started.
Created /log_20260806.csv
Saved: 2026-08-06 14:35:20, 28.42 C, 61.37 %RH -> /log_20260806.csv
Saved: 2026-08-06 14:35:30, 28.44 C, 61.29 %RH -> /log_20260806.csv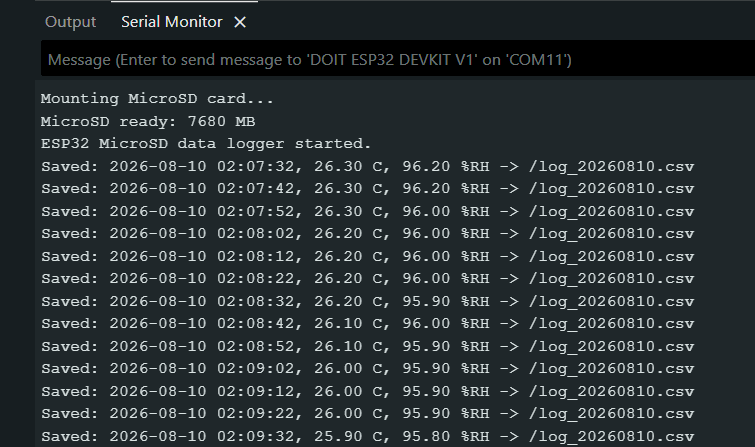
When you have collected enough test data, disconnect power before removing the card. Open the card on your computer and look for a file such as log_20260806.csv.
The contents should look like this:
timestamp,temperature_c,humidity_percent
2026-08-06 14:35:20,28.42,61.37
2026-08-06 14:35:30,28.44,61.29
2026-08-06 14:35:40,28.45,61.18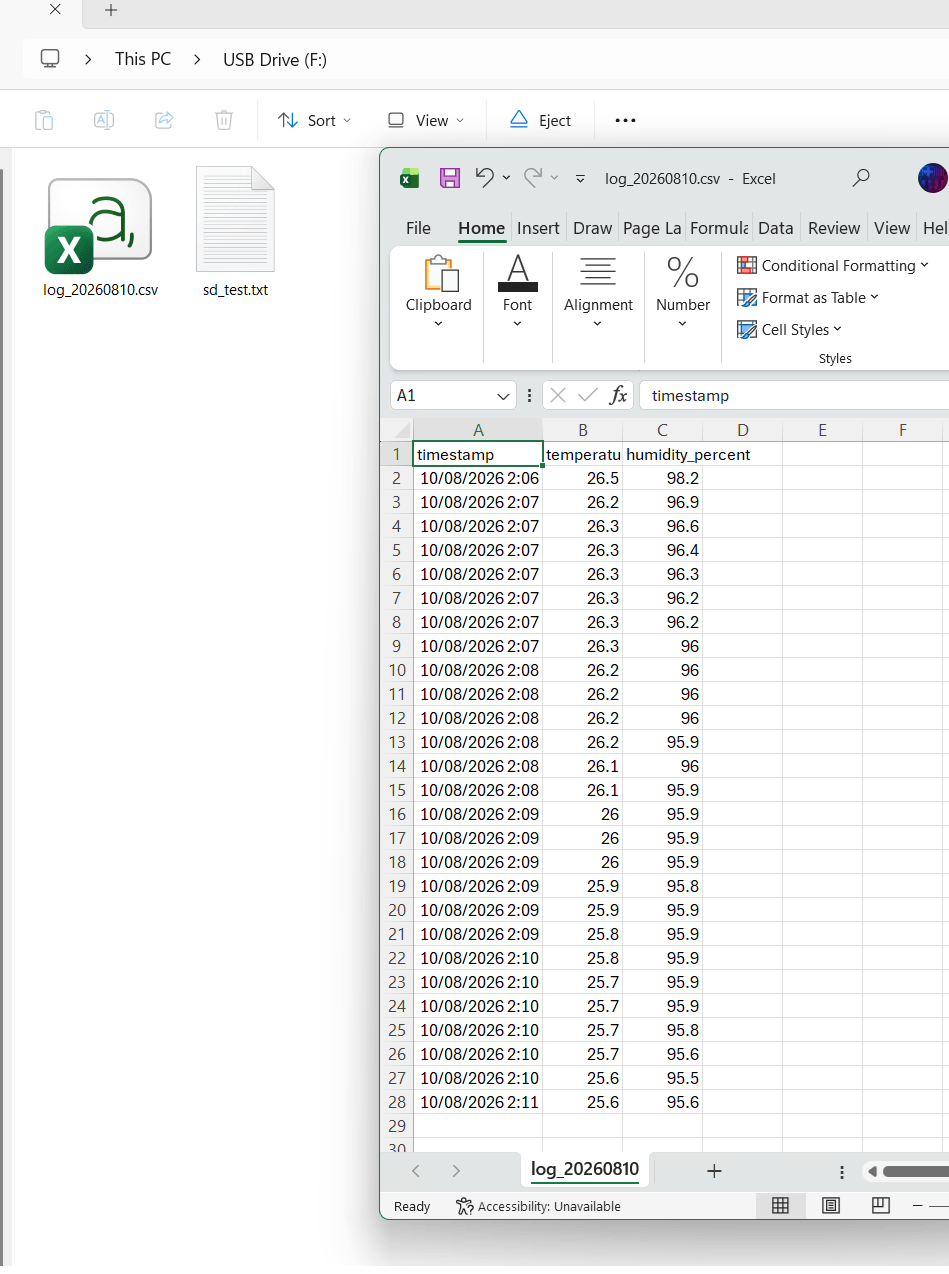
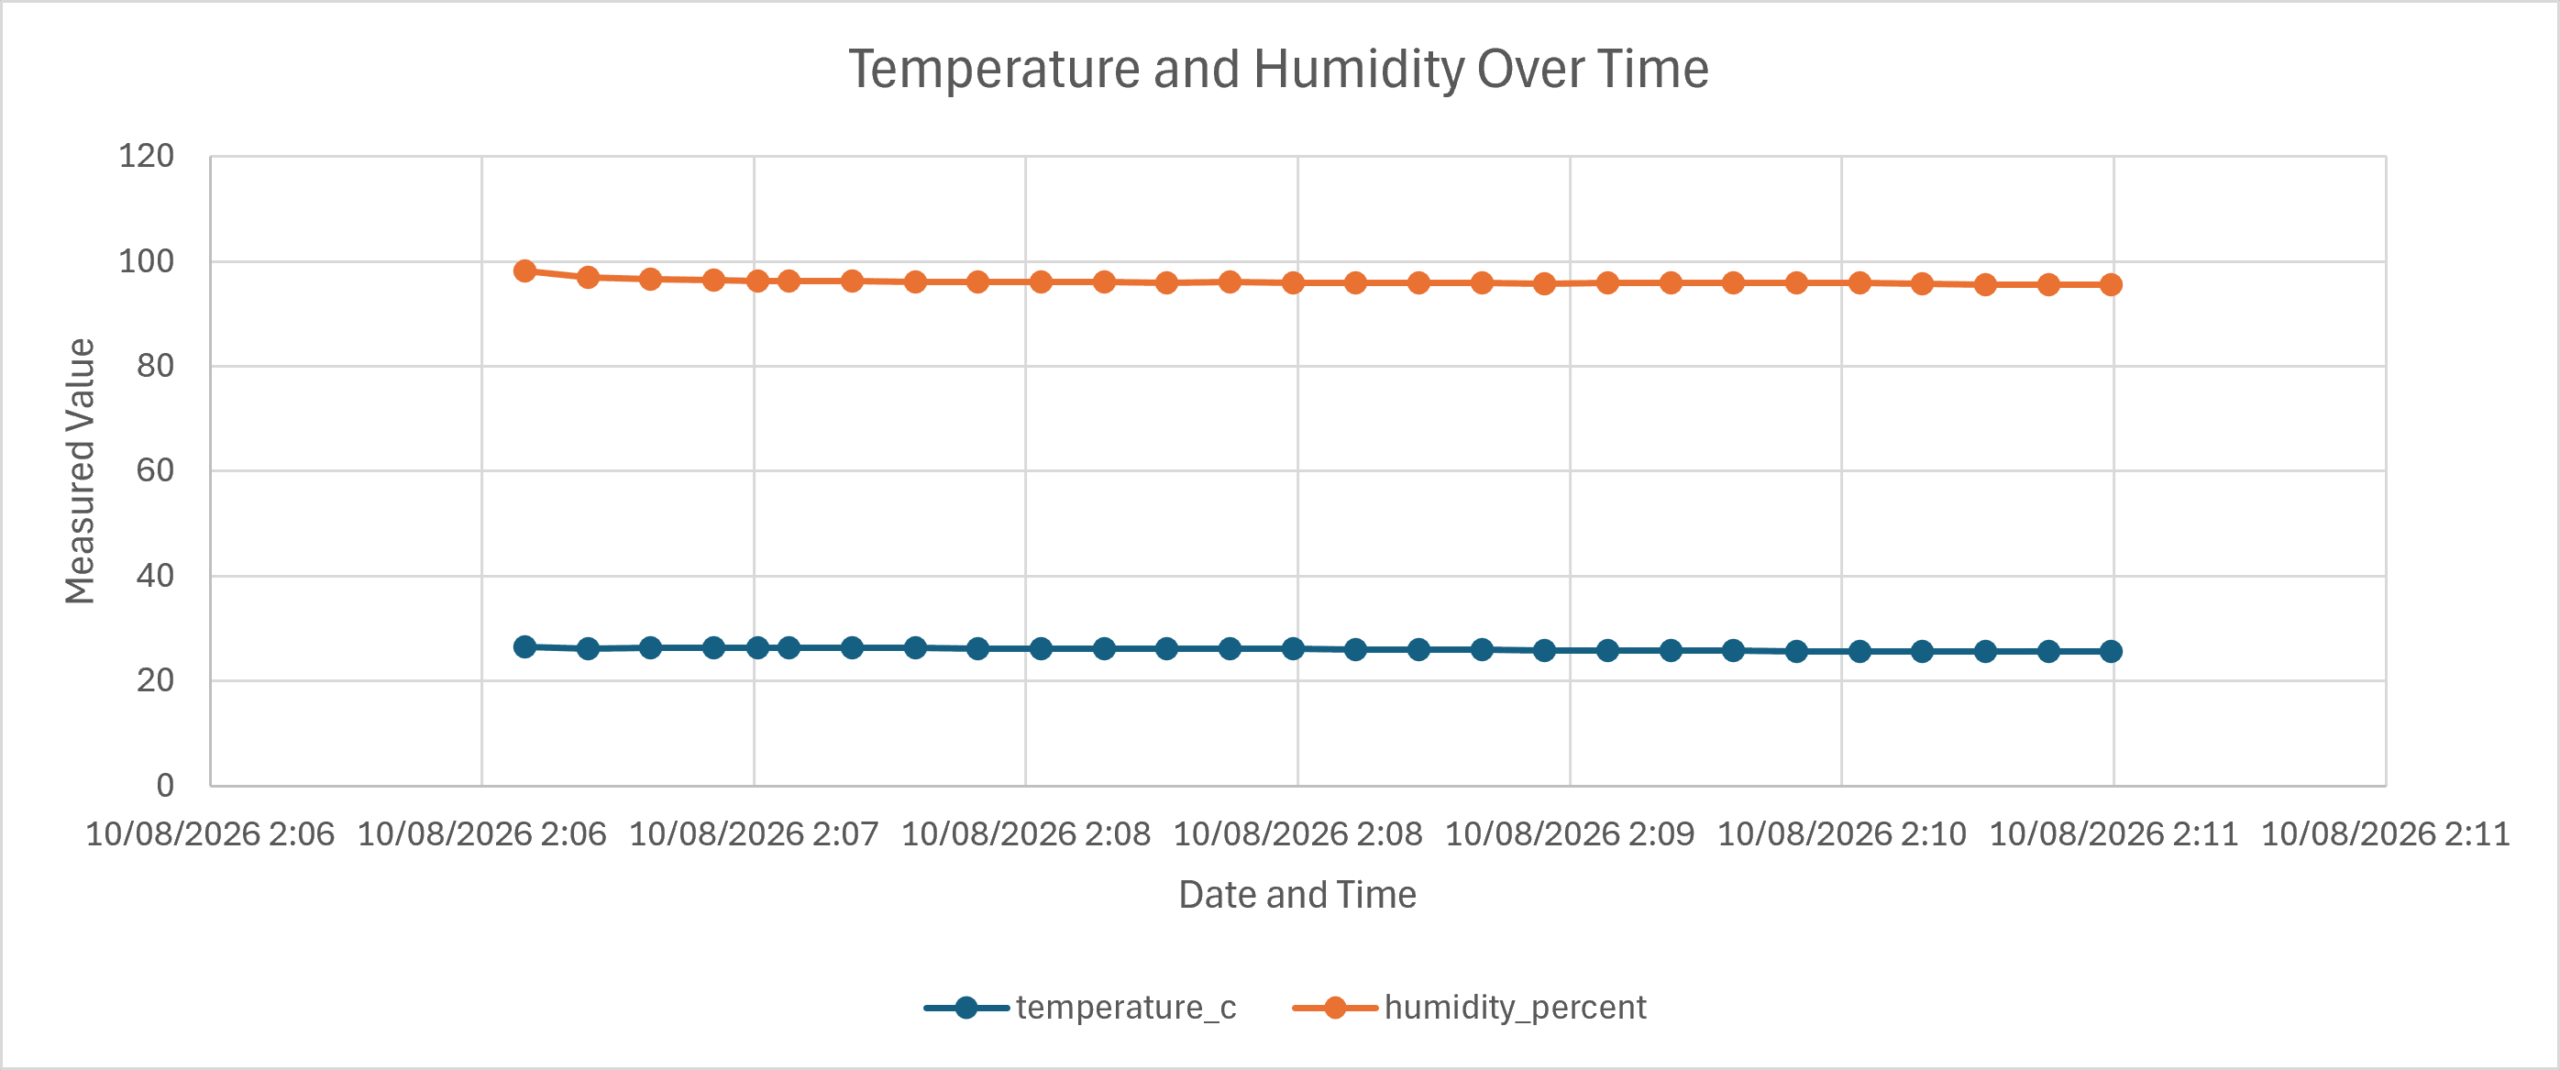
Create a Temperature and Humidity Chart
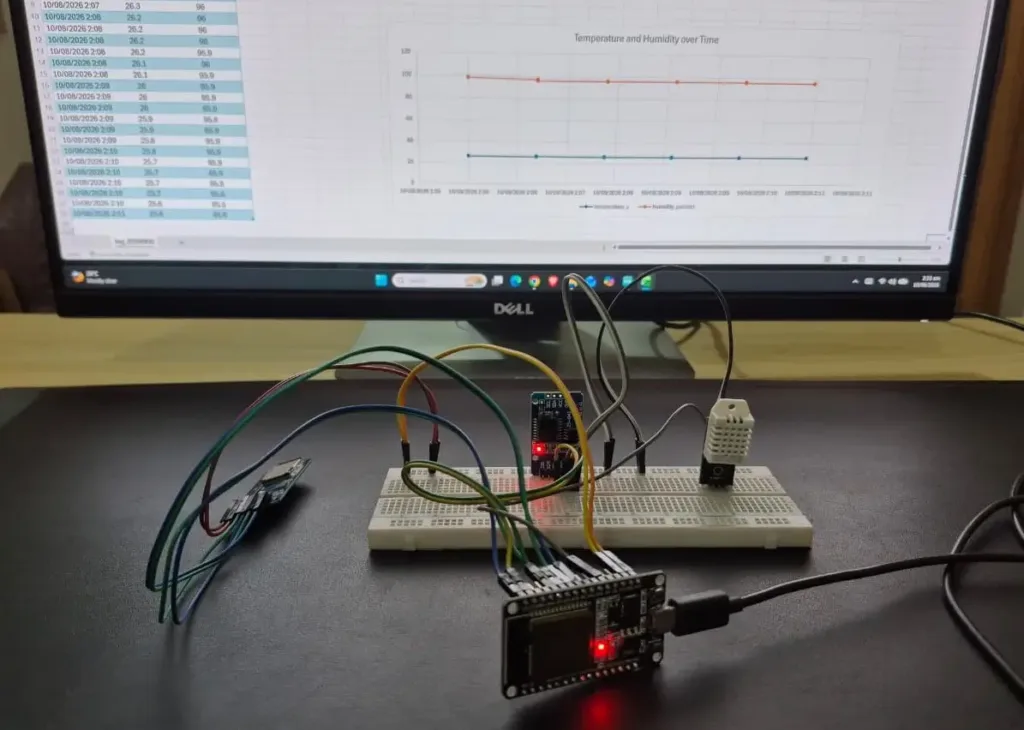
Open the CSV file in Excel, Google Sheets, or LibreOffice Calc. Select the timestamp, temperature, and humidity columns, then insert a line chart.
Because temperature and relative humidity use different units, the chart is easier to read when humidity uses a secondary vertical axis. A chart also provides an excellent final confirmation that the logger is capturing a continuous time series rather than isolated readings.
How Much Storage Does the Logger Need?
One row from this project is roughly 30–40 bytes. Actual size varies slightly with the values and line endings.
| Logging interval | Records per day | Approximate data per day |
| 1 second | 86,400 | About 3 MB |
| 10 seconds | 8,640 | About 0.3 MB |
| 1 minute | 1,440 | About 0.05 MB |
| 10 minutes | 144 | Less than 0.01 MB |
Even a small card can hold years of low-rate environmental readings. Storage capacity is rarely the limiting factor; reliable power, card quality, sensor maintenance, and safe shutdown matter more in long deployments.
How to Change the Logging Interval
Edit this constant:
const uint32_t LOG_INTERVAL_MS = 10000UL;Common values are:
| Interval | Value |
| 2 seconds | 2000UL |
| 10 seconds | 10000UL |
| 1 minute | 60000UL |
| 5 minutes | 300000UL |
| 10 minutes | 600000UL |
Do not use an interval below two seconds with the DHT22. If you need fast data acquisition, choose a faster sensor and redesign the file-writing strategy around buffered block writes.
Using a Different Sensor
The storage and RTC functions are independent of the DHT22. To use another sensor, replace the DHT initialization and the sensor-reading section inside readAndLogSensors().
You can adapt the logger for:
- BME280 temperature, humidity, and pressure
- DS18B20 waterproof temperature probe
- INA219 voltage, current, and power monitor
- Soil moisture sensor
- Light sensor
- GPS module
- Load cell and HX711 amplifier
- Accelerometer or vibration sensor
Also update the CSV header and appended columns so they correctly describe the new data.
Improving Reliability for Long Deployments
For a classroom demonstration, a breadboard and USB cable are sufficient. For unattended operation over days or months, make the following improvements:
- Use a reliable power supply. MicroSD cards can produce brief current demands during writes. A marginal USB cable or regulator can reset the ESP32.
- Shorten or solder the SPI wiring. Long loose wires can corrupt high-speed digital signals.
- Use a reputable, genuine MicroSD card. Counterfeit or worn cards are a common source of unexplained failures.
- Power down before removing the card. Removing it during a write can damage the current file or filesystem.
- Add a controlled shutdown system. A battery-backed supply, supercapacitor, or power-fail input can give the ESP32 time to close the file before power disappears.
- Keep daily file rotation. Smaller files are easier to copy, inspect, and recover.
- Test with the final enclosure and supply. A logger that works for ten minutes on a desk is not automatically ready for a month outdoors.
For a battery-powered version, the ESP32 can enter deep sleep between samples. Read our ESP32 sleep modes and wake-up sources guide before making that change. Always finish the card write and close the file before entering deep sleep.
Troubleshooting the ESP32 MicroSD Data Logger
| Problem | Likely cause | What to check |
MicroSD card mount failed | Wiring, card format, wrong CS pin, weak power, or incompatible module | Run the test sketch, verify GPIO 5/18/19/23, use FAT32, shorten wires, and confirm module voltage |
No MicroSD card detected | Card not inserted or socket contact problem | Reinsert the card with power disconnected and inspect the socket |
| ESP32 fails to boot with the module attached | A module is disturbing a boot-strapping pin or supply rail | Confirm CS is not held low; try GPIO 13 for CS and update SD_CS in the code |
| File cannot be created or appended | Card is write-protected through an adapter, filesystem is damaged, or power is unstable | Reformat after backing up, try a known-good card, and test the supply |
DHT22 returns nan | Missing pull-up, wrong data pin, loose wire, or sampling too quickly | Check GPIO 4 and the 10 kΩ pull-up; keep the interval at two seconds or longer |
DS3231 RTC not found | SDA/SCL reversed, missing power, or I2C fault | Verify GPIO 21/22 and run our ESP32 I2C scanner; the DS3231 normally appears at 0x68 |
| Date or time is incorrect | RTC was never set, backup cell is missing, or an old adjustment line runs every boot | Set the RTC once, then remove the unconditional adjustment line |
| CSV file is empty after power loss | Power disappeared before cached data was committed | Keep the per-row close(), use stable power, and add a controlled shutdown for critical logging |
| Logger works briefly and then resets | Weak supply, long SPI wires, or poor card/module quality | Use a better cable and supply, shorten wiring, retain the 4 MHz SPI setting, and try another card |
| A 64 GB card will not mount | It is probably formatted as exFAT | Use a 32 GB-or-smaller FAT32 card or reformat only after backing up its contents |
Espressif specifically notes that many SD mount failures come from poor prototype connections. If the same circuit must work reliably outside the lab, soldered connections are strongly preferable to long Dupont wires.
Frequently Asked Questions
Can an ESP32 write directly to a MicroSD card?
Yes. An external SPI MicroSD module can be used with the SD library included in the ESP32 Arduino core. In this project, the ESP32 uses GPIO 18, 19, 23, and 5 for SCK, MISO, MOSI, and CS.
Why use a DS3231 instead of internet time?
The DS3231 allows the logger to produce real timestamps without Wi-Fi. NTP is a good alternative for a permanently connected device, but an offline logger needs its own clock or must accept relative timestamps based on uptime.
Can I remove the MicroSD card while the ESP32 is running?
Avoid doing so. The ESP32 may be writing or updating filesystem information even if no LED is visible. Disconnect power or implement a proper stop/eject button before removing the card.
Can I use a DHT11 instead of a DHT22?
Yes. Change the declaration to DHT dht(DHT_PIN, DHT11);. The DHT11 has a smaller measurement range and lower resolution, but the rest of the logger can remain the same.
Can I use this code with an ESP32-CAM’s built-in card slot?
Not without changes. The ESP32-CAM’s onboard slot normally uses the SD_MMC interface and board-specific pins, while this tutorial uses an external SPI module and the SD library.
Can this project log data faster than once per second?
The ESP32 and MicroSD card can support much faster logging, but the DHT22 cannot. High-rate logging also benefits from buffering binary or CSV records and writing them in blocks instead of opening and closing the file for each sample.
What happens when the date changes?
The code builds the filename from the current RTC date before every write. The first sample after midnight therefore creates a new CSV file and adds its header automatically.
Conclusion
You have now built an ESP32 MicroSD data logger that records DHT22 temperature and humidity measurements with accurate DS3231 timestamps. The data remains available without Wi-Fi or cloud storage and is saved in daily CSV files that can be opened directly in a spreadsheet.
More importantly, this version includes the details that make a logger useful beyond a quick demonstration: sensor validation, non-blocking timing, daily file rotation, card retry handling, conservative SPI settings, and safer file closing.
Once the basic logger is working, you can replace the DHT22 with almost any ESP32-compatible sensor, add deep sleep for battery operation, or combine local storage with MQTT or a web dashboard.