
In this project, we will create a simple ESP32 Webserver Alarm System using NTPClient. The alarm can be controlled via a web interface, allowing you to set the alarm time and have it trigger based on real-time clock synchronization.
WHAT IS NETWORK TIME PROTOCOL?
NTP is a protocol that works over the application layer, it uses a hierarchical system of time resources and provides synchronization within the stratum servers. First, at the topmost level, there is highly accurate time resources’ ex. atomic or GPS clocks. These clock resources are called stratum 0 servers, and they are linked to the below NTP server called Stratum 1,2 or 3 and so on. These servers then provide the accurate date and time so that communicating hosts are synced to each other.

Components Required:
- ESP32 Module
- Buzzer
- Breadboard
- Connecting Wires
Wiring Diagram:
Connect the Buzzer to ESP32:
- Connect one pin of the buzzer to a GPIO pin on the ESP32 (e.g., GPIO2).
- Connect the other pin of the buzzer to the GND pin of the ESP32.

Setting Up the Web Server with Alarm Time Input:
The ESP32 will host a web page where you can set the alarm time. The alarm will trigger based on real-time synchronization using the NTP (Network Time Protocol) client.
Step 1: Install Required Libraries
Install the ESP32 Board Support Package via the Arduino IDE.
- Download the following libraries:
- Go to sketch-> Include library-> Add zip file

Now add the downloaded zip files one by one.
Step 2: Arduino Code
Below is the code to set up the alarm time and trigger the buzzer:
#include <WiFi.h>
#include <ESPAsyncWebServer.h>
#include <NTPClient.h>
#include <WiFiUdp.h>

// Replace with your network credentials
const char* ssid = "YourSSID";
const char* password = "YourPassword";

// Define NTP client and web server
WiFiUDP ntpUDP;
NTPClient timeClient(ntpUDP, "asia.pool.ntp.org", 5 * 3600, 3600000);
AsyncWebServer server(80);

// Buzzer pin definition
const int buzzerPin = 2;

// Alarm time variables
int alarmHour = 0;
int alarmMinute = 0;
bool alarmSet = false;
const char index_html[] PROGMEM = R"rawliteral(
 <!DOCTYPE html>
 <html><body>
    <h1>ESP32 Alarm System</h1>
    <form action='/set_alarm' method='GET'>
    <label for='hour'>Set Hour (0-23):</label><br>
    <input type='number' id='hour' name='hour' min='0' max='23'><br>
    <label for='minute'>Set Minute (0-59):</label><br>
    <input type='number' id='minute' name='minute' min='0' max='59'><br><br>
    <input type='submit' value='Set Alarm'>
    </form>
    <p>Current Alarm Time: %ALARMHR%:%ALARMMINT% </p>
    <p>Alarm is %ALARMSET% </p>
    </body></html> )rawliteral";
    String processor(const String& var){
  //Serial.println(var);
  if(var == "ALARMHR"){
    return String(alarmHour);
  }
    if(var == "ALARMMINT"){
    return String(alarmMinute);
  }

   if(var == "ALARMSET"){
    return String(alarmSet ? "ON" : "OFF");
  }

  return String();
}
void setup() {
  // Initialize serial communication
  Serial.begin(9600);

  // Setup buzzer pin
  pinMode(buzzerPin, OUTPUT);
  digitalWrite(buzzerPin, LOW);

  // Connect to Wi-Fi
  Serial.print("Connecting to Wi-Fi");
  WiFi.begin(ssid, password);

  while (WiFi.status() != WL_CONNECTED) {
    delay(500);
    Serial.print(".");
  }
  Serial.println("Connected!");
  Serial.println(WiFi.localIP());

  // Initialize NTP client
  timeClient.begin();

  // Set up web server routes
  server.on("/", HTTP_GET, [](AsyncWebServerRequest *request) {


   request->send_P(200, "text/html", index_html, processor);
  });

  server.on("/set_alarm", HTTP_GET, [](AsyncWebServerRequest *request) {
    if (request->hasParam("hour") && request->hasParam("minute")) {
      alarmHour = request->getParam("hour")->value().toInt();
      alarmMinute = request->getParam("minute")->value().toInt();
      alarmSet = true;
    }
    request->redirect("/");
  });

  server.begin();
   timeClient.update();

  // Get the current time
 Serial.println(timeClient.getFormattedTime());

}

void loop() {
  // Update the time from the NTP server
  timeClient.update();


String Time=timeClient.getFormattedTime();
  // Check if the alarm should be triggered
  if ((getValue(Time, ':', 0)) == String(alarmHour) && (getValue(Time, ':', 1)) == String(alarmMinute)) {
    digitalWrite(buzzerPin, HIGH);
    delay(5000); // Sound the buzzer for 5 seconds
    digitalWrite(buzzerPin, LOW);
    alarmSet = false; // Reset the alarm
  }
   Serial.print("Current Time: ");Serial.print(getValue(Time, ':', 0).toInt());Serial.print(":");Serial.println(getValue(Time, ':', 1).toInt());
    Serial.print("Alarm Time: "); Serial.print(alarmHour);Serial.print(":");Serial.println(alarmMinute);
  delay(1000);
}
String getValue(String data, char separator, int index)
{
  int found = 0;
  int strIndex[] = {0, -1};
  int maxIndex = data.length() - 1;

  for (int i = 0; i <= maxIndex && found <= index; i++)
  {
    if (data.charAt(i) == separator || i == maxIndex)
    {
      found++;
      strIndex[0] = strIndex[1] + 1;
      strIndex[1] = (i == maxIndex) ? i + 1 : i;
    }
  }

  return found > index ? data.substring(strIndex[0], strIndex[1]) : "";
}
To set the NTP client for a specific region, you need to configure the NTPClient to use an appropriate NTP server and optionally adjust the timezone offset. Here’s how you can do it:
- Specify a Region-Specific NTP Server
Replace the default pool server (pool.ntp.org) with a regional server, such as:europe.pool.ntp.orgfor Europenorth-america.pool.ntp.orgfor North Americaasia.pool.ntp.orgfor Asiaoceania.pool.ntp.orgfor Oceania
NTPClient timeClient(ntpUDP, "asia.pool.ntp.org");- Set the Timezone Offset
Adjust the time offset in seconds based on your timezone. For example:- UTC+5:00:
5 * 3600UTC-7:00:-7 * 3600
- UTC+5:00:
NTPClient timeClient(ntpUDP, "asia.pool.ntp.org", 5 * 3600);- Update Frequency
You can adjust how often the ESP32 synchronizes with the NTP server. The default is every 60 seconds (60000 milliseconds). If you need less frequent updates, provide an additional parameter. Example:
NTPClient timeClient(ntpUDP, "asia.pool.ntp.org", 5 * 3600, 3600000); // Update every hourFinal Example
Here’s how you can set the NTP client for UTC+5 (Asia region) and update every hour:
NTPClient timeClient(ntpUDP, "asia.pool.ntp.org", 5 * 3600, 3600000);
After modifying the timeClient initialization, the rest of the code will continue to fetch and handle the time correctly based on your configured region.
How Does the code Work?
- The ESP32 connects to your Wi-Fi network and synchronizes time using the NTP client.
- A web page hosted on the ESP32 allows you to set the alarm time.
- The alarm time is compared with the real-time clock, and when they match, the buzzer is triggered.
Testing the Alarm:
- Upload the Code:
- Connect your ESP32 to your computer via USB.
- Select the appropriate COM port and board type in the Arduino IDE.
- Upload the code to the ESP32.
- Set the Alarm Time:
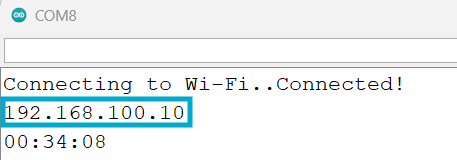
- Open the Serial Monitor to find the ESP32’s IP address.
- Enter the IP address in your browser to access the web page. Set the desired alarm time using the form.

3. Verify the Alarm:
- Wait for the alarm to trigger at the specified time.
- The buzzer should sound for 5 seconds.
Customization:
- Adjust Alarm Duration: Modify the
delayin the loop to change how long the buzzer sounds. - Add Multiple Alarms: Expand the code to handle multiple alarm times.
- Enhance the UI: Use JavaScript and CSS to create a more interactive and user-friendly interface.
Conclusion:
This ESP32 Webserver Alarm System combines real-time clock synchronization and web-based control, making it a practical and customizable solution for various use cases. This part of the ESP32 webserver series is created also to show you how we can input form data from a webpage to ESP32. Experiment with additional features to enhance functionality!
Thank you!!!
In case you missed:
Part 1: Getting Started With The ESP32 Web Server: Hello World! – ArduinoYard
Part 2: ESP32 Webserver LED Control: Toggle An LED Using A Webpage – ArduinoYard
Part 3: ESP32 Webserver PWM Control: Control Brightness Of An LED Using A Webpage – ArduinoYard