
Introduction
In this guide, we will learn how to send email using an ESP32 and an SMTP server. The ESP32 is a powerful microcontroller with Wi-Fi capabilities, making it ideal for IoT applications. One useful application is sending emails, which can be used for notifications, alerts, or logging data remotely.
Requirements
Before getting started, ensure you have the following:
- An ESP32 development board
- Arduino IDE installed with ESP32 board support
- Wi-Fi network credentials
- A valid email address to send messages
INCASE YOU HAVEN’T INSTALLED THE ESP32 BOARDS IN ARDUINO IDE, YOU SHOULD VISIT:
How To Install ESP32 And ESP8266 Boards In Arduino IDE (Step-by-Step Guide) – ArduinoYard
Installing Required Libraries
In the Arduino IDE, install the ESP32_MailClient library:
- Go to Sketch > Include Library > Manage Libraries
- Search for
ESP32 Mail Client - Install the latest version

Writing the ESP32 Code
Below is the code to send email using an ESP32:
//How to send email using an esp32 by arduinoYard
#include <Arduino.h>
#if defined(ESP32)
  #include <WiFi.h>
#elif defined(ESP8266)
  #include <ESP8266WiFi.h>
#endif
#include <ESP_Mail_Client.h>

#define WIFI_SSID "your_ssid"
#define WIFI_PASSWORD "your_password"
#define SMTP_HOST "smtp.gmail.com"
#define SMTP_PORT 465
/* The sign in credentials */
#define AUTHOR_EMAIL "your_email@gmail.com"
#define AUTHOR_PASSWORD "xxxxxxx"
/* Recipient's email*/
#define RECIPIENT_EMAIL "your_recipient_email@gmail.com"


/* The SMTP Session object used for Email sending */
SMTPSession smtp;

/* Callback function to get the Email sending status */
void smtpCallback(SMTP_Status status);


void setup(){
  Serial.begin(115200);
  Serial.println();
  Serial.print("Connecting to AP");
  WiFi.begin(WIFI_SSID, WIFI_PASSWORD);
  while (WiFi.status() != WL_CONNECTED){
    Serial.print(".");
    delay(200);
  }
  Serial.println("");
  Serial.println("WiFi connected.");
  Serial.println("IP address: ");
  Serial.println(WiFi.localIP());
  Serial.println();

  /** Enable the debug via Serial port
   * none debug or 0
   * basic debug or 1
  */
sendEmail();
}

void loop(){

}

/* Callback function to get the Email sending status */
void smtpCallback(SMTP_Status status){
  /* Print the current status */
  Serial.println(status.info());

  /* Print the sending result */
  if (status.success()){
    Serial.println("----------------");
    ESP_MAIL_PRINTF("Message sent success: %d\n", status.completedCount());
    ESP_MAIL_PRINTF("Message sent failled: %d\n", status.failedCount());
    Serial.println("----------------\n");
    struct tm dt;

    for (size_t i = 0; i < smtp.sendingResult.size(); i++){
      /* Get the result item */
      SMTP_Result result = smtp.sendingResult.getItem(i);
      time_t ts = (time_t)result.timestamp;
      localtime_r(&ts, &dt);

      ESP_MAIL_PRINTF("Message No: %d\n", i + 1);
      ESP_MAIL_PRINTF("Status: %s\n", result.completed ? "success" : "failed");
      ESP_MAIL_PRINTF("Date/Time: %d/%d/%d %d:%d:%d\n", dt.tm_year + 1900, dt.tm_mon + 1, dt.tm_mday, dt.tm_hour, dt.tm_min, dt.tm_sec);
      ESP_MAIL_PRINTF("Recipient: %s\n", result.recipients);
      ESP_MAIL_PRINTF("Subject: %s\n", result.subject);
    }
    Serial.println("----------------\n");
  }
}
void sendEmail()
{
    smtp.debug(1);

  /* Set the callback function to get the sending results */
  smtp.callback(smtpCallback);

  /* Declare the session config data */
  ESP_Mail_Session session;

  /* Set the session config */
  session.server.host_name = SMTP_HOST;
  session.server.port = SMTP_PORT;
  session.login.email = AUTHOR_EMAIL;
  session.login.password = AUTHOR_PASSWORD;
  session.login.user_domain = "";

  /* Declare the message class */
  SMTP_Message message;

  /* Set the message headers */
  message.sender.name = "ESP";
  message.sender.email = AUTHOR_EMAIL;
  message.subject = "ESP Test Email";
  message.addRecipient("Arduino Yard", RECIPIENT_EMAIL);

  /*Send HTML message*/
  String htmlMsg = "<div style=\"color:#2f4468;\"><h1>Hello World!</h1><p>- Sent from ESP board</p></div>";
  message.html.content = htmlMsg.c_str();
  message.html.content = htmlMsg.c_str();
  message.text.charSet = "us-ascii";
  message.html.transfer_encoding = Content_Transfer_Encoding::enc_7bit;

  //message.addHeader("Message-ID: <abcde.fghij@gmail.com>");

  /* Connect to server with the session config */
  if (!smtp.connect(&session))
    return;

  /* Start sending Email and close the session */
  if (!MailClient.sendMail(&smtp, &message))
    Serial.println("Error sending Email, " + smtp.errorReason());
  }
How to get started with the code?
To get started with the code, you need to replace the placeholder values with your actual information:
- Wi-Fi Credentials
- Replace
"your_ssid"with your Wi-Fi network name. - Replace
"your_password"with your Wi-Fi password.
- Replace
- SMTP Server Information
SMTP_SERVER: Use"smtp.gmail.com"for Gmail.SMTP_PORT: Use465for SSL or587for TLS.
- Email Credentials
AUTHOR_EMAIL: Replace with your sender email (e.g.,"your_email@gmail.com").AUTHOR_PASSWORD: Use either your email password or an App Password (recommended for Gmail).- It’s like you are Signing in your email account in ESP32 with email and password.
- Recipient Email
RECIPIENT_EMAIL: Replace your_recipient_email@gmail.com with the email where you want to send the message.
Once you update these values, select right ESP32 board and com port. upload the code to your ESP32, and it will send email using an ESP32 when powered up.
Explanation of the Code
- Connects to the Wi-Fi network
- Sets up SMTP authentication
- Configures the email sender and recipient
- Sends an email with a subject and message
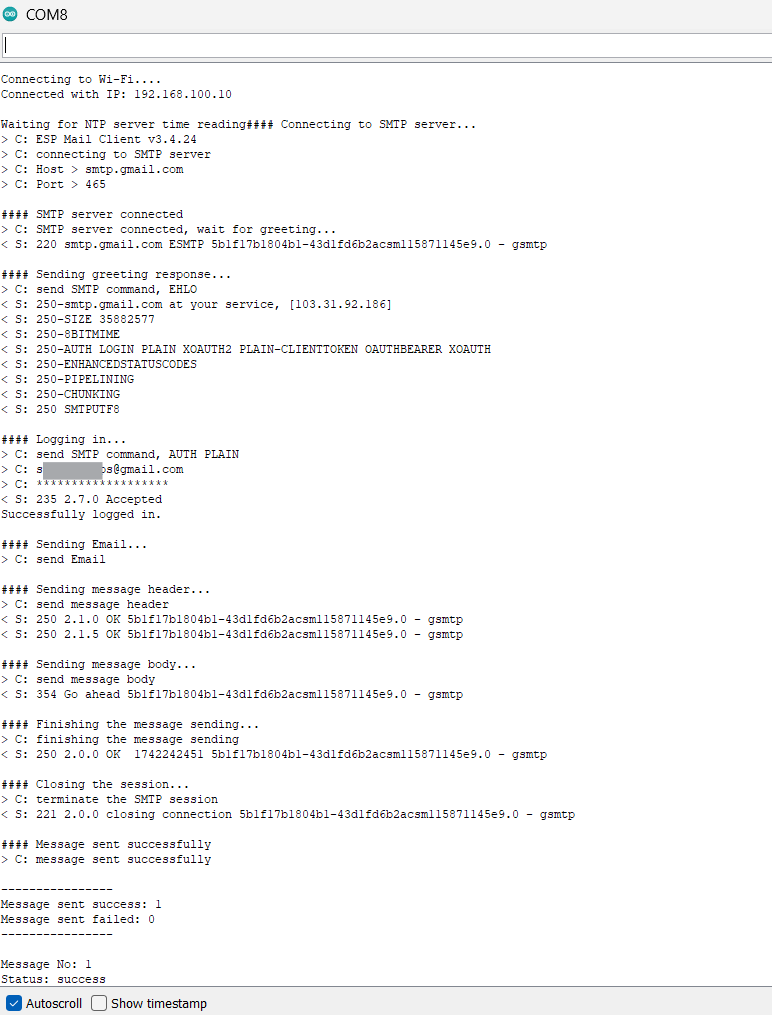
Serial Monitor
Mail Inbox

Troubleshooting
Common Error
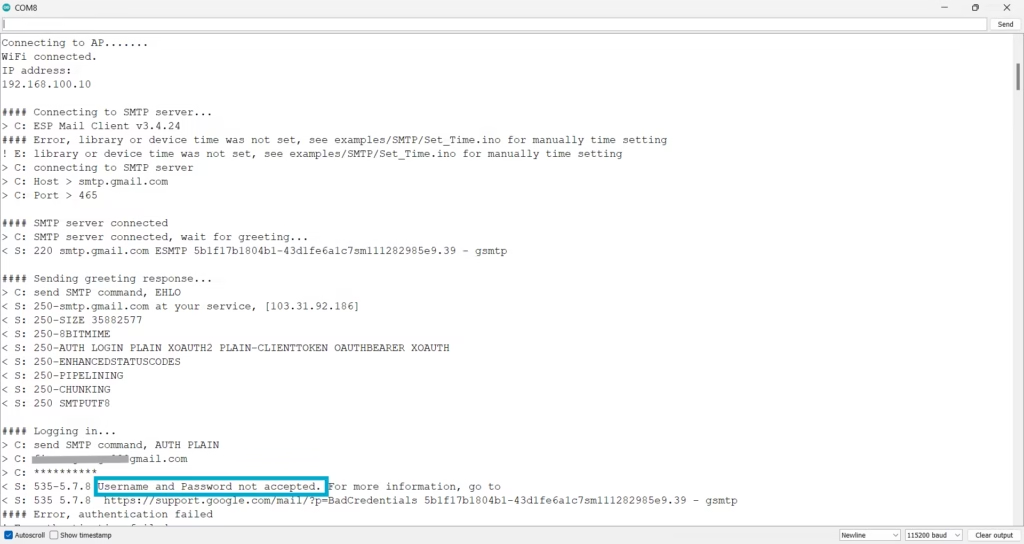
Solution
- Ensure all the credentials are correct
- Use an App Password instead of your regular password
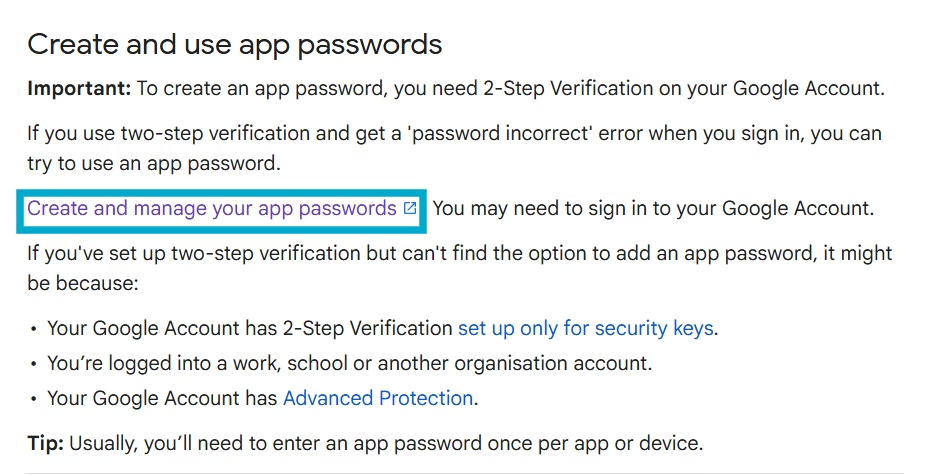
How to get App Password?
- Click on this link: Sign in with app passwords – Gmail Help
- Click here to manage App passwords
- In next window, add the App name i.e. ESP32 and click create.

- Just copy this 16-character password and click Done.
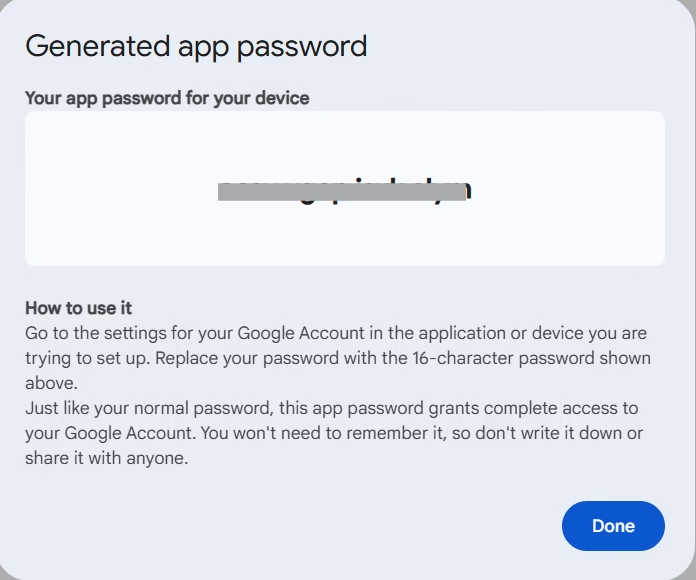
- Paste the App password in code as AUTHOR_PASSWORD

Possible Applications
- Home automation alerts
- Security system notifications
- Data logging and reports
- Weather station updates
Conclusion
Send email using an esp32 is a powerful way to enable real-time notifications in IoT applications. By leveraging an SMTP server, you can automate alerts, monitor data remotely, and improve your projects’ functionality. With further enhancements, you can include attachments, integrate with cloud services, or even send emails based on sensor readings. Start experimenting and take your ESP32 applications to the next level!
IF YOU WANT TO CREATE WHATSAPP CHATBOT USING ESP32. MUST VISIT: