Introduction
In this tutorial, we will explore how to use the DFRobot Gravity: Gesture and Face Detection Sensor with the ESP32. This powerful sensor supports offline AI-based gesture and face detection, making it ideal for smart, contactless, and privacy-focused applications. We’ll guide you step-by-step to connect and program it using both I2C and UART communication.
By the end of this guide, you’ll be able to read gesture types, detect face positions, and build simple interactive projects.
What is the Gesture & Face Detection Sensor?
The Gravity: Gesture & Face Detection Sensor is a compact, all-in-one AI vision sensor that enables your ESP32 or Arduino projects to recognize human faces, upper bodies, and common hand gestures—without any internet connection, external computing, or machine learning model training.
This makes it ideal for low-power, privacy-conscious edge applications such as smart home automation, gesture-controlled devices, interactive displays, and more.
Unlike traditional cameras or complex vision modules that require external processing, this sensor handles everything internally and outputs simple, easy-to-parse data over I²C or UART. All the AI logic runs onboard using a built-in Kendryte K210 processor, making integration incredibly simple.
🔍 Key Features
| Feature | Description |
|---|---|
| Detection Types | Hand gestures, face, upper-body |
| Gestures Supported | 👍 Thumbs Up, ✌️ Victory, 🤚 Palm, 🤙 Rock, 👌 OK |
| Face Detection | Detects up to 10 faces or upper bodies simultaneously |
| Data Output | Face/Body position (X, Y), width, height, confidence score |
| Gesture Output | Gesture ID and name |
| Communication Interfaces | I²C and UART (selectable using MODE pin) |
| Default I²C Address | 0x72 |
| Frame Rate | ~15 FPS |
| Detection Distance | Up to 3 meters |
| Operating Voltage | 3.3V to 5V |
| Indicators | RGB LED (gesture type), red LED (face/body detected) |
| Compact Size | Only 31 x 25 mm |
✋ Gesture Recognition Mapping
The module recognizes 5 popular hand gestures, and it provides both a gesture ID and a visual indication using an onboard RGB LED.
| Gesture | Visual Indicator Color | Code Value |
|---|---|---|
| 👍 Thumbs Up | Blue | 1 |
| 👌 OK | Green | 2 |
| 🤚 Palm | Red | 3 |
| ✌️ Victory / Peace | Yellow | 4 |
| 🤙 Rock / Shaka | Purple | 5 |

These values are sent over I²C or UART when the sensor detects a valid gesture. You can easily map them in your ESP32 code for triggering specific actions—like toggling an LED, sending a message, or activating a device.
👥 Face & Body Detection Capabilities
In addition to gesture recognition, the sensor can also detect human faces and upper bodies, making it suitable for access control, people counting, or automation projects. For each detected person, the sensor returns:
- Object Type (0 = face, 1 = upper body)
- X, Y Position
- Width & Height of the bounding box
- Confidence Score
It can track up to 10 people simultaneously, depending on lighting and distance.
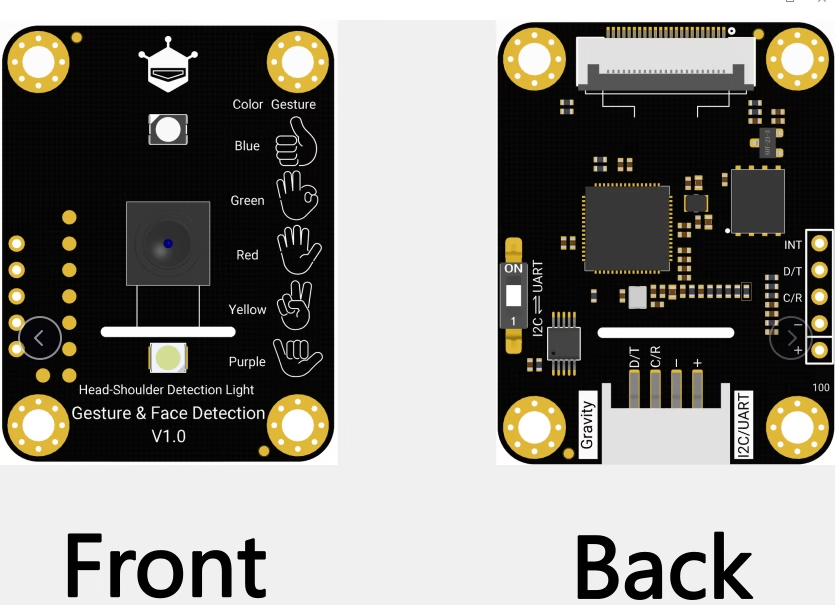
Function Diagram
| Name | Function Description |
|---|---|
| D/T | I2C Data Line SDA or UART TXD (3.3V Level) |
| C/R | I2C Clock Line SCL or UART RXD (3.3V Level) |
| GND | Power Negative |
| VCC | Power Positive (3.3~5.5V) |
| INT | Interrupt Output, Outputs Low Level When Any Gesture is Recognized |
| I2C/UART | I2C/UART Communication Mode Selection Switch |
| Head-Shoulder Indicator Light | Always on when the camera detects head and shoulders, off when people leave |
| Gesture Indicator Light | Lights up with the color corresponding to 5 fixed gestures |
Components Required
- ESP32 Development Board (e.g. DevKit V1)
- DFRobot Gesture and Face Detection Module
- Breadboard and jumper wires
- (Optional) OLED display, LED strip, Servo Motor (for advanced projects)
- Arduino IDE installed on your computer
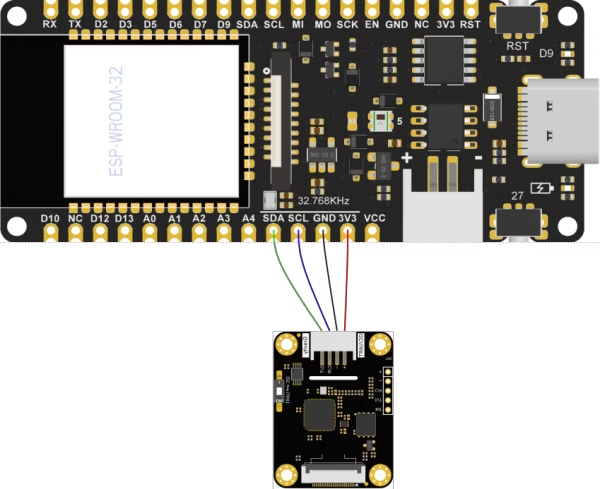
Wiring the Module to ESP32 (I2C Mode)
To use the module with I2C communication, set the MODE switch to I2C.
I2C Wiring Table:
| Module Pin | ESP32 Pin |
| VCC | 5V or 3.3V |
| GND | GND |
| D/T (SDA) | GPIO21 (SDA) |
| C/R (SCL) | GPIO22 (SCL) |
| INT (Optional) | GPIO4 |
💡 Note: If you’re unsure about the I2C pin numbers on your ESP32 board, check out our ESP32 Pinout Guide for a detailed reference.
By default, SDA is GPIO 21 and SCL is GPIO 22 on most ESP32 development boards. If you’re using a custom board or different pins, make sure to adjust them in the code accordingly.
Installing the Required Libraries
Use the official library for I²C register access:
- In Arduino IDE, go to Sketch → Include Library → Manage Libraries.
- Search DFRobot_GestureFaceDetection and install.
- Ensure the DFRobot_RTU dependency is also installed
Alternatively, download zip library from:
ESP32 Code Example using I2C
// Gesture and Face Detection in I2C Mode
#include "DFRobot_GestureFaceDetection.h"
#define DEVICE_ID  0x72

DFRobot_GestureFaceDetection_I2C gfd(DEVICE_ID);
char str[100];

void setup(){
    gfd.begin(&Wire);
    Serial.begin(115200);
    gfd.setFaceDetectThres(60);
    gfd.setGestureDetectThres(60);
    gfd.setDetectThres(100);
}

void loop(){
    if(gfd.getFaceNumber() > 0){
        uint16_t faceScore = gfd.getFaceScore();
        uint16_t faceX = gfd.getFaceLocationX();
        uint16_t faceY = gfd.getFaceLocationY();
        sprintf(str, "detect face at (x = %d, y = %d, score = %d)\n", faceX, faceY, faceScore);
        Serial.print(str);
        uint16_t gestureType = gfd.getGestureType();
        uint16_t gestureScore = gfd.getGestureScore();
        sprintf(str, "detect gesture %d, score = %d\n", gestureType, gestureScore);
        Serial.print(str);
    }
    delay(1500);
}Working: Serial Monitor and Video
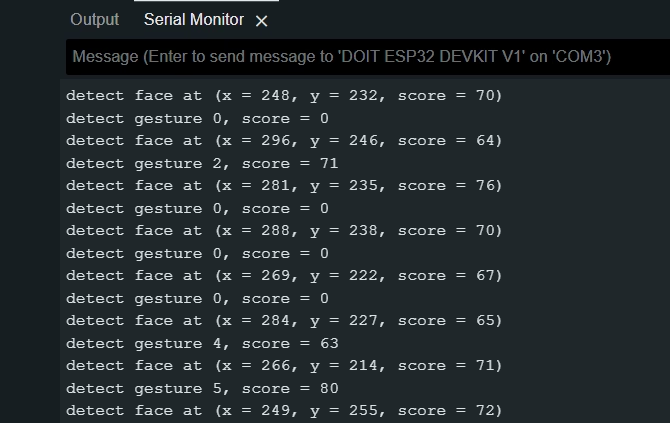
Once uploaded, open the Serial Monitor at 115200 baud. Wave your hand or show your face in front of the sensor:
- You’ll see gesture IDs and their confidence scores.
- Face data includes X, Y coordinates and a score.
Video Demonstration:
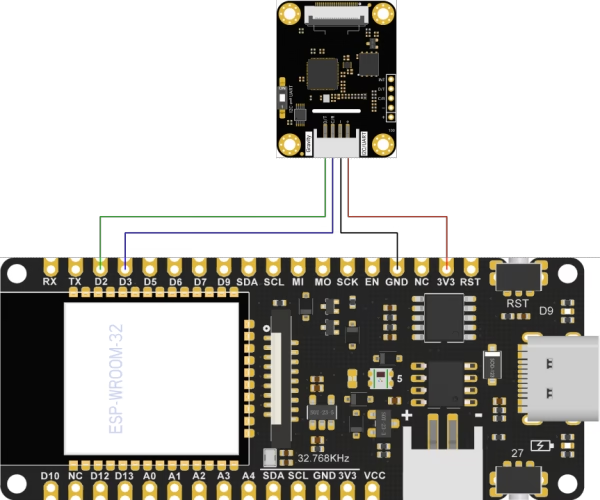
ESP32 Code Example using UART to Read Data
To use the module with UART communication, set the MODE switch to UART.
UART Wiring Table:
| Module Pin | ESP32 Pin |
| VCC | 5V or 3.3V |
| GND | GND |
| D/T (TX) | GPIO16 (RX) |
| C/R (RX) | GPIO17 (TX) |
UART Example Code:
// Gesture and Face Detection in UART Mode
#include "DFRobot_GestureFaceDetection.h"
#define DEVICE_ID  0x72

DFRobot_GestureFaceDetection_UART gfd(&Serial1, DEVICE_ID);

void setup(){
    Serial1.begin(9600,SERIAL_8N1, D2, D3);
    Serial.begin(115200);
    delay(1500);
    Serial.print("Product ID: ");
    Serial.println(gfd.getPid());
    Serial.print("Vendor ID: ");
    Serial.println(gfd.getVid());
}

void loop(){
    Serial.print("Faces detected: ");
    Serial.println(gfd.getFaceNumber());
    delay(1500);
}Note: UART mode is simpler but only outputs basic IDs without detailed data.
Project Ideas
- Face Controlled Fan – Track face X position to rotate servo.
- Gesture-Controlled Door – Open/close latch using hand signs.
- People Counter – Detect and count individuals walking past.
- Touchless Switch – Control lights or appliances using gestures.
- Sanitizer Trigger – Detect face and trigger dispenser with servo.
Troubleshooting
| Issue | Solution |
| Sensor not detected | Check I2C address, wiring, and MODE pin state |
| Data not updating | Call sensor.update() regularly with delay |
| UART data incorrect | Use correct RX/TX pin configuration |
| No gesture detected | Adjust threshold values to be more sensitive |
Conclusion
The DFRobot Gesture and Face Detection Sensor brings intelligent offline AI to your ESP32 projects. With just a few connections and some code, you can recognize faces and interpret hand gestures in real time. Whether you’re building a smart home interface or an interactive robot, this module offers a reliable and responsive vision solution.
Explore more by integrating with OLED displays, Wi-Fi logging, or Blynk for remote feedback. Let your next project see and react—just like you!